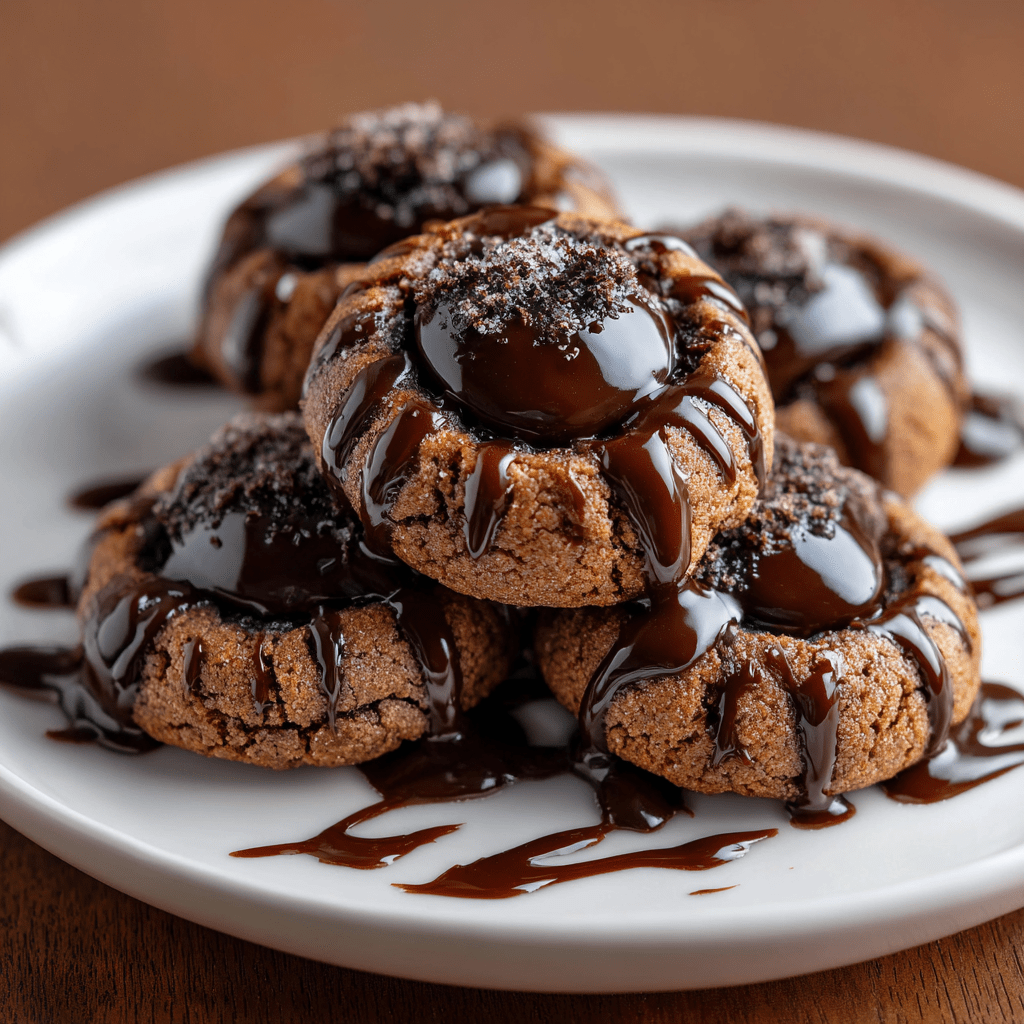
Introduction to Chocolate Thumbprint Cookies
As a busy mom, I know how precious time can be, especially when it comes to baking. That’s why I adore these Chocolate Thumbprint Cookies! They’re not just delicious; they’re a quick solution for those hectic days when you want to whip up something special. Imagine the joy on your loved ones’ faces as they bite into these rich chocolate cookies, filled with gooey chocolate centers. Whether it’s a family gathering or a cozy night in, these cookies are sure to impress. Let’s dive into this delightful recipe that’s as easy as it is satisfying!
Why You’ll Love This Chocolate Thumbprint Cookies
These Chocolate Thumbprint Cookies are a dream come true for busy lives! They come together in just 32 minutes, making them perfect for last-minute treats. The rich chocolate flavor is simply irresistible, and the gooey centers are a delightful surprise. Plus, they’re versatile enough for any occasion, whether it’s a bake sale or a cozy family night. Trust me, once you try them, you’ll be hooked!
Ingredients for Chocolate Thumbprint Cookies
Gathering the right ingredients is the first step to creating these delightful Chocolate Thumbprint Cookies. Here’s what you’ll need:
- Unsalted butter: This adds richness and helps create a tender cookie. Make sure it’s softened for easy mixing.
- Granulated sugar: This sweetens the dough and contributes to a lovely texture.
- Brown sugar: Packed with moisture, it gives the cookies a chewy texture and a hint of caramel flavor.
- Large eggs: They bind the ingredients together and add moisture, making the cookies soft and fluffy.
- Vanilla extract: A splash of this adds warmth and depth to the flavor profile.
- All-purpose flour: The backbone of the cookie, providing structure and stability.
- Unsweetened cocoa powder: This is what gives these cookies their rich chocolate flavor. Use high-quality cocoa for the best results.
- Baking powder: A leavening agent that helps the cookies rise and become light.
- Salt: Just a pinch enhances the sweetness and balances the flavors.
- Chocolate chips: These are the stars of the show! They fill the thumbprint with gooey chocolate goodness. Feel free to use dark chocolate for a richer taste.
For exact measurements, check the bottom of the article where you can find everything listed for easy printing. Happy baking!
How to Make Chocolate Thumbprint Cookies
Step 1: Preheat the Oven
Preheating your oven to 350°F (175°C) is crucial for baking these Chocolate Thumbprint Cookies. It ensures even cooking and helps the cookies rise properly. If you skip this step, your cookies might spread too much or bake unevenly. So, let that oven warm up while you prepare the dough!
Step 2: Cream the Butter and Sugars
In a large bowl, cream together the softened butter, granulated sugar, and brown sugar until the mixture is light and fluffy. This process is essential because it incorporates air into the dough, giving your cookies a tender texture. Aim for a smooth consistency, and don’t rush it! The more you cream, the better your cookies will be.
Step 3: Add Eggs and Vanilla
Next, add the eggs and vanilla extract to the creamed mixture. These ingredients not only enhance the flavor but also contribute to the cookies’ moisture and structure. Mix until everything is well combined, and you’ll notice the batter becoming richer and more inviting!
Step 4: Combine Dry Ingredients
In a separate bowl, whisk together the all-purpose flour, cocoa powder, baking powder, and salt. Each dry ingredient plays a vital role: flour provides structure, cocoa gives that deep chocolate flavor, baking powder helps the cookies rise, and salt balances the sweetness. This step ensures an even distribution of flavors and textures in your cookies.
Step 5: Mix Wet and Dry Ingredients
Now, gradually add the dry ingredients to the wet mixture. Stir gently until just combined. Be careful not to overwork the dough, as this can lead to tough cookies. You want a soft, slightly sticky dough that holds together beautifully. Trust me, your taste buds will thank you!
Step 6: Shape the Cookies
Roll the dough into small balls, about the size of a tablespoon, and place them on a baking sheet lined with parchment paper. Using your thumb, make a gentle indentation in the center of each ball. This is where the magic happens! The thumbprint will hold the gooey chocolate filling, making each bite a delightful surprise.
Step 7: Fill with Chocolate Chips
Now comes the fun part! Fill each thumbprint with chocolate chips. You can use semi-sweet, dark, or even milk chocolate chips, depending on your preference. The chocolate will melt beautifully while baking, creating a luscious center that complements the cookie perfectly.
Step 8: Bake the Cookies
Pop the baking sheet into your preheated oven and bake for 10-12 minutes. Keep an eye on them! The edges should be firm, while the centers may look slightly soft. This is normal, as they will continue to set while cooling. Trust your instincts; you want them to be just right!
Step 9: Cool and Enjoy
Once baked, let the cookies cool on the baking sheet for a few minutes before transferring them to a wire rack. This cooling period allows the cookies to firm up, making them easier to handle. Once they’re cool, grab a glass of milk and enjoy these delightful Chocolate Thumbprint Cookies!
Tips for Success
- Use room temperature ingredients for better mixing and texture.
- Don’t skip the preheating step; it’s key for even baking.
- For a fun twist, try adding a sprinkle of sea salt on top before baking.
- Experiment with different chocolate types for unique flavors.
- Store cookies in an airtight container to keep them fresh longer.
Equipment Needed
- Baking sheet: A standard baking sheet works well, but you can use a stoneware pan for even heat distribution.
- Parchment paper: This helps prevent sticking; silicone baking mats are a great alternative.
- Mixing bowls: Use any size, but a large bowl is ideal for creaming ingredients.
- Whisk: A whisk is perfect for combining dry ingredients; a fork can work in a pinch.
- Cookie scoop: This helps with uniform cookie sizes; a tablespoon works just as well.
Variations
- Nutty Delight: Add chopped nuts like walnuts or pecans to the dough for a crunchy texture.
- Mint Chocolate: Incorporate mint extract into the dough for a refreshing twist, and use mint chocolate chips for the filling.
- Gluten-Free Option: Substitute all-purpose flour with a gluten-free flour blend for a delicious gluten-free treat.
- Spicy Kick: Add a pinch of cayenne pepper or cinnamon to the dough for a warm, spicy flavor.
- Fruit-Filled: Instead of chocolate chips, fill the thumbprints with fruit preserves or jam for a fruity surprise.
Serving Suggestions
- Pair these Chocolate Thumbprint Cookies with a glass of cold milk for a classic treat.
- Serve them alongside a warm cup of coffee or tea for a cozy afternoon snack.
- For a festive touch, arrange cookies on a decorative platter with fresh berries.
- Drizzle melted chocolate over the cookies for an elegant presentation.
FAQs about Chocolate Thumbprint Cookies
Can I use different types of chocolate for the filling?
Absolutely! You can use semi-sweet, dark, or even white chocolate chips for the filling. Each type will give a unique flavor to your Chocolate Thumbprint Cookies, so feel free to experiment!
How should I store my Chocolate Thumbprint Cookies?
To keep your cookies fresh, store them in an airtight container at room temperature. They’ll stay delicious for up to a week. If you want to keep them longer, you can freeze them for up to three months!
Can I make the dough ahead of time?
Yes! You can prepare the dough in advance and refrigerate it for up to 48 hours. Just let it sit at room temperature for a few minutes before shaping and baking. This is a great time-saver for busy days!
What can I do if my cookies spread too much while baking?
If your cookies spread too much, it could be due to warm dough or not enough flour. Make sure your butter is softened, not melted, and consider chilling the dough for about 30 minutes before baking to help them hold their shape.
Are these cookies suitable for a gluten-free diet?
Yes! You can easily make these Chocolate Thumbprint Cookies gluten-free by substituting all-purpose flour with a gluten-free flour blend. Just ensure that all other ingredients are also gluten-free!
Final Thoughts
Making Chocolate Thumbprint Cookies is more than just baking; it’s about creating sweet memories with loved ones. The joy of pulling a tray of warm cookies from the oven, the aroma wafting through the house, and the smiles on my family’s faces are priceless. These cookies are a delightful treat that brings everyone together, whether for a special occasion or a simple weeknight dessert. I hope you find as much happiness in baking and sharing these cookies as I do. So, roll up your sleeves, and let’s make some delicious memories together!
Print
Chocolate Thumbprint Cookies: Discover the Secret Recipe!
- Total Time: 32 minutes
- Yield: 24 cookies 1x
- Diet: Vegetarian
Description
Delicious chocolate cookies with a rich chocolate center, perfect for any occasion.
Ingredients
- 1 cup unsalted butter, softened
- 1 cup granulated sugar
- 1 cup brown sugar, packed
- 2 large eggs
- 2 teaspoons vanilla extract
- 3 cups all-purpose flour
- 1 cup unsweetened cocoa powder
- 1 teaspoon baking powder
- 1/2 teaspoon salt
- 1 cup chocolate chips (for filling)
Instructions
- Preheat your oven to 350°F (175°C).
- In a large bowl, cream together the softened butter, granulated sugar, and brown sugar until smooth.
- Add the eggs and vanilla extract, mixing well.
- In another bowl, whisk together the flour, cocoa powder, baking powder, and salt.
- Gradually add the dry ingredients to the wet ingredients, mixing until just combined.
- Roll the dough into small balls and place them on a baking sheet lined with parchment paper.
- Make an indentation in the center of each ball using your thumb.
- Fill each indentation with chocolate chips.
- Bake for 10-12 minutes, or until the edges are firm.
- Let cool on the baking sheet for a few minutes before transferring to a wire rack to cool completely.
Notes
- For a richer flavor, use dark chocolate chips.
- Store cookies in an airtight container for up to a week.
- These cookies can be frozen for up to three months.
- Prep Time: 20 minutes
- Cook Time: 12 minutes
- Category: Dessert
- Method: Baking
- Cuisine: American
Nutrition
- Serving Size: 1 cookie
- Calories: 150
- Sugar: 10g
- Sodium: 50mg
- Fat: 7g
- Saturated Fat: 4g
- Unsaturated Fat: 2g
- Trans Fat: 0g
- Carbohydrates: 20g
- Fiber: 1g
- Protein: 2g
- Cholesterol: 20mg