

Introduction to Classic Deviled Eggs
Ah, Classic Deviled Eggs! They remind me of family gatherings, where laughter fills the air and delicious aromas waft through the kitchen. If you’re like me, juggling a busy schedule, you’ll appreciate how these little bites of joy can be a quick solution for a hectic day. They’re not just easy to whip up; they also impress your loved ones with their creamy, tangy filling. Whether it’s a potluck, a holiday feast, or just a cozy dinner at home, Classic Deviled Eggs are the perfect appetizer to bring everyone together. Let’s dive into this delightful recipe!
Why You’ll Love This Classic Deviled Eggs
Classic Deviled Eggs are a lifesaver for busy moms and professionals like us. They come together in just 27 minutes, making them a quick and satisfying appetizer. The creamy filling, with its perfect balance of tang and richness, is simply irresistible. Plus, they’re gluten-free, so everyone can enjoy them. Whether you’re hosting a gathering or just need a snack, these eggs are sure to please!
Ingredients for Classic Deviled Eggs
Gathering the right ingredients is key to making the best Classic Deviled Eggs. Here’s what you’ll need:
- Large eggs: The star of the show! Fresh eggs yield the best flavor and texture.
- Mayonnaise: This creamy base adds richness. You can use regular or light, depending on your preference.
- Dijon mustard: A touch of tanginess that elevates the flavor. Feel free to swap it with yellow mustard if that’s what you have.
- White vinegar: This adds a subtle acidity that balances the richness of the yolks.
- Salt and pepper: Essential for seasoning. Adjust to your taste for the perfect bite.
- Paprika: A sprinkle on top not only adds color but also a hint of smokiness.
For those who like a kick, consider adding a dash of hot sauce to the yolk mixture. If you’re short on time, you can make these a day in advance; just keep them covered in the refrigerator. Exact quantities for each ingredient are listed at the bottom of the article for easy printing!
How to Make Classic Deviled Eggs
Making Classic Deviled Eggs is a breeze! Follow these simple steps, and you’ll have a delicious appetizer ready in no time. Let’s get cracking!
Step 1: Hard Boil the Eggs
Start by placing your large eggs in a pot. Cover them with cold water, about an inch above the eggs. Turn the heat to high and bring the water to a rolling boil. Once boiling, cover the pot and remove it from the heat. Let the eggs sit for 12 minutes. This method ensures perfectly cooked yolks without that greenish ring. Trust me, it’s a game-changer!
Step 2: Cool the Eggs
Cooling the eggs is crucial. After the timer goes off, carefully transfer the eggs to an ice bath. Fill a bowl with ice and cold water, then gently place the eggs in. This stops the cooking process and makes peeling easier. Let them sit for about 5-10 minutes. You’ll be amazed at how much easier it is to peel them when they’re cool!
Step 3: Peel and Slice
Once the eggs are cool, it’s time to peel them. Gently tap each egg on a hard surface to crack the shell, then roll it to loosen. Start peeling from the wider end, where there’s usually an air pocket. This makes it easier! After peeling, slice each egg in half lengthwise. Place the whites on a serving platter, ready for filling.
Step 4: Prepare the Filling
Now for the fun part! Carefully scoop out the yolks and place them in a mixing bowl. Add your mayonnaise, Dijon mustard, white vinegar, salt, and pepper. Mix everything together until it’s smooth and creamy. You can use a fork or a hand mixer for this. Taste the filling and adjust the seasoning if needed. It should be rich and tangy, just like a Classic Deviled Egg should be!
Step 5: Fill the Egg Whites
Time to fill those egg whites! You can use a spoon, but I love using a piping bag for a neat finish. If you don’t have one, a zip-top bag with a corner snipped off works just as well. Fill each egg white generously with the yolk mixture. Don’t be shy; a heaping spoonful looks great!
Step 6: Garnish and Serve
Finally, it’s time to make your Classic Deviled Eggs look as good as they taste! Sprinkle a dash of paprika on top for that classic touch. You can also add fresh herbs like chives or dill for a pop of color and flavor. Serve them on a beautiful platter, and watch them disappear!
Tips for Success
- Use fresh eggs for the best flavor and easier peeling.
- Don’t skip the ice bath; it’s key for easy peeling.
- Adjust the seasoning to your taste; a little extra salt can make a big difference.
- For a fun twist, try adding different spices or herbs to the filling.
- Keep your deviled eggs covered in the fridge if making ahead.
Equipment Needed
- Pot: A medium-sized pot for boiling eggs. A large saucepan works too.
- Mixing bowl: Any bowl will do for mixing the yolk filling.
- Spoon or piping bag: Use a spoon for filling or a piping bag for a neat finish.
- Ice bath container: A large bowl or basin filled with ice and water.
Variations of Classic Deviled Eggs
- Spicy Deviled Eggs: Add a dash of hot sauce or a sprinkle of cayenne pepper to the yolk mixture for a fiery kick.
- Bacon and Cheddar Deviled Eggs: Mix in crumbled bacon and shredded cheddar cheese for a savory twist that’s sure to please.
- Avocado Deviled Eggs: Replace mayonnaise with mashed avocado for a creamy, healthier option that’s packed with flavor.
- Herbed Deviled Eggs: Stir in fresh herbs like dill, chives, or parsley for a refreshing taste that brightens up the classic recipe.
- Curried Deviled Eggs: Add curry powder to the yolk mixture for an exotic flavor that will surprise your guests.
Serving Suggestions for Classic Deviled Eggs
- Pair with a crisp green salad for a refreshing contrast.
- Serve alongside a platter of fresh veggies and dip for a colorful spread.
- Complement with a light white wine or sparkling water for a delightful drink.
- Present on a decorative platter with fresh herbs for an elegant touch.
FAQs about Classic Deviled Eggs
Can I make Classic Deviled Eggs ahead of time?
Absolutely! You can prepare them a day in advance. Just keep them covered in the refrigerator. This makes them a perfect option for busy days or gatherings.
What’s the best way to store leftover deviled eggs?
Store any leftovers in an airtight container in the fridge. They’re best enjoyed within 2-3 days for optimal freshness and flavor.
Can I use different types of mustard in the filling?
Yes! While Dijon mustard is traditional, feel free to experiment with yellow mustard or even spicy brown mustard for a different flavor profile.
How can I make my deviled eggs spicier?
For a kick, add a dash of hot sauce or cayenne pepper to the yolk mixture. You can also mix in some finely chopped jalapeños for an extra punch!
What can I serve with Classic Deviled Eggs?
These eggs pair wonderfully with a fresh salad, veggie platter, or even a light wine. They’re versatile and can complement many dishes!
Final Thoughts
Making Classic Deviled Eggs is more than just a cooking task; it’s a delightful experience that brings joy to both the cook and the guests. The creamy, tangy filling and the vibrant presentation make them a hit at any gathering. I love how they spark conversations and smiles around the table. Plus, they’re so easy to customize, allowing you to add your personal touch. Whether you’re serving them at a holiday feast or a casual get-together, these little bites of happiness are sure to create lasting memories. So, roll up your sleeves and enjoy the process!
Print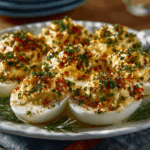
Classic Deviled Eggs: Discover the Best Recipe Today!
- Total Time: 27 minutes
- Yield: 12 deviled eggs 1x
- Diet: Gluten Free
Description
Classic Deviled Eggs are a delicious and easy-to-make appetizer, perfect for parties and gatherings.
Ingredients
- 6 large eggs
- 3 tablespoons mayonnaise
- 1 teaspoon Dijon mustard
- 1 teaspoon white vinegar
- Salt and pepper to taste
- Paprika for garnish
Instructions
- Hard boil the eggs by placing them in a pot of cold water, bringing it to a boil, then covering and letting them sit for 12 minutes.
- Remove the eggs from the pot and place them in an ice bath to cool.
- Once cooled, peel the eggs and slice them in half lengthwise.
- Remove the yolks and place them in a bowl.
- Add mayonnaise, Dijon mustard, white vinegar, salt, and pepper to the yolks and mix until smooth.
- Fill the egg whites with the yolk mixture using a spoon or piping bag.
- Sprinkle paprika on top for garnish.
Notes
- For a spicier version, add a dash of hot sauce to the yolk mixture.
- These can be made a day in advance; just keep them covered in the refrigerator.
- Prep Time: 15 minutes
- Cook Time: 12 minutes
- Category: Appetizer
- Method: Boiling
- Cuisine: American
Nutrition
- Serving Size: 1 egg half
- Calories: 70
- Sugar: 0.2g
- Sodium: 60mg
- Fat: 5g
- Saturated Fat: 1.5g
- Unsaturated Fat: 3g
- Trans Fat: 0g
- Carbohydrates: 1g
- Fiber: 0g
- Protein: 6g
- Cholesterol: 186mg


