Introduction to Cookie Butter Cheesecake Cups
Hey there, fellow dessert lovers! If you’re anything like me, you know that life can get pretty hectic. Between juggling work, family, and everything in between, finding time to whip up a delightful treat can feel impossible. That’s where these Cookie Butter Cheesecake Cups come in! They’re not just easy to make; they’re a creamy, dreamy indulgence that will impress your loved ones without taking hours in the kitchen. Perfect for a quick solution on a busy day or a sweet surprise for a special occasion, these little cups are sure to bring smiles all around!
Why You’ll Love This Cookie Butter Cheesecake Cups
These Cookie Butter Cheesecake Cups are a game-changer for busy moms and professionals alike. They come together in just 20 minutes, making them a quick and satisfying dessert option. The creamy texture and rich flavor of cookie butter create a taste sensation that feels indulgent yet effortless. Plus, they’re no-bake, so you can skip the oven and enjoy a cool treat that’s perfect for any occasion!
Ingredients for Cookie Butter Cheesecake Cups
Gathering the right ingredients is the first step to creating these delightful Cookie Butter Cheesecake Cups. Here’s what you’ll need:
- Cream Cheese: This is the base of your cheesecake. Make sure it’s softened to room temperature for easy mixing.
- Cookie Butter: The star of the show! This sweet, spiced spread adds a unique flavor that’s hard to resist.
- Powdered Sugar: This sweetener gives your cheesecake a smooth texture and sweetness without the graininess of granulated sugar.
- Vanilla Extract: A splash of this adds depth and enhances the overall flavor of your cheesecake.
- Whipped Cream: Light and airy, it makes the cheesecake fluffy. You can use store-bought or whip your own for a fresher taste.
- Graham Cracker Crumbs: These form the crunchy base of your cups. You can crush your own or buy pre-made crumbs for convenience.
- Melted Butter: This binds the graham cracker crumbs together, creating a delicious crust.
- Chocolate Shavings: Optional, but they make for a beautiful garnish that adds a touch of elegance to your dessert.
For exact measurements, check the bottom of the article where you can find everything listed for easy printing. Happy cooking!
How to Make Cookie Butter Cheesecake Cups
Now that you have all your ingredients ready, let’s dive into the fun part—making these Cookie Butter Cheesecake Cups! Follow these simple steps, and you’ll have a delicious dessert that’s sure to impress.
Step 1: Prepare the Cheesecake Mixture
Start by grabbing a mixing bowl. Combine the softened cream cheese, cookie butter, powdered sugar, and vanilla extract. Using an electric mixer, beat the mixture until it’s smooth and creamy. This is where the magic begins! The cookie butter will blend beautifully with the cream cheese, creating a luscious filling.
Step 2: Fold in the Whipped Cream
Next, it’s time to add some lightness to your cheesecake. Gently fold in the whipped cream into the mixture. Use a spatula to incorporate it carefully, ensuring you keep that airy texture. This step is crucial for achieving that fluffy cheesecake consistency that melts in your mouth!
Step 3: Make the Graham Cracker Base
In another bowl, mix the graham cracker crumbs with the melted butter. Stir until the crumbs are evenly coated and crumbly. This mixture will form the crunchy base of your cups. If you love a bit of extra crunch, feel free to add more crumbs!
Step 4: Layer the Cups
Now comes the fun part—layering! In your serving cups, start by adding a generous layer of the graham cracker mixture at the bottom. Press it down gently to create a solid base. Then, spoon the creamy cookie butter cheesecake mixture on top. Fill each cup to the brim for a delightful treat!
Step 5: Chill and Garnish
Once your cups are layered, it’s time to chill them in the refrigerator. Let them sit for at least 2 hours. This allows the flavors to meld and the cheesecake to set perfectly. Just before serving, sprinkle some chocolate shavings on top for that extra touch of elegance. Trust me, your guests will be impressed!
Tips for Success
- Make sure your cream cheese is at room temperature for easy mixing.
- Use a rubber spatula to fold in the whipped cream gently, preserving that light texture.
- Chill the cups for at least 2 hours to ensure they set properly.
- Feel free to customize with your favorite toppings, like crushed cookies or fresh fruit.
- These cups can be made a day in advance for stress-free entertaining!
Equipment Needed
- Mixing Bowl: A large bowl for combining ingredients. A sturdy glass or ceramic bowl works well.
- Electric Mixer: For beating the cheesecake mixture. A whisk can be used if you prefer a workout!
- Spatula: Essential for folding in the whipped cream and layering the cups.
- Serving Cups: Any small cups or jars will do. Mason jars add a cute touch!
Variations
- Nutty Delight: Add a layer of crushed nuts, like pecans or almonds, to the graham cracker base for an extra crunch.
- Chocolate Lovers: Mix in some cocoa powder with the cheesecake mixture or use chocolate cookie butter for a richer flavor.
- Fruit Fusion: Top your cheesecake cups with fresh berries or sliced bananas for a fruity twist.
- Gluten-Free Option: Substitute graham cracker crumbs with gluten-free cookie crumbs to make this dessert suitable for gluten-sensitive friends.
- Vegan Version: Use vegan cream cheese and whipped coconut cream to create a plant-based version of these delightful cups.
Serving Suggestions
- Pair with Coffee: A warm cup of coffee or espresso complements the sweetness of the cheesecake cups beautifully.
- Fresh Fruit: Serve alongside fresh berries or sliced strawberries for a refreshing contrast.
- Elegant Presentation: Use clear glass cups to showcase the layers, and add a sprig of mint for a pop of color.
- Chocolate Drizzle: Drizzle some melted chocolate over the top for an extra indulgent touch.
FAQs about Cookie Butter Cheesecake Cups
Can I make these Cookie Butter Cheesecake Cups ahead of time?
Absolutely! These cups can be made a day in advance. Just keep them covered in the refrigerator. This not only saves you time but also allows the flavors to meld beautifully.
What can I substitute for cookie butter?
If you can’t find cookie butter, you can use peanut butter or Nutella for a different flavor profile. Just keep in mind that it will change the taste of your cheesecake cups.
How long do these cheesecake cups last in the fridge?
These Cookie Butter Cheesecake Cups can last up to 3 days in the refrigerator. Just make sure they are stored in an airtight container to maintain freshness.
Can I freeze these cheesecake cups?
While I recommend enjoying them fresh, you can freeze the cheesecake mixture in individual cups. Just thaw them in the fridge before serving. However, the texture may change slightly after freezing.
What’s the best way to serve these cups?
For a stunning presentation, serve them in clear glass cups to showcase the beautiful layers. A sprinkle of chocolate shavings or a fresh berry on top adds a lovely finishing touch!
Final Thoughts
Creating these Cookie Butter Cheesecake Cups is more than just making a dessert; it’s about bringing joy to your kitchen and smiles to your loved ones. The creamy, dreamy layers are a delightful treat that can brighten even the busiest of days. Plus, the no-bake aspect means you can whip them up without the stress of turning on the oven. Whether it’s a family gathering or a quiet evening at home, these cups are sure to impress. So, roll up your sleeves, gather your ingredients, and let the sweet magic unfold!
Print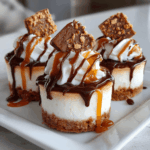
Cookie Butter Cheesecake Cups That Will Delight You!
- Total Time: 2 hours 20 minutes
- Yield: 6 servings 1x
- Diet: Vegetarian
Description
Delicious and creamy cookie butter cheesecake cups that are easy to make and perfect for any occasion.
Ingredients
- 8 oz cream cheese, softened
- 1/2 cup cookie butter
- 1/2 cup powdered sugar
- 1 tsp vanilla extract
- 1 cup whipped cream
- 1 package of graham cracker crumbs
- 1/4 cup melted butter
- Chocolate shavings for garnish
Instructions
- In a mixing bowl, combine the softened cream cheese, cookie butter, powdered sugar, and vanilla extract. Beat until smooth.
- Fold in the whipped cream until well combined.
- In another bowl, mix the graham cracker crumbs with melted butter until crumbly.
- In serving cups, layer the graham cracker mixture at the bottom.
- Top with the cookie butter cheesecake mixture.
- Chill in the refrigerator for at least 2 hours before serving.
- Garnish with chocolate shavings before serving.
Notes
- Make sure the cream cheese is at room temperature for easier mixing.
- You can use store-bought whipped cream or make your own.
- These cups can be made a day in advance for convenience.
- Prep Time: 20 minutes
- Cook Time: 0 minutes
- Category: Dessert
- Method: No-bake
- Cuisine: American
Nutrition
- Serving Size: 1 cup
- Calories: 350
- Sugar: 25g
- Sodium: 150mg
- Fat: 22g
- Saturated Fat: 10g
- Unsaturated Fat: 8g
- Trans Fat: 0g
- Carbohydrates: 30g
- Fiber: 1g
- Protein: 4g
- Cholesterol: 50mg