As you step into your kitchen, the comforting aroma of sizzling onions and garlicky goodness fills the air, wrapping around you like a warm embrace. You can practically taste the anticipation. Tonight, you’re not just making dinner; you’re crafting a meal that speaks to the soul, a dish that invites you to gather around the table with family and friends. The stovetop gently hisses as the kielbasa sizzles, releasing a rich, smoky essence that dances harmoniously with the gentle sweetness of sautéed onions, making your mouth water in excitement.
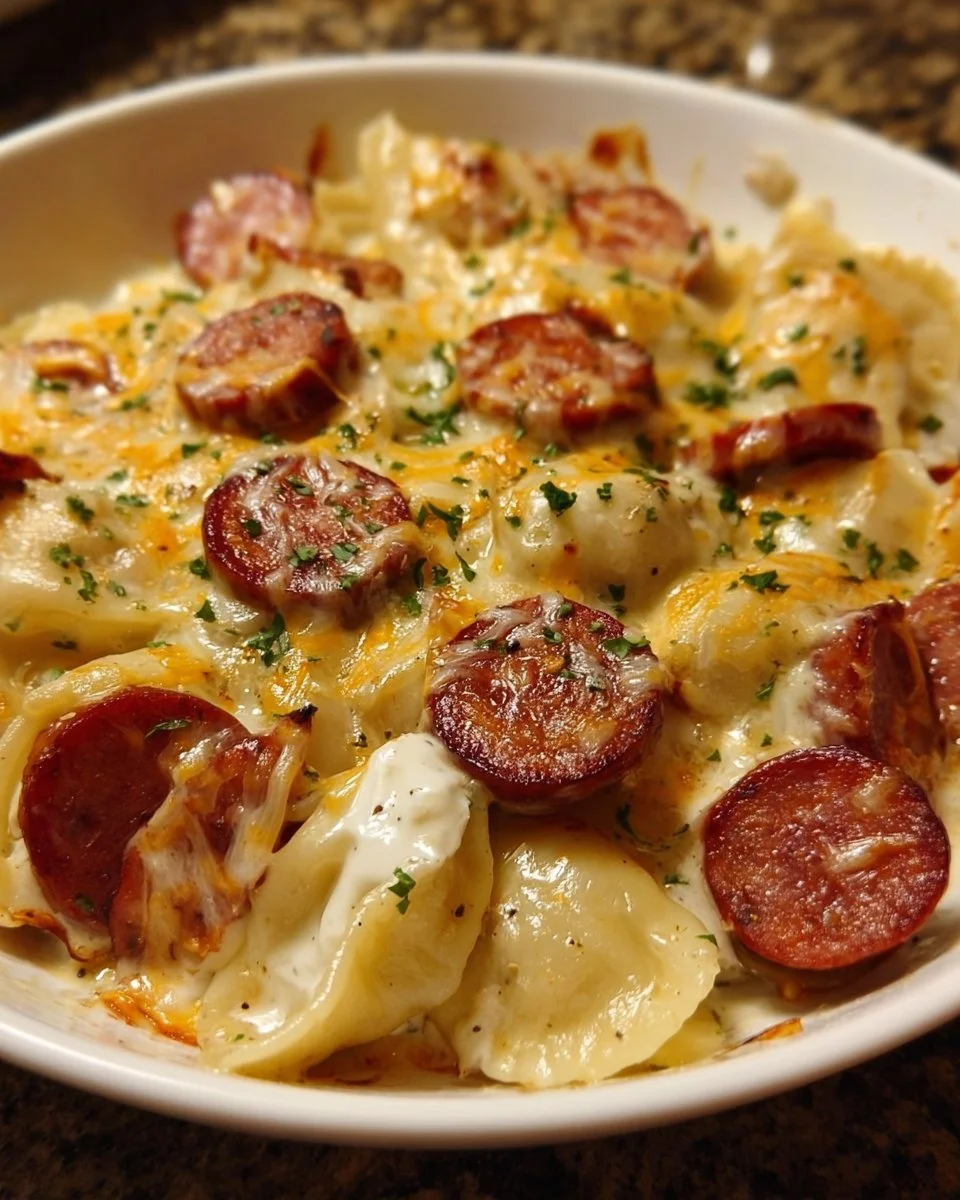
Imagine a casserole dish, bubbling and golden in the oven—each layer a celebration of flavor and texture. You layer tender, pillowy pierogis beneath perfectly seasoned kielbasa, then blanket it all with gooey, melted cheese that stretches enticingly as you pull a piece from the dish. This Kielbasa and Pierogi Bake is not just a meal; it’s an experience that transforms a simple gathering into a heartfelt occasion, bringing warmth and joy to every bite.
Why You’ll Love This Kielbasa and Pierogi Bake
This dish stands out as a true crowd-pleaser, perfect for cozy weeknight dinners or festive gatherings. With every layer, you dive into a world of flavors—each element harmonizes beautifully, from the hearty smokiness of the kielbasa to the creamy richness of the cheese and the delightful softness of the pierogis.
Kielbasa and Pierogi Bake isn’t just satisfying to the palate; it’s also incredibly easy to prepare. Perfect for those busy evenings when you crave comfort without spending hours in the kitchen, this dish allows you to sit back, relax, and enjoy the delightful aromas filling your home. Whether you’re feeding a family or entertaining friends, this bake delivers not only on flavor but also on heartwarming nostalgia, making it an ideal dish for any occasion.
Preparation Phase & Tools to Use
Arming yourself with the right tools before you dive into the cooking process can make all the difference, turning an ordinary evening into something special. Here are a few essentials:
-
Large Skillet: Essential for sautéing onions and garlic, allowing them to soften and bloom before mixing with the other ingredients. Look for one with a good non-stick surface to prevent sticking.
-
Baking Dish: A deep, oven-safe dish will hold all those delectable layers and ensure even cooking. A 9×13 inch size works wonders for this recipe.
-
Chef’s Knife and Cutting Board: For slicing the kielbasa and chopping chunky additions like onions or garlic. A sharp knife makes the task quick and easy.
-
Measuring Cups and Spoons: Ensure accuracy in seasoning and layering, bringing out the best taste in your dish.
Preparation Tips:
- Have everything measured and chopped before starting to cook. This organization not only streamlines your process but also enhances the overall cooking experience.
Ingredients for Kielbasa and Pierogi Bake
Gathering quality ingredients makes your meal shine. Here’s what you’ll need:
-
Frozen Pierogis: These delightful dumplings serve as the base of your dish. You can find potato and cheese or sauerkraut varieties in the freezer aisle. Fresh or homemade versions are wonderful alternatives if you’re up for the challenge.
-
Smoky Sausage (Kielbasa): The heart of your dish, kielbasa adds depth and warmth with its rich flavor. If you prefer a milder sausage, turkey kielbasa is a great substitute.
-
Gooey Cheese: Cheddar or mozzarella creates that luscious layer of creaminess. Feel free to mix it up with pepper jack for a bit of spice or gouda for added smokiness.
-
Onion and Garlic (optional): These aromatic ingredients elevate the dish, balancing the richness of the kielbasa and cheese. If you’re not a fan of these flavors, feel free to skip them.
-
Olive Oil or Butter: Used for sautéing, these fats enhance flavor and keep things from sticking.
-
Salt and Pepper to taste: Essential for bringing out the best in your ingredients.
-
Sour Cream (for serving, optional): Adds a refreshing, tangy note that perfectly complements the bake.
How to Make Kielbasa and Pierogi Bake
-
Preheat your oven to 375°F (190°C). This sets the perfect backdrop for all those glorious layers to meld together.
-
In a large skillet, heat olive oil or butter over medium heat. Once hot, add chopped onions and minced garlic (if using). Sauté until the onions soften and turn translucent, about 3–4 minutes. This step infuses your dish with aromatic goodness.
-
In a baking dish, layer the frozen pierogis at the bottom. Arrange them snugly, as this layer forms a delightful base that absorbs all the luscious flavors above.
-
Slice the kielbasa and layer it on top of the pierogis. Scatter the slices evenly to ensure every bite is packed with that smoky taste.
-
Sprinkle a generous layer of cheese over the top. Use your favorite blend, watching as it settles into every crevice.
-
Add salt and pepper to taste. Seasoning is key—don’t be shy with the salt, as it will enhance all those rich flavors.
-
Bake in the preheated oven for about 30–35 minutes. Keep an eye out for that bubbly and golden brown finish. The kitchen begins to fill with an irresistible aroma!
-
Serve hot, garnished with sour cream if desired. A dollop of sour cream adds a tangy brightness that balances the richness beautifully.
Chef’s Notes & Helpful Tips
-
Make-ahead tips: Assemble the dish a day before and refrigerate it covered. When ready to cook, just pop it in the oven—no hassle on busy nights!
-
Cooking alternatives: If you have an air fryer, you can reduce the cooking time and still achieve crispy, golden goodness.
-
Customization ideas: Add extra veggies like spinach, mushrooms, or bell peppers for more color and nutrients. Change the cheese combination for a unique twist each time.
Common Mistakes to Avoid
-
Overcooking the kielbasa: Sizzling it too long before baking can lead to dryness. Aim for a quick sauté to enhance flavor without losing moisture, reserving the final embrace of heat for the oven.
-
Skipping the seasoning: Forgetting to season between layers often leads to a bland dish. Taste as you go and sprinkle salt and pepper generously to bring the flavors to life.
-
Not covering with enough cheese: Cheese is the magic ingredient that ties the dish together. Be generous—no one wants a dry bake!
What to Serve With Kielbasa and Pierogi Bake
Pair your delicious bake with sides that complement its rich flavors and rounded textures. Consider these ideas:
-
Steamed Broccoli: This fresh and vibrant vegetable adds a delightful crunch and balances the heaviness of the main dish.
-
Garden Salad: A light, crisp salad with tangy vinaigrette can refresh the palate. Think mixed greens, cherry tomatoes, and a sprinkle of feta cheese.
-
Garlic Bread: For those who adore bread, this is the perfect pairing to soak up any delicious cheesy goodness.
-
Applesauce: A sweet and tangy side that contrasts with the savory notes while staying true to comfort food roots.
-
Pickles: Adding a sharp and tangy flavor, pickles are excellent for cutting through the dish’s richness.
-
Coleslaw: The crunch of a crunchy coleslaw with a sweet dressing beautifully complements the bake, offering a delightful contrast.
Storage & Reheating Instructions
Leftovers can be a delightful treat! Store any uneaten portion in an airtight container in the refrigerator for up to 3 days. Reheat in the oven at 350°F (175°C) until warmed through and cheese starts to bubble again.
For longer storage, freeze the assembled dish before baking. Wrap securely in plastic wrap and aluminum foil. It can be frozen for up to three months. When you’re ready to enjoy it again, thaw in the refrigerator overnight and bake as usual.
Estimated Nutrition Information
Each serving (approx. 1 cup) contains:
- Calories: 410
- Protein: 20g
- Carbohydrates: 33g
- Fat: 24g
- Fiber: 2g
Nutrition values are estimates and will vary based on ingredients used.
FAQs
Can I use fresh or homemade pierogis instead of frozen?
Absolutely! Fresh or homemade pierogis provide an authentic touch and incredible flavor, though they may require slight adjustments in cooking time.
What is the best type of kielbasa to use?
Choose a high-quality Polish kielbasa for the best flavor. If you prefer it spiced, opt for smoked varieties which deepen the dish’s overall appeal.
Can I make this dish vegetarian?
Certainly! Substitute the kielbasa with a flavorful meat alternative and use vegetable broth for added depth. Ensure your pierogis are meat-free as well.
How long does leftover Kielbasa and Pierogi Bake last in the fridge?
You can keep it in the fridge for up to three days. It’s even more flavorful as the ingredients meld together!
What if I want to make a larger batch?
This recipe can easily be doubled—the only adjustment is ensuring your baking dish is large enough and extending the baking time slightly. Keep an eye on it until the cheese is bubbly and golden.
Conclusion
As the oven timer dings and the tantalizing aroma draws everyone closer, you find comfort in knowing that this Kielbasa and Pierogi Bake will warm hearts and fill bellies. This dish embodies the spirit of togetherness, inviting memories and love into every forkful. Whether you serve it on a cozy Friday night or at a joyous family gathering, it promises satisfying bites that resonate with laughter and conversations. So roll up your sleeves, gather your ingredients, and immerse yourself in the warmth of home-cooked comfort. You’ll soon discover that every layer holds a delicious story just waiting to be shared. Give this recipe a try—you won’t regret it!
Print
Kielbasa and Pierogi Bake
- Total Time: 45 minutes
- Yield: 4 servings 1x
- Diet: None
Description
A comforting Kielbasa and Pierogi Bake layered with tender pierogis, smoky kielbasa, and gooey cheese, perfect for family gatherings or cozy dinners.
Ingredients
- 24 oz frozen pierogis
- 1 lb kielbasa (smoky sausage)
- 2 cups shredded cheese (cheddar or mozzarella)
- 1 medium onion, chopped
- 2 cloves garlic, minced (optional)
- 2 tbsp olive oil or butter
- Salt and pepper to taste
- Sour cream (for serving, optional)
Instructions
- Preheat your oven to 375°F (190°C).
- Heat olive oil or butter in a large skillet over medium heat.
- Add chopped onions and garlic; sauté until softened, about 3–4 minutes.
- Layer the frozen pierogis in a baking dish.
- Slice the kielbasa and layer it on top of the pierogis.
- Sprinkle with cheese and season with salt and pepper.
- Bake for 30–35 minutes until bubbly and golden brown.
- Serve hot with sour cream if desired.
Notes
For make-ahead preparation, assemble the dish and refrigerate covered. Bake when ready. Customize with additional veggies or varied cheeses if desired.
- Prep Time: 15 minutes
- Cook Time: 30 minutes
- Category: Main Course
- Method: Baking
- Cuisine: Polish
Nutrition
- Serving Size: 1 serving
- Calories: 410
- Sugar: 3g
- Sodium: 800mg
- Fat: 24g
- Saturated Fat: 10g
- Unsaturated Fat: 8g
- Trans Fat: 0g
- Carbohydrates: 33g
- Fiber: 2g
- Protein: 20g
- Cholesterol: 80mg