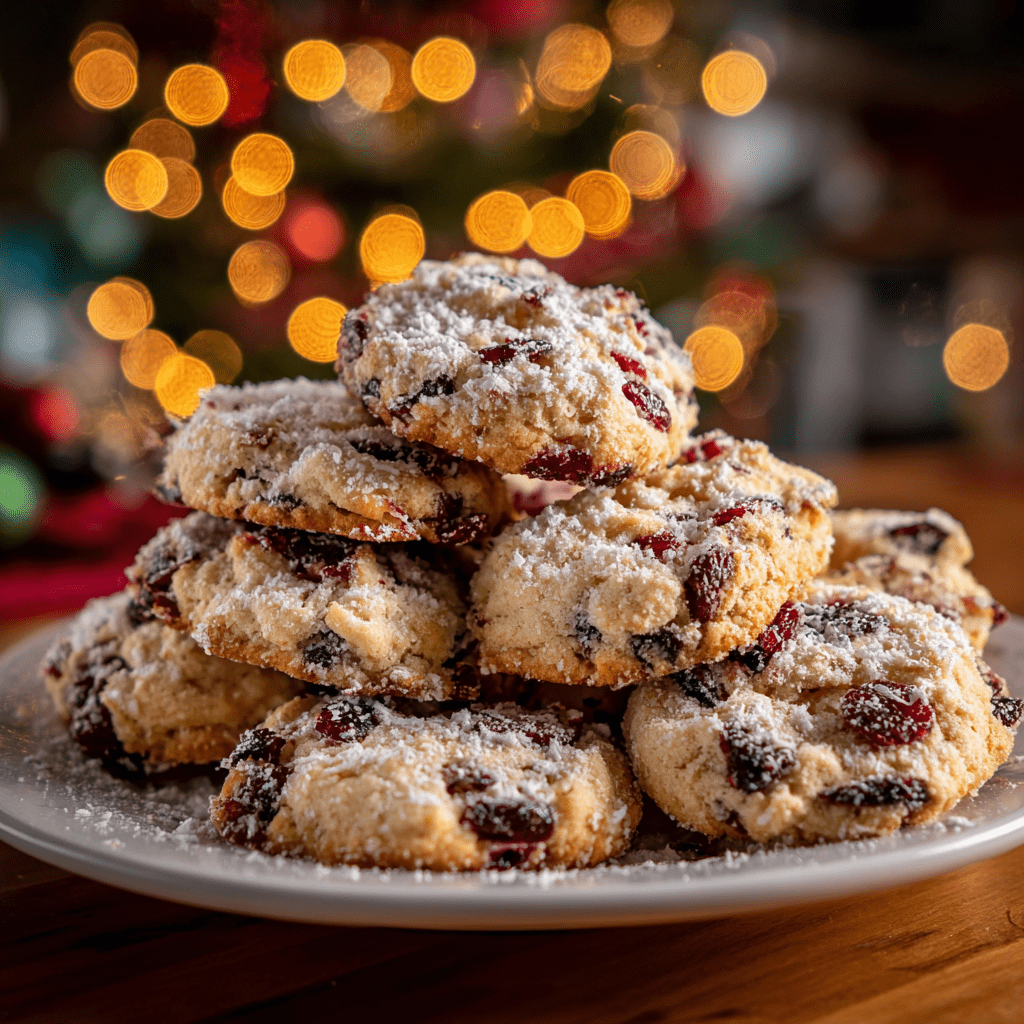
Introduction to Kitchen Sink Christmas Cookies
Ah, the holiday season! It’s a time filled with joy, laughter, and, let’s be honest, a bit of chaos. As a busy mom, I know how challenging it can be to juggle everything while still wanting to create something special for my family. That’s where these delightful Kitchen Sink Christmas Cookies come in! They’re the perfect solution for a quick, festive treat that everyone will love. With a mix of flavors and textures, these cookies are sure to impress your loved ones and bring a smile to their faces. Let’s dive into this delicious adventure!
Why You’ll Love This Kitchen Sink Christmas Cookies
These Kitchen Sink Christmas Cookies are a game-changer for busy days. They come together in no time, making them perfect for last-minute holiday baking. The best part? You can customize them with your favorite mix-ins, ensuring every bite is a delightful surprise. Plus, they’re a hit with kids and adults alike, making them a fantastic addition to any holiday gathering. Trust me, you’ll want to keep this recipe close!
Ingredients for Kitchen Sink Christmas Cookies
Gathering the right ingredients is half the fun of baking! For these Kitchen Sink Christmas Cookies, you’ll need a delightful mix of staples and fun add-ins. Here’s what you’ll need:
- All-purpose flour: This is the foundation of your cookies, giving them structure and chewiness.
- Baking soda: A leavening agent that helps your cookies rise and become fluffy.
- Salt: Just a pinch enhances the sweetness and balances the flavors.
- Unsalted butter: Softened butter creates a rich, creamy texture. Make sure it’s at room temperature for easy mixing!
- Granulated sugar: This sweetener adds sweetness and helps the cookies spread.
- Brown sugar: Packed with moisture, it gives your cookies a chewy texture and a hint of caramel flavor.
- Vanilla extract: A splash of this aromatic ingredient elevates the overall flavor profile.
- Large eggs: They bind the ingredients together and add moisture. Adding them one at a time ensures even mixing.
- Chocolate chips: Because who doesn’t love chocolate? They add a melty, sweet surprise in every bite.
- Chopped nuts: Walnuts or pecans add a delightful crunch and nutty flavor. Feel free to skip them if you have nut allergies!
- Dried cranberries or raisins: These fruity additions bring a pop of color and a chewy texture, balancing the sweetness.
- M&M’s or other candies: These colorful treats make your cookies festive and fun! You can use any candy you love.
Feel free to customize your mix-ins based on what you have on hand or your family’s preferences. The exact quantities for each ingredient are listed at the bottom of the article for easy printing. Happy baking!
How to Make Kitchen Sink Christmas Cookies
Now that we have our ingredients ready, let’s get baking! Making these Kitchen Sink Christmas Cookies is a fun and straightforward process. Follow these steps, and you’ll have a batch of delicious cookies in no time!
Step 1: Preheat the Oven
First things first, preheat your oven to 350°F (175°C). This step is crucial because it ensures that your cookies bake evenly. If you skip this, your cookies might spread too much or not rise properly. Trust me, a well-preheated oven is the secret to cookie perfection!
Step 2: Prepare the Dry Ingredients
In a medium bowl, whisk together the all-purpose flour, baking soda, and salt. This step is essential because it evenly distributes the leavening agent and salt throughout the flour. Mixing these dry ingredients first helps prevent clumps and ensures a consistent texture in your cookies.
Step 3: Cream the Butter and Sugars
In a large bowl, cream together the softened butter, granulated sugar, brown sugar, and vanilla extract until smooth. This process is where the magic happens! Creaming incorporates air into the mixture, giving your cookies a light and fluffy texture. It’s like giving your cookies a little spa treatment!
Step 4: Add the Eggs
Next, add the eggs one at a time, mixing well after each addition. This step is important because it allows the eggs to fully incorporate into the batter, creating a smooth and cohesive mixture. Plus, it helps to build that lovely structure we all love in cookies!
Step 5: Combine Wet and Dry Ingredients
Gradually add the dry ingredients to the wet mixture, mixing until just combined. Be careful not to overwork the dough! Overmixing can lead to tough cookies, and we want them to be soft and chewy. Just mix until you see no more flour, and you’re good to go!
Step 6: Fold in the Mix-Ins
Now comes the fun part! Gently fold in the chocolate chips, nuts, dried cranberries, and M&M’s. This is where you can get creative! Feel free to customize your mix-ins based on what you have on hand or what your family loves. The more colorful and varied, the better!
Step 7: Shape the Cookies
Using a spoon or cookie scoop, drop spoonfuls of dough onto a baking sheet lined with parchment paper. Make sure to leave some space between each cookie, as they will spread while baking. If you want perfectly round cookies, you can gently shape them with your hands before placing them on the sheet.
Step 8: Bake the Cookies
Bake your cookies in the preheated oven for 10-12 minutes or until the edges are golden brown. Keep an eye on them! Every oven is different, and you don’t want to end up with overbaked cookies. A little golden on the edges is perfect, while the centers should look slightly underbaked.
Step 9: Cool and Enjoy
Once baked, allow the cookies to cool on the baking sheet for a few minutes before transferring them to a wire rack to cool completely. This cooling time is important because it allows the cookies to set up properly. Plus, it gives you a moment to savor the delicious aroma wafting through your kitchen!
Tips for Success
- Always use room temperature ingredients for better mixing.
- Don’t skip the parchment paper; it prevents sticking and makes cleanup a breeze.
- For uniform cookies, use a cookie scoop to measure dough.
- Experiment with different mix-ins to keep things exciting!
- Store cookies in an airtight container to maintain freshness.
Equipment Needed
- Mixing bowls: A set of various sizes is handy. You can use any large bowl you have.
- Whisk: Essential for mixing dry ingredients. A fork works in a pinch!
- Electric mixer: Great for creaming butter and sugars. A sturdy wooden spoon can do the job too.
- Baking sheet: A standard one is perfect. If you don’t have one, a flat oven-safe dish will work.
- Parchment paper: Helps prevent sticking. Aluminum foil can be a substitute if needed.
Variations of Kitchen Sink Christmas Cookies
- Gluten-Free: Substitute all-purpose flour with a gluten-free blend for a delicious gluten-free version.
- Vegan: Use coconut oil or vegan butter instead of regular butter, and replace eggs with flaxseed meal or applesauce.
- Nut-Free: Omit the nuts and add extra chocolate chips or seeds for crunch without the allergens.
- Spiced Up: Add a teaspoon of cinnamon or nutmeg for a warm, festive flavor that screams holiday cheer.
- Chocolate Lovers: Swap half of the flour for cocoa powder to create a rich, chocolatey cookie base.
Serving Suggestions for Kitchen Sink Christmas Cookies
- Pair these cookies with a warm cup of cocoa or spiced chai for a cozy treat.
- Serve them on a festive platter, garnished with holiday sprinkles for a cheerful touch.
- For a fun twist, sandwich two cookies with a scoop of ice cream for a delightful dessert.
- Include a selection of cookies in gift boxes for friends and family during the holidays.
- Enjoy them fresh out of the oven with a dollop of whipped cream on top!
FAQs about Kitchen Sink Christmas Cookies
As you embark on your baking journey with these delightful Kitchen Sink Christmas Cookies, you might have a few questions. Here are some common queries that can help you along the way!
Can I use different mix-ins for my Kitchen Sink Christmas Cookies?
Absolutely! The beauty of these cookies lies in their versatility. You can swap in your favorite nuts, dried fruits, or even different types of chocolate. Get creative and make them your own!
How should I store my cookies to keep them fresh?
To keep your Kitchen Sink Christmas Cookies fresh, store them in an airtight container at room temperature. They’ll stay delicious for about a week. If you want to keep them longer, consider freezing them!
Can I make the dough ahead of time?
Yes! You can prepare the dough in advance and refrigerate it for up to 3 days. Just make sure to let it sit at room temperature for a few minutes before baking. This will help them spread evenly.
What if I don’t have all the ingredients on hand?
No worries! Many ingredients can be substituted. For example, if you’re out of brown sugar, you can use granulated sugar instead. Just remember that it may alter the flavor and texture slightly.
Are these cookies suitable for gifting?
Definitely! These Kitchen Sink Christmas Cookies make a wonderful gift. Just package them in a festive box or tin, and you’ll have a delightful homemade present that friends and family will love!
Final Thoughts
Baking these Kitchen Sink Christmas Cookies is more than just a recipe; it’s a joyful experience that brings the family together. The delightful aroma wafting through the house creates a warm, festive atmosphere that makes the holiday season even more special. Each cookie is a little surprise, bursting with flavors and textures that everyone will adore. Whether you’re sharing them with loved ones or enjoying them with a cozy cup of tea, these cookies are sure to create sweet memories. So, roll up your sleeves and let the holiday baking magic begin!
Print
Kitchen Sink Christmas Cookies: A Festive Delight Awaits!
- Total Time: 32 minutes
- Yield: 24 cookies 1x
- Diet: Vegetarian
Description
Kitchen Sink Christmas Cookies are a delightful mix of flavors and textures, perfect for the holiday season. These cookies combine various ingredients, making them a festive treat for everyone.
Ingredients
- 2 1/4 cups all-purpose flour
- 1 teaspoon baking soda
- 1/2 teaspoon salt
- 1 cup unsalted butter, softened
- 3/4 cup granulated sugar
- 3/4 cup brown sugar, packed
- 1 teaspoon vanilla extract
- 2 large eggs
- 1 cup chocolate chips
- 1 cup chopped nuts (walnuts or pecans)
- 1 cup dried cranberries or raisins
- 1 cup M&M’s or other candies
Instructions
- Preheat your oven to 350°F (175°C).
- In a bowl, whisk together flour, baking soda, and salt.
- In a separate large bowl, cream together the softened butter, granulated sugar, brown sugar, and vanilla extract until smooth.
- Add the eggs one at a time, mixing well after each addition.
- Gradually add the dry ingredients to the wet ingredients, mixing until just combined.
- Fold in the chocolate chips, nuts, dried cranberries, and M&M’s.
- Drop spoonfuls of dough onto a baking sheet lined with parchment paper.
- Bake for 10-12 minutes or until the edges are golden brown.
- Allow cookies to cool on the baking sheet for a few minutes before transferring to a wire rack to cool completely.
Notes
- Feel free to customize the mix-ins based on your preferences.
- Store cookies in an airtight container to keep them fresh.
- These cookies freeze well; just thaw before serving.
- Prep Time: 20 minutes
- Cook Time: 12 minutes
- Category: Dessert
- Method: Baking
- Cuisine: American
Nutrition
- Serving Size: 1 cookie
- Calories: 150
- Sugar: 10g
- Sodium: 100mg
- Fat: 7g
- Saturated Fat: 4g
- Unsaturated Fat: 2g
- Trans Fat: 0g
- Carbohydrates: 20g
- Fiber: 1g
- Protein: 2g
- Cholesterol: 20mg