Introduction to Magic Potion Cupcakes
Welcome to the enchanting world of Magic Potion Cupcakes! As a busy mom, I know how challenging it can be to whip up something delightful that also brings a sprinkle of joy to our loved ones. These cupcakes are not just a treat; they’re a quick solution for those hectic days when you want to impress without the fuss. With their vibrant colors and delicious flavors, they’re perfect for birthdays, celebrations, or simply to brighten up a regular Tuesday. Trust me, these cupcakes will enchant your taste buds and create magical moments in your kitchen!
Why You’ll Love This Magic Potion Cupcakes
These Magic Potion Cupcakes are a delightful blend of ease and flavor. In just 40 minutes, you can create a dozen enchanting treats that will wow your family and friends. The vibrant colors make them visually stunning, while the rich chocolate flavor keeps everyone coming back for more. Plus, they’re perfect for any occasion, whether it’s a birthday party or a cozy family night. Who wouldn’t love a little magic in their dessert?
Ingredients for Magic Potion Cupcakes
To create these enchanting Magic Potion Cupcakes, you’ll need a few simple ingredients that come together to create a delightful treat. Here’s what you’ll need:
- All-purpose flour: The base of your cupcakes, providing structure and a soft texture.
- Granulated sugar: Sweetens the batter and helps create a moist cupcake.
- Unsweetened cocoa powder: Adds a rich chocolate flavor that makes these cupcakes irresistible.
- Baking powder: A leavening agent that helps the cupcakes rise and become fluffy.
- Baking soda: Works with the baking powder to ensure a light texture.
- Salt: Enhances the flavors and balances the sweetness.
- Vegetable oil: Keeps the cupcakes moist and tender.
- Milk: Adds moisture and richness to the batter.
- Eggs: Bind the ingredients together and provide structure.
- Vanilla extract: Infuses a warm, sweet flavor that complements the chocolate.
- Boiling water: Helps to dissolve the cocoa powder and creates a smooth batter.
- Food coloring: The magic ingredient that brings vibrant colors to your cupcakes.
- Buttercream frosting: The perfect topping to add sweetness and a creamy texture.
- Edible glitter (optional): For that extra touch of magic and sparkle!
For exact measurements, check the bottom of the article where you can find everything listed for easy printing. Feel free to get creative with your ingredients! You can swap in different flavored extracts or even use whole wheat flour for a healthier twist. The possibilities are as endless as your imagination!
How to Make Magic Potion Cupcakes
Step 1: Preheat and Prepare
First things first, let’s get that oven preheating to 350°F (175°C). While it warms up, grab your cupcake pan and line it with colorful cupcake liners. This is where the magic begins! The liners not only add a pop of color but also make cleanup a breeze. Trust me, you’ll appreciate this little time-saver later. Once the oven is ready, you’ll be all set to create your enchanting treats!
Step 2: Mix Dry Ingredients
In a large mixing bowl, combine the all-purpose flour, granulated sugar, cocoa powder, baking powder, baking soda, and salt. Whisk them together until they’re well blended. This step is crucial because it ensures that the leavening agents are evenly distributed, giving your cupcakes that perfect rise. Plus, the aroma of cocoa will start to fill your kitchen, making it feel even more magical!
Step 3: Combine Wet Ingredients
Now, it’s time to add the wet ingredients! Pour in the vegetable oil, milk, eggs, and vanilla extract into the bowl with your dry mix. Using a whisk or a hand mixer, blend everything together until it’s smooth and creamy. This is where the magic potion starts to take shape! The batter should be thick yet pourable, and the rich chocolatey scent will make your mouth water.
Step 4: Add Boiling Water
Here comes the secret ingredient: boiling water! Carefully stir in the boiling water to the batter. This step is essential as it helps dissolve the cocoa powder, creating a silky-smooth batter. The heat also activates the baking powder and baking soda, ensuring your cupcakes rise beautifully. Don’t worry if the batter seems thin; that’s exactly how it should be for those moist, fluffy cupcakes!
Step 5: Color the Batter
Now for the fun part! Divide the batter into separate bowls, depending on how many colors you want to use. Add a few drops of food coloring to each bowl and mix until you achieve your desired shades. This is where your creativity shines! You can go for vibrant hues or pastel tones—whatever suits your magical theme. Just remember, the more colors, the more enchanting your cupcakes will look!
Step 6: Fill the Cupcake Liners
Carefully pour the colored batters into the cupcake liners, alternating colors for a swirling effect. Use a toothpick or a skewer to gently swirl the colors together for that magical look. Don’t fill the liners more than two-thirds full to allow room for rising. Watching the colors blend is like creating your own little potion, and I promise it’s as satisfying as it sounds!
Step 7: Bake the Cupcakes
Pop the cupcake pan into the preheated oven and bake for 18-20 minutes. To check for doneness, insert a toothpick into the center of a cupcake; it should come out clean. If it’s still wet, give them a few more minutes. The aroma wafting through your kitchen will be pure bliss, and you’ll know you’re on the right track to creating something magical!
Step 8: Cool and Frost
Once baked, remove the cupcakes from the oven and let them cool in the pan for about 5 minutes. Then, transfer them to a wire rack to cool completely. This step is crucial; frosting warm cupcakes can lead to a melty mess! Once they’re cool, frost them with your favorite buttercream frosting and sprinkle with edible glitter for that extra touch of magic. Your enchanting treats are now ready to be devoured!
Tips for Success
- Always measure your ingredients accurately for the best results.
- Let the cupcakes cool completely before frosting to avoid melting.
- Experiment with different food coloring combinations for unique designs.
- Use a cookie scoop for even batter distribution in the liners.
- Store any leftovers in an airtight container to keep them fresh.
Equipment Needed
- Mixing bowls: Use any size you have on hand; a large bowl is ideal.
- Whisk or hand mixer: A whisk works great, but a hand mixer saves time.
- Measuring cups and spoons: Essential for accurate ingredient measurements.
- Cupcake pan: A standard 12-cup pan is perfect for this recipe.
- Oven mitts: Protect your hands when handling hot pans.
Variations
- Gluten-Free: Substitute all-purpose flour with a gluten-free blend for a delicious gluten-free option.
- Vegan: Replace eggs with flaxseed meal and use almond milk instead of regular milk for a vegan-friendly treat.
- Flavor Infusions: Add a teaspoon of peppermint or almond extract to the batter for a unique flavor twist.
- Fruit Additions: Fold in mini chocolate chips or chopped fruits like raspberries for added texture and flavor.
- Healthier Option: Use unsweetened applesauce in place of vegetable oil to reduce fat content.
Serving Suggestions
- Pair your Magic Potion Cupcakes with a tall glass of cold milk for a classic treat.
- Serve alongside fresh fruit, like strawberries or blueberries, for a refreshing contrast.
- For a magical presentation, arrange cupcakes on a colorful platter with fairy lights.
- Consider adding themed decorations, like mini wands or sparkly confetti, for special occasions.
FAQs about Magic Potion Cupcakes
Can I make Magic Potion Cupcakes ahead of time?
Absolutely! These enchanting cupcakes can be made a day in advance. Just store them in an airtight container to keep them fresh. Frost them right before serving for the best results.
What can I use instead of food coloring?
If you prefer a natural approach, you can use fruit or vegetable purees for coloring. Beet juice, spinach puree, or blueberry juice can add beautiful hues without artificial ingredients.
How do I store leftover cupcakes?
To keep your cupcakes fresh, store them in an airtight container at room temperature for up to three days. If you need to keep them longer, consider refrigerating them, but let them come to room temperature before serving.
Can I freeze Magic Potion Cupcakes?
Yes! You can freeze the unfrosted cupcakes for up to three months. Just wrap them tightly in plastic wrap and place them in a freezer-safe bag. Thaw them in the fridge before frosting and serving.
What’s the best way to frost these cupcakes?
For a magical touch, use a piping bag with a star tip to frost your cupcakes. This creates beautiful swirls and peaks. Don’t forget to sprinkle some edible glitter on top for that extra sparkle!
Final Thoughts
Creating these Magic Potion Cupcakes is more than just baking; it’s about crafting joyful moments in your kitchen. Each swirl of color and every sprinkle of edible glitter brings a sense of wonder that can brighten even the busiest of days. Whether you’re celebrating a special occasion or simply treating your family, these cupcakes are sure to enchant everyone who takes a bite. I hope you find as much joy in making them as I do. So, roll up your sleeves, unleash your creativity, and let the magic unfold in your home!
Print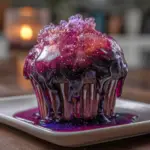
Magic Potion Cupcakes that Will Enchant Your Tastebuds!
- Total Time: 40 minutes
- Yield: 12 cupcakes 1x
- Diet: Vegetarian
Description
Delicious and enchanting cupcakes that are perfect for any magical occasion.
Ingredients
- 1 1/2 cups all-purpose flour
- 1 cup granulated sugar
- 1/2 cup unsweetened cocoa powder
- 1 tsp baking powder
- 1/2 tsp baking soda
- 1/4 tsp salt
- 1/2 cup vegetable oil
- 1 cup milk
- 2 large eggs
- 1 tsp vanilla extract
- 1/2 cup boiling water
- Food coloring (various colors)
- Buttercream frosting
- Edible glitter (optional)
Instructions
- Preheat your oven to 350°F (175°C) and line a cupcake pan with cupcake liners.
- In a large bowl, mix together the flour, sugar, cocoa powder, baking powder, baking soda, and salt.
- Add the vegetable oil, milk, eggs, and vanilla extract to the dry ingredients and mix until well combined.
- Slowly stir in the boiling water until the batter is smooth.
- Divide the batter into separate bowls and add food coloring to each bowl to create different colors.
- Pour the colored batters into the cupcake liners, swirling them together for a magical effect.
- Bake for 18-20 minutes or until a toothpick inserted in the center comes out clean.
- Let the cupcakes cool completely before frosting.
- Frost with buttercream frosting and sprinkle with edible glitter if desired.
Notes
- For a more intense flavor, consider adding flavored extracts to the batter.
- These cupcakes can be made ahead of time and stored in an airtight container.
- Feel free to experiment with different colors and designs for a unique look.
- Prep Time: 20 minutes
- Cook Time: 20 minutes
- Category: Dessert
- Method: Baking
- Cuisine: American
Nutrition
- Serving Size: 1 cupcake
- Calories: 250
- Sugar: 20g
- Sodium: 150mg
- Fat: 10g
- Saturated Fat: 2g
- Unsaturated Fat: 8g
- Trans Fat: 0g
- Carbohydrates: 35g
- Fiber: 1g
- Protein: 3g
- Cholesterol: 30mg