
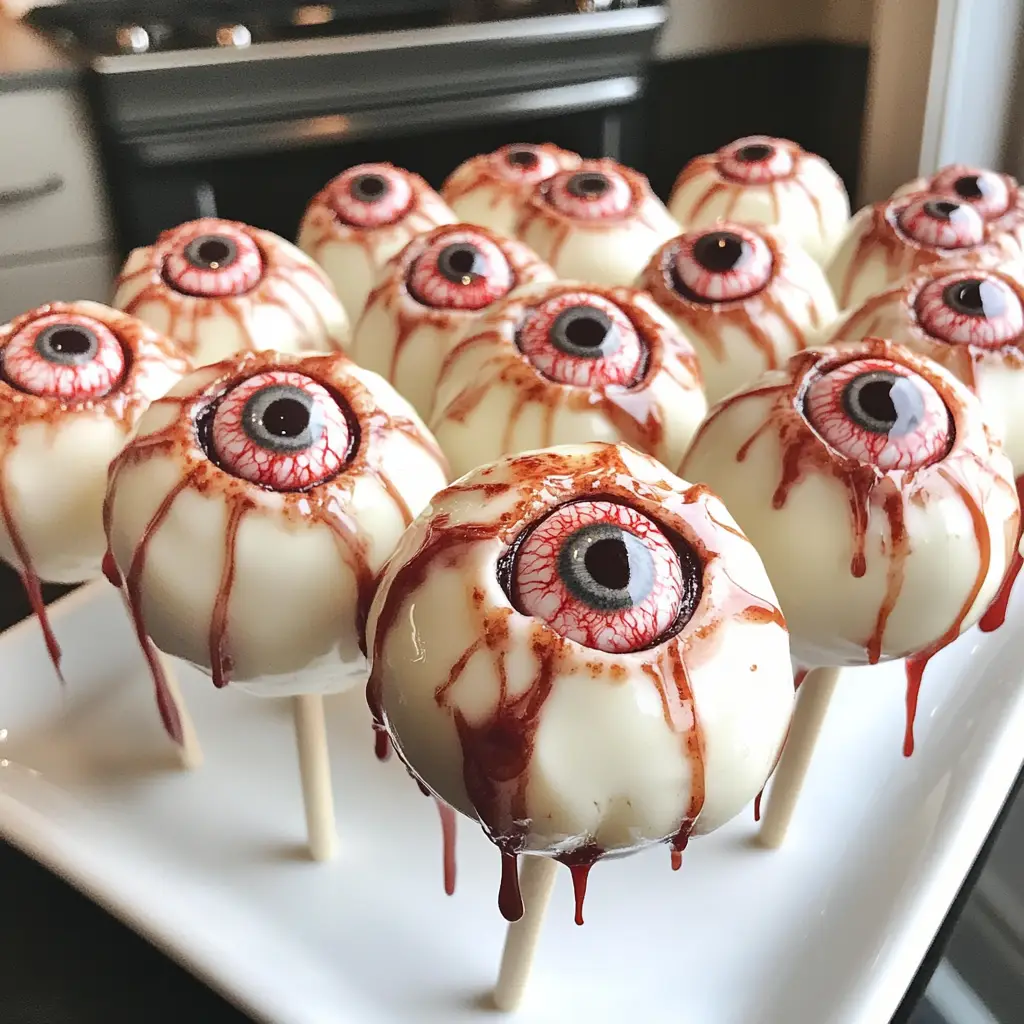
Introduction to Monster Eyeball Cake Pops
As a busy mom, I know how challenging it can be to whip up something fun and festive, especially when Halloween rolls around. That’s why I absolutely adore these Monster Eyeball Cake Pops! They’re not just a treat; they’re a delightful way to bring a little spooky magic into your kitchen without spending hours slaving away. With just a few simple ingredients, you can create these eye-catching delights that will impress both kids and adults alike. Trust me, these cake pops are the perfect solution for a quick, fun dessert that everyone will love!
Why You’ll Love This Monster Eyeball Cake Pops
These Monster Eyeball Cake Pops are a game-changer for busy days! They’re incredibly easy to make, allowing you to spend less time in the kitchen and more time enjoying the festivities. Plus, the taste is simply irresistible! With a moist cake center and a creamy chocolate coating, these treats are sure to satisfy any sweet tooth. They’re perfect for parties, school events, or just a fun family night in!
Ingredients for Monster Eyeball Cake Pops
Gathering the right ingredients is key to making these delightful Monster Eyeball Cake Pops. Here’s what you’ll need:
- Cake mix: A box of your favorite flavor makes this recipe quick and easy. Chocolate or vanilla works wonderfully!
- Frosting: This adds moisture and sweetness. You can use store-bought or homemade frosting. Flavored frosting can elevate the taste!
- White chocolate melts: These are perfect for coating the cake pops. They create a smooth, sweet shell that’s easy to work with.
- Food coloring (red and green): Use these to create spooky veins and add a pop of color to your eyeballs. Get creative!
- Chocolate chips: These serve as the pupils of your monster eyeballs. Dark chocolate adds a nice contrast to the white coating.
- Lollipop sticks: Essential for turning cake balls into fun pops! You can find these at most grocery or craft stores.
For exact measurements, check the bottom of the article where you can find a printable version of the recipe. Feel free to mix and match flavors or even add sprinkles for extra fun!
How to Make Monster Eyeball Cake Pops
Now that you have your ingredients ready, let’s dive into the fun part—making these Monster Eyeball Cake Pops! Follow these simple steps, and you’ll have a batch of spooky treats in no time.
Step 1: Prepare the Cake Mix
Start by preheating your oven according to the instructions on the cake mix box. Prepare the cake mix as directed, and pour it into a greased baking pan. The aroma of baking cake is simply delightful!
Step 2: Crumble the Cake
Once the cake has cooled completely, it’s time to crumble it. I like to use my hands for this part; it’s oddly satisfying! Break the cake into small pieces and place them in a large bowl. The finer the crumbs, the better the cake pops will hold together.
Step 3: Mix with Frosting
Add your frosting to the crumbled cake. Mix it well until everything is combined. You want a dough-like consistency that holds together when you form it into balls. If it feels too dry, add a bit more frosting!
Step 4: Form Cake Balls
Now comes the fun part—rolling the mixture into balls! Take a small amount of the cake mixture and roll it between your palms to form a ball about the size of a golf ball. Place each ball on a baking sheet lined with parchment paper.
Step 5: Chill the Cake Balls
Pop the baking sheet into the refrigerator for about 30 minutes. Chilling helps the cake balls firm up, making them easier to dip in chocolate later. Plus, it gives you a little break to clean up the kitchen!
Step 6: Melt the White Chocolate
While the cake balls chill, melt your white chocolate melts in a microwave-safe bowl. Heat in short bursts, stirring in between, until smooth. Be careful not to overheat; burnt chocolate is a sad sight!
Step 7: Insert Lollipop Sticks
Take your chilled cake balls out of the fridge. Dip the end of each lollipop stick into the melted chocolate, then insert it into the center of a cake ball. This helps the stick stay in place when you coat the pops.
Step 8: Coat with White Chocolate
Now, it’s time to coat the cake balls! Dip each one into the melted white chocolate, ensuring it’s fully covered. Let any excess chocolate drip off before placing it back on the baking sheet. This is where the magic happens!
Step 9: Add Chocolate Chip Pupils
Before the chocolate sets, gently press a chocolate chip into the center of each cake pop. This will be the pupil of your monster eyeball. It’s like giving your cake pops a little personality!
Step 10: Create Spooky Veins
Using your food coloring, add red veins around the chocolate chip. A toothpick works great for this! Just a few lines will give your cake pops that spooky, monster look. Get creative and have fun with it!
Step 11: Let Set Completely
Finally, let the cake pops set completely at room temperature or in the fridge. Once they’re firm, they’re ready to be devoured! Trust me, these Monster Eyeball Cake Pops will be the star of your Halloween festivities!
Tips for Success
- Make sure your cake is completely cooled before crumbling; this prevents a gooey mess.
- Use a cookie scoop for uniform cake balls; it saves time and ensures even sizes.
- Don’t rush the chilling process; it’s crucial for easy dipping.
- Experiment with different colors for the veins to match your party theme!
- Store leftover cake pops in an airtight container in the fridge for up to a week.
Equipment Needed
- Baking pan: A standard 9×13 inch pan works well. You can also use a round cake pan if you prefer.
- Mixing bowl: Any large bowl will do. A stand mixer can make mixing easier!
- Parchment paper: This helps prevent sticking. Wax paper is a good alternative.
- Microwave-safe bowl: For melting chocolate. A double boiler can also be used.
- Toothpick: Handy for creating veins. A small paintbrush can work too!
Variations
- Flavored Cake Mix: Try using red velvet or lemon cake mix for a unique twist on flavor and color.
- Gluten-Free Option: Substitute the regular cake mix with a gluten-free cake mix to accommodate dietary needs.
- Vegan Version: Use a vegan cake mix and plant-based frosting to make these treats suitable for a vegan diet.
- Colorful Coatings: Instead of white chocolate, use colored candy melts to create vibrant, eye-catching cake pops.
- Nutty Surprise: Add crushed nuts or sprinkles to the chocolate coating for added texture and flavor.
Serving Suggestions
- Pair these Monster Eyeball Cake Pops with spooky-themed drinks like a bubbling punch or apple cider.
- Serve them on a decorative platter with fake spider webs for a fun Halloween display.
- Include a variety of other Halloween treats for a festive dessert table.
- Wrap them in clear bags tied with colorful ribbons for party favors!
FAQs about Monster Eyeball Cake Pops
Can I make Monster Eyeball Cake Pops in advance?
Absolutely! You can prepare these cake pops a day in advance. Just store them in an airtight container in the refrigerator. They’ll be just as delicious when it’s time to serve!
What can I use instead of white chocolate melts?
If you’re not a fan of white chocolate, you can use milk chocolate or dark chocolate melts instead. Just remember, the color of the coating will change the overall look of your Monster Eyeball Cake Pops!
How do I store leftover cake pops?
Store any leftover Monster Eyeball Cake Pops in an airtight container in the fridge. They’ll stay fresh for up to a week. Just make sure they’re completely set before storing!
Can I use homemade frosting?
Of course! Homemade frosting can add a personal touch and unique flavor to your cake pops. Just ensure it’s thick enough to hold the cake mixture together.
What if my cake pops are falling off the sticks?
If your cake pops are falling off the sticks, it might be due to the cake balls being too soft. Make sure to chill them long enough before dipping. If needed, add a bit more frosting to help them hold together!
Final Thoughts
Creating these Monster Eyeball Cake Pops is more than just baking; it’s about making memories with your loved ones. The joy on your kids’ faces when they see these spooky treats is priceless! Plus, the process is a fun way to bond in the kitchen, sharing laughter and creativity. Whether you’re hosting a Halloween party or just looking to add a little fun to your week, these cake pops are sure to bring smiles all around. So roll up your sleeves, unleash your inner monster, and enjoy the delightful chaos of making these irresistible treats!
Print
Monster Eyeball Cake Pops: Irresistibly Fun Treats!
- Total Time: 1 hour
- Yield: 24 cake pops 1x
- Diet: Vegetarian
Description
Monster Eyeball Cake Pops are fun and spooky treats perfect for Halloween or any monster-themed party. These cake pops are decorated to look like eyeballs, making them a hit with kids and adults alike.
Ingredients
- 1 box of cake mix
- 1 cup of frosting
- White chocolate melts
- Food coloring (red and green)
- Chocolate chips
- Lollipop sticks
Instructions
- Prepare the cake mix according to package instructions and bake.
- Once cooled, crumble the cake into a large bowl.
- Add frosting to the crumbled cake and mix until combined.
- Form the mixture into balls and place them on a baking sheet.
- Chill the cake balls in the refrigerator for about 30 minutes.
- Melt the white chocolate melts in a microwave-safe bowl.
- Dip the end of each lollipop stick into the melted chocolate and insert it into a cake ball.
- Coat each cake ball in the melted white chocolate and let excess chocolate drip off.
- Before the chocolate sets, place a chocolate chip in the center of each cake pop to create the eyeball pupil.
- Use food coloring to add red veins around the chocolate chip for a spooky effect.
- Let the cake pops set completely before serving.
Notes
- For a more intense flavor, use flavored frosting.
- These cake pops can be made a day in advance and stored in the refrigerator.
- Feel free to get creative with decorations!
- Prep Time: 30 minutes
- Cook Time: 30 minutes
- Category: Dessert
- Method: Baking and Decorating
- Cuisine: American
Nutrition
- Serving Size: 1 cake pop
- Calories: 150
- Sugar: 12g
- Sodium: 50mg
- Fat: 7g
- Saturated Fat: 4g
- Unsaturated Fat: 2g
- Trans Fat: 0g
- Carbohydrates: 20g
- Fiber: 1g
- Protein: 2g
- Cholesterol: 15mg


