
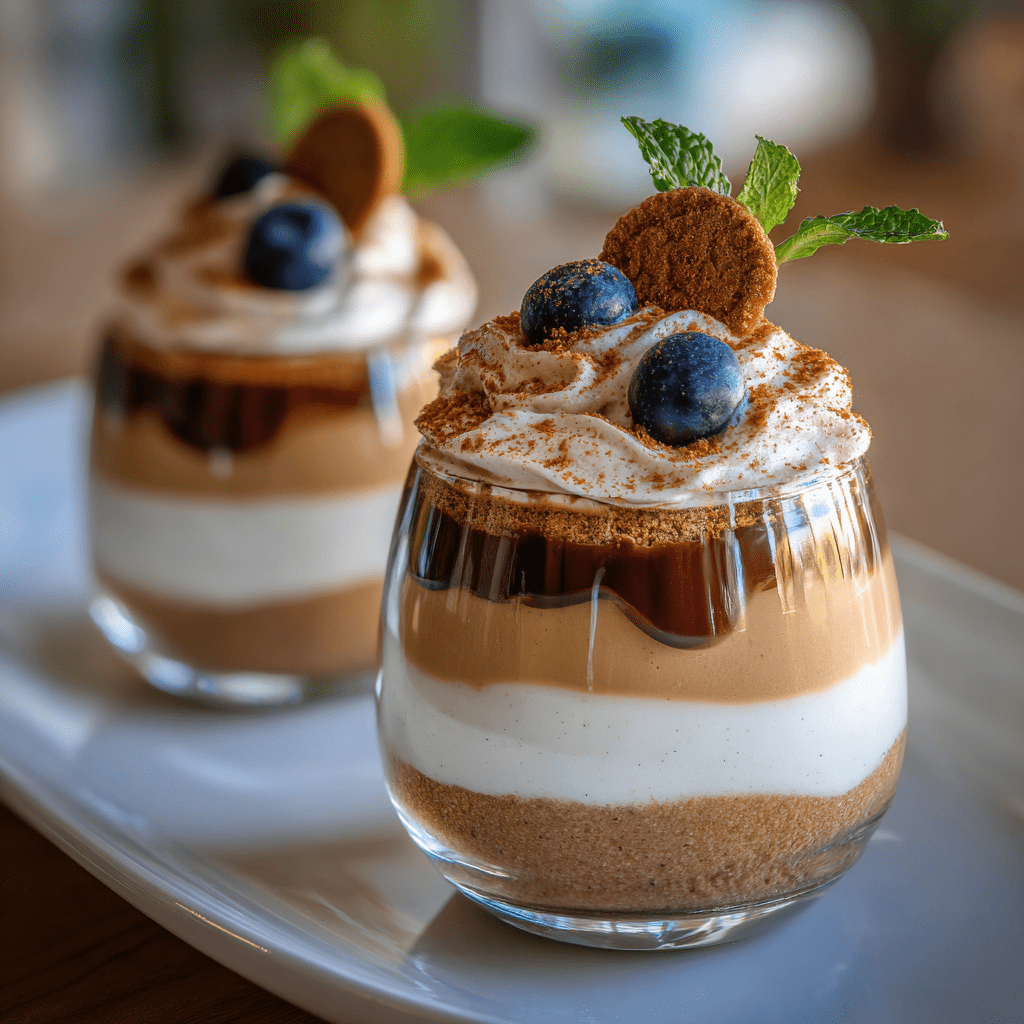
Introduction to No-Bake Biscoff Mousse Cups
Hey there, fellow dessert lovers! If you’re anything like me, you know that life can get pretty hectic. Between juggling work, family, and everything in between, finding time to whip up a delightful treat can feel impossible. That’s where these No-Bake Biscoff Mousse Cups come to the rescue! They’re not just quick and easy; they’re a creamy, dreamy indulgence that will impress your loved ones without breaking a sweat. Imagine serving these luscious cups at your next gathering or simply enjoying them after a long day. Trust me, they’re a game-changer!
Why You’ll Love This No-Bake Biscoff Mousse Cups
These No-Bake Biscoff Mousse Cups are a dream come true for busy moms and professionals alike. They come together in just 20 minutes, making them a perfect last-minute dessert. The rich, velvety mousse paired with the crunchy Biscoff crust creates a delightful contrast that will have everyone asking for seconds. Plus, there’s no baking involved, so you can enjoy the sweet rewards without the hassle!
Ingredients for No-Bake Biscoff Mousse Cups
Let’s dive into the deliciousness! Here’s what you’ll need to create these heavenly No-Bake Biscoff Mousse Cups. Each ingredient plays a vital role in crafting that perfect balance of flavors and textures.
- Biscoff cookie crumbs: These are the star of the show! They provide a sweet, spiced flavor and a delightful crunch for the crust.
- Unsalted butter: This helps bind the cookie crumbs together, creating a rich and buttery base for your mousse cups.
- Heavy whipping cream: The key to that light and airy mousse texture. Whipping it adds volume and creaminess.
- Powdered sugar: This sweetens the mousse without adding graininess, ensuring a smooth finish.
- Biscoff spread: This luscious spread is packed with the same flavors as the cookies, making the mousse irresistibly rich.
- Vanilla extract: A splash of this adds warmth and depth to the mousse, enhancing the overall flavor.
- Chocolate shavings or additional Biscoff cookies: These are optional but make for a beautiful and tasty garnish that elevates your dessert.
For exact measurements, check the bottom of the article where you can find everything listed for easy printing. Now, let’s get ready to whip up some magic!
How to Make No-Bake Biscoff Mousse Cups
Ready to create your own No-Bake Biscoff Mousse Cups? Let’s get started! Follow these simple steps, and you’ll have a delightful dessert that’s sure to impress.
Step 1: Prepare the Crust
First, grab a bowl and mix the Biscoff cookie crumbs with the melted unsalted butter. Stir until everything is well combined. The mixture should resemble wet sand.
Next, take your serving cups and press the crumb mixture firmly into the bottom of each cup. This forms a sturdy crust that will hold all that delicious mousse. Make sure it’s even and compact for the best texture!
Step 2: Make the Mousse
In a separate bowl, whip the heavy whipping cream and powdered sugar together. Use an electric mixer for about 3-5 minutes until soft peaks form. This is where the magic happens—fluffy and airy mousse!
Now, in another bowl, mix the Biscoff spread and vanilla extract until smooth. This will be the base of your mousse. Gently fold the whipped cream into the Biscoff mixture. Be careful not to deflate the cream; you want to keep that light texture!
Step 3: Combine and Chill
Once the mousse is fully combined, it’s time to spoon it over the crust in your cups. Fill them generously, leaving a little space at the top for garnishing later.
Now, cover the cups with plastic wrap and pop them in the refrigerator. Let them chill for at least 2 hours. This step is crucial for the mousse to set properly and develop its rich flavor.
Step 4: Garnish and Serve
When you’re ready to serve, take the cups out of the fridge. For a finishing touch, sprinkle chocolate shavings or crushed Biscoff cookies on top. This adds a lovely crunch and makes your dessert look extra special!
Now, dig in and enjoy your homemade No-Bake Biscoff Mousse Cups. Trust me, each spoonful is pure bliss!
Tips for Success
- Make sure your heavy cream is cold for better whipping results.
- Use a rubber spatula to gently fold the whipped cream into the Biscoff mixture.
- For a richer flavor, consider using dark chocolate shavings as a garnish.
- Chill the mousse cups overnight for an even more intense flavor.
- Feel free to adjust the sweetness by adding more or less powdered sugar.
Equipment Needed
- Mixing bowls: Use any size you have on hand; just make sure they’re large enough for mixing.
- Electric mixer: A hand mixer works great, but a whisk can do the job if you’re feeling adventurous!
- Serving cups: Any small cups or jars will work; get creative with what you have!
- Rubber spatula: Perfect for folding and scraping down the sides of your bowls.
Variations
- Nutty Delight: Add crushed nuts like almonds or hazelnuts to the crust for an extra crunch and flavor.
- Chocolate Lovers: Mix in some cocoa powder with the Biscoff spread for a chocolatey twist on the mousse.
- Vegan Option: Substitute heavy cream with coconut cream and use vegan butter for a plant-based version.
- Spiced Up: Add a pinch of cinnamon or nutmeg to the mousse for a warm, spiced flavor.
- Fruit Fusion: Layer fresh berries or banana slices between the crust and mousse for a fruity surprise.
Serving Suggestions
- Pair your No-Bake Biscoff Mousse Cups with a hot cup of coffee or a chilled glass of dessert wine for a delightful contrast.
- Serve alongside fresh fruit like strawberries or raspberries to add a refreshing touch.
- For a beautiful presentation, use clear cups to showcase the layers of mousse and crust.
- Consider adding a dollop of whipped cream on top for extra indulgence!
FAQs about No-Bake Biscoff Mousse Cups
Got questions about these delightful No-Bake Biscoff Mousse Cups? I’ve got you covered! Here are some common queries that might pop up as you whip up this delicious dessert.
Can I make these mousse cups in advance?
Absolutely! In fact, making them a day ahead can enhance the flavors. Just keep them covered in the fridge until you’re ready to serve.
What can I use instead of Biscoff spread?
If you can’t find Biscoff spread, try using cookie butter or even Nutella for a different flavor profile. Just keep in mind that it will change the taste!
How long do these mousse cups last in the fridge?
These No-Bake Biscoff Mousse Cups can last up to 3 days in the fridge. Just make sure they’re covered to keep them fresh.
Can I freeze the mousse cups?
While you can freeze them, the texture may change once thawed. It’s best to enjoy them fresh for the ultimate creamy experience!
What can I use for a gluten-free version?
For a gluten-free treat, simply use gluten-free cookies for the crust. There are many delicious options available that will work perfectly!
Final Thoughts
Creating these No-Bake Biscoff Mousse Cups is more than just making a dessert; it’s about bringing joy to your kitchen and delighting your loved ones. Each spoonful is a reminder that even on the busiest days, you can indulge in something truly special. The creamy mousse, paired with the crunchy crust, creates a symphony of flavors that will leave everyone smiling. So, whether you’re celebrating a special occasion or simply treating yourself after a long day, these mousse cups are sure to bring a little bliss into your life. Enjoy every delicious bite!
Print
No-Bake Biscoff Mousse Cups: Indulge in Bliss Today!
- Total Time: 2 hours 20 minutes
- Yield: 4 servings 1x
- Diet: Vegetarian
Description
Delicious and creamy no-bake mousse cups made with Biscoff cookies, perfect for a quick dessert.
Ingredients
- 1 cup Biscoff cookie crumbs
- 1/2 cup unsalted butter, melted
- 1 cup heavy whipping cream
- 1/2 cup powdered sugar
- 1 cup Biscoff spread
- 1 teaspoon vanilla extract
- Chocolate shavings or additional Biscoff cookies for garnish
Instructions
- In a bowl, mix Biscoff cookie crumbs and melted butter until combined.
- Press the mixture into the bottom of serving cups to form a crust.
- In another bowl, whip the heavy cream and powdered sugar until soft peaks form.
- In a separate bowl, mix Biscoff spread and vanilla extract until smooth.
- Gently fold the whipped cream into the Biscoff mixture until fully combined.
- Spoon the mousse over the crust in the cups.
- Chill in the refrigerator for at least 2 hours before serving.
- Garnish with chocolate shavings or crushed Biscoff cookies before serving.
Notes
- For a richer flavor, use dark chocolate shavings for garnish.
- Can be made a day in advance for convenience.
- Adjust the sweetness by varying the amount of powdered sugar.
- Prep Time: 20 minutes
- Cook Time: 0 minutes
- Category: Dessert
- Method: No-Bake
- Cuisine: American
Nutrition
- Serving Size: 1 cup
- Calories: 350
- Sugar: 20g
- Sodium: 150mg
- Fat: 25g
- Saturated Fat: 15g
- Unsaturated Fat: 5g
- Trans Fat: 0g
- Carbohydrates: 30g
- Fiber: 1g
- Protein: 3g
- Cholesterol: 60mg


