
Introduction to No-Bake Cherry Cheesecake
As a busy mom, I know how precious time can be, especially when it comes to whipping up something sweet. That’s why I absolutely adore this No-Bake Cherry Cheesecake! It’s a delightful treat that requires minimal effort but delivers maximum flavor. Whether you’re hosting a gathering or just want to indulge after a long day, this cheesecake is your go-to solution. With its creamy texture and vibrant cherry topping, it’s sure to impress your loved ones. Plus, no baking means less mess and more time to enjoy the moment!
Why You’ll Love This No-Bake Cherry Cheesecake
This No-Bake Cherry Cheesecake is a dream come true for anyone short on time but big on flavor. It’s incredibly easy to make, requiring just a handful of ingredients and minimal prep. The creamy filling paired with the sweet cherry topping creates a taste sensation that’s hard to resist. Plus, it’s a crowd-pleaser, making it perfect for family gatherings or a simple weeknight treat. You’ll love how quickly it comes together!
Ingredients for No-Bake Cherry Cheesecake
Gathering the right ingredients is the first step to creating this delightful No-Bake Cherry Cheesecake. Here’s what you’ll need:
- Graham cracker crumbs: These form the base of your cheesecake, providing a sweet and crunchy texture.
- Unsalted butter: Melted butter binds the crumbs together, creating a rich crust. You can substitute with coconut oil for a dairy-free option.
- Cream cheese: The star of the show! Softened cream cheese gives the cheesecake its creamy, luscious texture. Make sure it’s at room temperature for easy mixing.
- Powdered sugar: This sweetens the filling and helps achieve that smooth consistency. You can use granulated sugar if you don’t have powdered on hand.
- Vanilla extract: A splash of vanilla adds depth and enhances the overall flavor of the cheesecake.
- Heavy whipping cream: Whipped to perfection, it lightens the cream cheese mixture, making it airy and delightful.
- Cherry pie filling: This is the crowning glory! It adds a burst of flavor and color. For a fresher taste, feel free to use fresh cherries instead.
For exact measurements, check the bottom of the article where you can find everything listed for easy printing. Happy baking!
How to Make No-Bake Cherry Cheesecake
Now that you have all your ingredients ready, let’s dive into the fun part—making this No-Bake Cherry Cheesecake! Follow these simple steps, and you’ll have a delicious dessert that will wow your family and friends.
Step 1: Prepare the Crust
Start by combining your graham cracker crumbs and melted butter in a bowl. Mix them until the crumbs are fully coated. This mixture should resemble wet sand. Next, press it firmly into the bottom of a 9-inch springform pan. Use the back of a measuring cup to get an even layer. This crust is the foundation of your cheesecake, so make sure it’s packed well!
Step 2: Make the Cream Cheese Mixture
In a separate bowl, beat the softened cream cheese until it’s smooth and creamy. This step is crucial for a velvety texture. Gradually add in the powdered sugar and vanilla extract, mixing until everything is well combined. The sweetness of the sugar balances the tanginess of the cream cheese, creating a delightful filling.
Step 3: Whip the Cream
Now, grab another bowl and whip the heavy cream until stiff peaks form. This means when you lift the whisk, the cream holds its shape. Gently fold the whipped cream into the cream cheese mixture. Be careful not to deflate the whipped cream; you want to keep that light and airy texture!
Step 4: Combine and Spread
Once the whipped cream is fully incorporated, it’s time to spread the cream cheese mixture over your crust. Use a spatula to smooth it out evenly. This layer is where the magic happens, so take your time to make it look pretty. The creaminess will be the highlight of your cheesecake!
Step 5: Add Cherry Topping
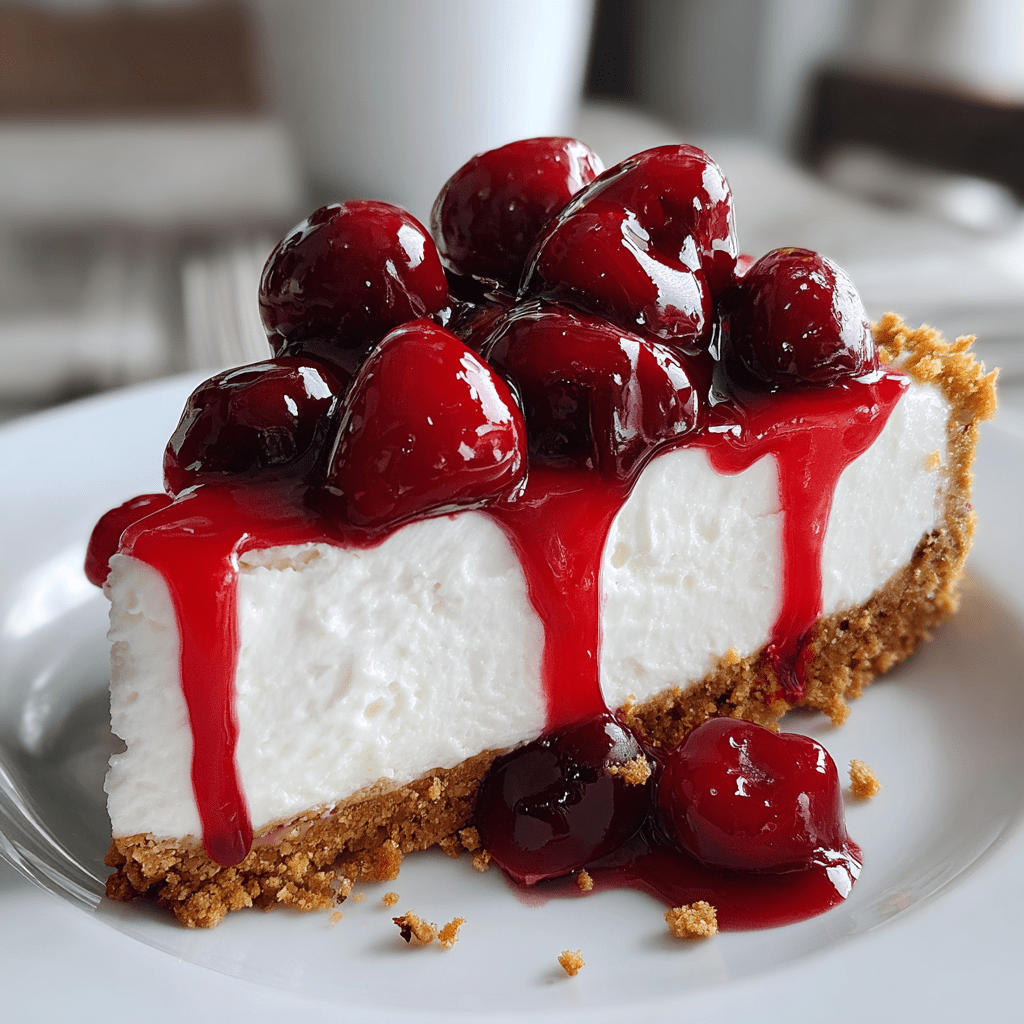
Now for the fun part—adding the cherry topping! Spoon the cherry pie filling over the cream cheese layer, spreading it evenly. The vibrant red cherries not only add flavor but also make your cheesecake visually stunning. If you’re using fresh cherries, slice them and arrange them artfully for an extra touch.
Step 6: Chill and Serve
Finally, cover the cheesecake with plastic wrap and refrigerate it for at least 4 hours, or overnight for a firmer texture. Once it’s set, slice it into pieces and serve chilled. Each bite will be a creamy, cherry-filled delight that’s sure to bring smiles all around!
Tips for Success
- Make sure your cream cheese is at room temperature for easy mixing.
- For a firmer cheesecake, let it chill overnight.
- Use a spatula to smooth the cream cheese layer for a polished look.
- Experiment with different toppings like chocolate or fresh fruit.
- Keep leftovers covered in the fridge for up to 3 days.
Equipment Needed
- 9-inch springform pan: Essential for easy removal. A regular pie dish works too.
- Mixing bowls: Use at least two for mixing different components. Any size will do!
- Electric mixer: Ideal for beating cream cheese and whipping cream. A whisk can work in a pinch.
- Spatula: Perfect for spreading the cream cheese mixture evenly.
- Measuring cups and spoons: Necessary for accurate ingredient measurements.
Variations of No-Bake Cherry Cheesecake
- Chocolate Cherry Cheesecake: Add melted chocolate to the cream cheese mixture for a rich, decadent twist.
- Berry Medley: Swap out the cherry pie filling for a mix of fresh berries like strawberries, blueberries, and raspberries for a fruity explosion.
- Gluten-Free Option: Use gluten-free graham crackers or almond flour for the crust to make it suitable for gluten-sensitive friends.
- Vegan Version: Substitute cream cheese with a vegan cream cheese alternative and use coconut cream instead of heavy whipping cream.
- Nutty Crust: Mix crushed nuts like almonds or pecans with the graham cracker crumbs for added flavor and crunch.
Serving Suggestions for No-Bake Cherry Cheesecake
- Pair with a dollop of whipped cream for extra indulgence.
- Serve alongside fresh fruit like strawberries or blueberries for a refreshing contrast.
- Complement with a scoop of vanilla ice cream for a delightful treat.
- Drizzle chocolate or caramel sauce on top for added flair.
- Garnish with mint leaves for a pop of color and freshness.
FAQs about No-Bake Cherry Cheesecake
Can I make No-Bake Cherry Cheesecake ahead of time?
Absolutely! This cheesecake is perfect for making ahead. Just prepare it the day before and let it chill overnight. It will be even firmer and more flavorful!
How long does No-Bake Cherry Cheesecake last in the fridge?
When stored properly in an airtight container, your No-Bake Cherry Cheesecake will last up to three days in the fridge. Just make sure to keep it covered to maintain its freshness.
Can I use fresh cherries instead of pie filling?
Yes, fresh cherries are a fantastic option! Just wash, pit, and slice them before arranging them on top of the cheesecake. They add a lovely, natural sweetness.
What can I substitute for cream cheese?
If you’re looking for a lighter option, you can use Greek yogurt or a vegan cream cheese alternative. Both will give you a creamy texture without the heaviness.
Is this No-Bake Cherry Cheesecake suitable for special diets?
Yes! You can easily adapt this recipe for gluten-free or vegan diets. Just follow the variations I mentioned earlier, and you’ll have a delicious dessert for everyone!
Final Thoughts
Creating this No-Bake Cherry Cheesecake is more than just making a dessert; it’s about bringing joy to your table. Each slice is a celebration of flavors, from the creamy filling to the sweet cherry topping. I love how this recipe transforms a busy day into a moment of indulgence. It’s perfect for family gatherings or a quiet night in. Plus, the smiles on my loved ones’ faces when they take that first bite? Priceless! So, roll up your sleeves, gather your ingredients, and let this delightful cheesecake become a cherished part of your culinary adventures.
Print
No-Bake Cherry Cheesecake: A Simple Delight You’ll Love!
- Total Time: 4 hours 20 minutes
- Yield: 8 servings 1x
- Diet: Vegetarian
Description
A delicious and easy-to-make no-bake cherry cheesecake that is perfect for any occasion.
Ingredients
- 1 ½ cups graham cracker crumbs
- ½ cup unsalted butter, melted
- 2 cups cream cheese, softened
- 1 cup powdered sugar
- 1 teaspoon vanilla extract
- 1 cup heavy whipping cream
- 1 can cherry pie filling
Instructions
- In a bowl, combine graham cracker crumbs and melted butter, then press into the bottom of a 9-inch springform pan.
- In a separate bowl, beat the cream cheese until smooth, then add powdered sugar and vanilla extract, mixing until well combined.
- In another bowl, whip the heavy cream until stiff peaks form, then gently fold it into the cream cheese mixture.
- Spread the cream cheese mixture over the crust in the springform pan.
- Top with cherry pie filling, spreading it evenly over the cheesecake.
- Refrigerate for at least 4 hours or until set.
- Slice and serve chilled.
Notes
- For a firmer cheesecake, refrigerate overnight.
- Feel free to use fresh cherries instead of pie filling for a fresher taste.
- Can be topped with whipped cream for extra indulgence.
- Prep Time: 20 minutes
- Cook Time: 0 minutes
- Category: Dessert
- Method: No-Bake
- Cuisine: American
Nutrition
- Serving Size: 1 slice
- Calories: 350
- Sugar: 25g
- Sodium: 200mg
- Fat: 22g
- Saturated Fat: 12g
- Unsaturated Fat: 8g
- Trans Fat: 0g
- Carbohydrates: 30g
- Fiber: 1g
- Protein: 4g
- Cholesterol: 60mg


