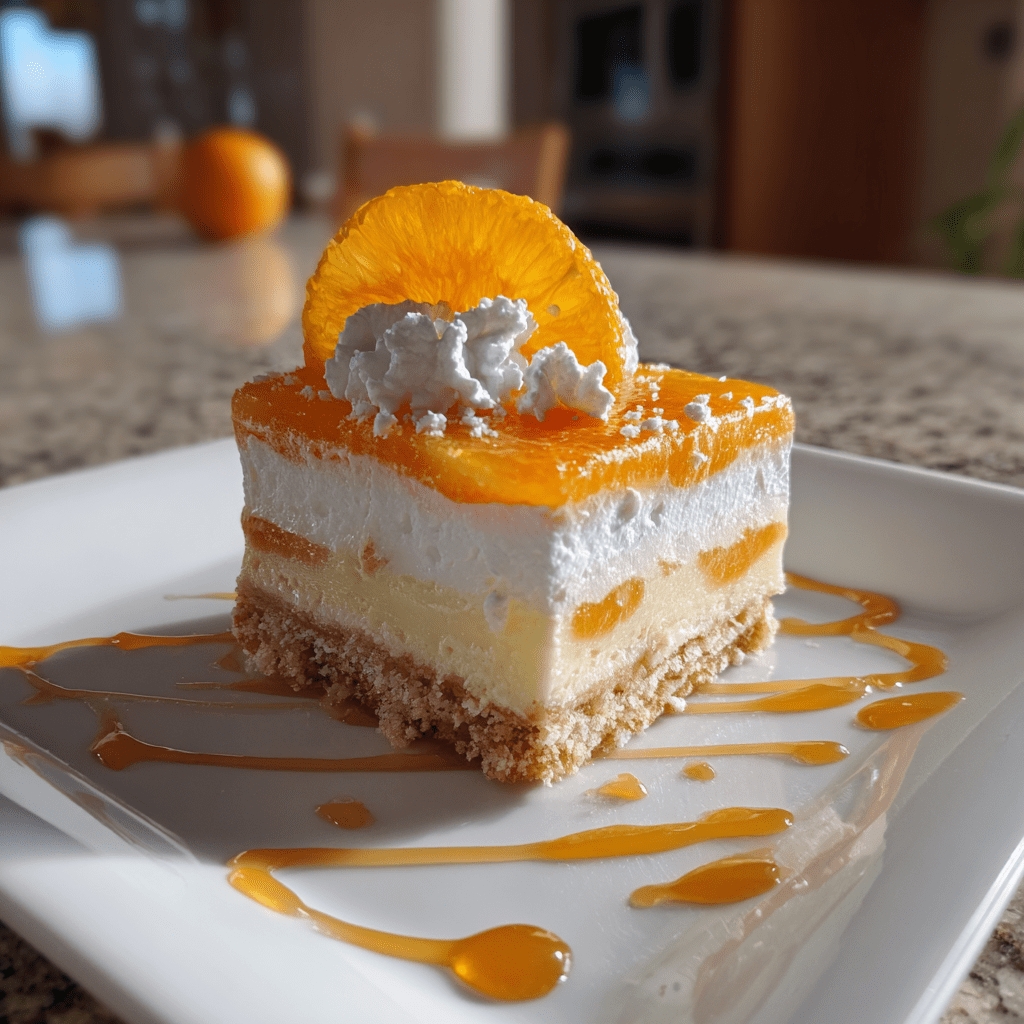
Introduction to Orange Creamsicle Dream Bars
As a busy mom, I know how precious our time can be, especially during the summer months. That’s why I absolutely adore these Orange Creamsicle Dream Bars! They’re not just a treat; they’re a delightful escape from the everyday hustle. Imagine biting into a creamy, citrusy bar that instantly transports you to a sunny beach. These bars are a quick solution for those hot days when you want something refreshing yet satisfying. Plus, they’re so easy to whip up that even the most hectic schedules can accommodate them. Trust me, your loved ones will be begging for seconds!
Why You’ll Love This Orange Creamsicle Dream Bars
These Orange Creamsicle Dream Bars are a breeze to make, taking just 15 minutes of prep time. They’re the perfect summer dessert that combines the nostalgic flavors of orange and cream. With no baking required, you can easily fit this recipe into your busy day. Plus, they’re a hit with kids and adults alike, making them a fantastic treat for family gatherings or a simple afternoon snack!
Ingredients for Orange Creamsicle Dream Bars
To create these delightful Orange Creamsicle Dream Bars, you’ll need a handful of simple ingredients that come together to make a refreshing treat. Here’s what you’ll need:
- Orange Juice: Freshly squeezed is best for vibrant flavor, but store-bought works too.
- Heavy Cream: This adds a rich, creamy texture. For a lighter option, you can use coconut cream.
- Sugar: Sweetens the bars perfectly. You can substitute with honey or agave for a natural alternative.
- Vanilla Extract: A splash enhances the overall flavor, giving it that dreamy quality.
- Orange Zest: This adds a burst of citrus aroma. Feel free to add more for a stronger orange flavor.
- Crushed Ice: Helps to create a refreshing, slushy texture. You can use ice cubes and crush them yourself.
For exact measurements, check the bottom of the article where you can find everything listed for easy printing. Enjoy the process of gathering these ingredients, and let the anticipation of making these bars build as you prepare!
How to Make Orange Creamsicle Dream Bars
Making these Orange Creamsicle Dream Bars is as easy as pie—well, easier actually! Follow these simple steps, and you’ll have a delicious frozen treat ready to impress your family and friends.
Step 1: Combine the Base Ingredients
Start by grabbing a mixing bowl. Pour in the orange juice, heavy cream, sugar, vanilla extract, and orange zest. This combination is the heart of your bars, so make sure to use fresh ingredients for the best flavor. The vibrant orange juice and creamy texture will make your taste buds dance!
Step 2: Mix Until Smooth
Using a whisk or an electric mixer, blend the ingredients together until the sugar dissolves completely. You want a smooth, creamy mixture that looks like sunshine in a bowl. This step is crucial because it ensures that every bite of your Orange Creamsicle Dream Bars is perfectly sweet and creamy.
Step 3: Add Crushed Ice
Now, it’s time to add the crushed ice. Gently fold it into the mixture until it’s evenly distributed. The ice will give your bars that refreshing, slushy texture that screams summer. Just imagine biting into a cool, creamy bar on a hot day—pure bliss!
Step 4: Prepare for Freezing
Pour the mixture into a baking dish, spreading it out evenly. I like to use a glass dish because it’s easy to see the layers. Make sure to smooth the top with a spatula. This will help your bars freeze evenly, ensuring a perfect texture when you’re ready to serve.
Step 5: Freeze and Set
Pop the dish into the freezer and let it chill for at least 4 hours, or until solid. Patience is key here! While you wait, you can daydream about how delicious these bars will be. Just remember to keep the kids away from the freezer—they might be tempted to sneak a taste!
Step 6: Cut and Serve
Once your bars are frozen solid, take them out and let them sit for a few minutes. This makes cutting easier. Use a sharp knife to slice them into bars. Serve them chilled, and watch as everyone’s faces light up with joy. These Orange Creamsicle Dream Bars are sure to be a hit!
Tips for Success
- Use fresh orange juice for the best flavor—it’s worth the extra effort!
- Let the bars sit at room temperature for a few minutes before cutting for cleaner slices.
- Experiment with different citrus juices like lemon or lime for a fun twist.
- For a creamier texture, blend the mixture longer until it’s super smooth.
- Store any leftovers in an airtight container to keep them fresh.
Equipment Needed
- Mixing Bowl: A large bowl for combining ingredients. A glass or stainless steel bowl works great.
- Whisk or Electric Mixer: For blending the mixture smoothly. A hand whisk is perfect if you prefer a workout!
- Baking Dish: A 9×9 inch dish is ideal. You can also use a loaf pan if that’s what you have.
- Sharp Knife: For cutting the bars into perfect squares. A serrated knife can make it easier.
Variations
- For a tropical twist, add a splash of pineapple juice to the orange juice mixture.
- Try using almond milk instead of heavy cream for a lighter, nutty flavor.
- Incorporate fresh berries like strawberries or blueberries for a fruity surprise.
- For a vegan option, substitute heavy cream with coconut cream and use maple syrup instead of sugar.
- Add a hint of mint extract for a refreshing herbal note that complements the orange.
Serving Suggestions for Orange Creamsicle Dream Bars
- Pair these bars with a scoop of vanilla ice cream for an extra creamy treat.
- Serve alongside fresh fruit like strawberries or blueberries for a colorful plate.
- Drizzle with chocolate sauce for a delightful contrast of flavors.
- Garnish with mint leaves for a refreshing touch.
- Enjoy with a glass of iced tea or lemonade to beat the heat!
FAQs about Orange Creamsicle Dream Bars
Can I make these Orange Creamsicle Dream Bars ahead of time?
Absolutely! These bars can be made up to two weeks in advance. Just store them in an airtight container in the freezer. They’re perfect for summer gatherings or unexpected guests!
What can I substitute for heavy cream?
If you’re looking for a lighter option, coconut cream works beautifully. It adds a subtle tropical flavor that pairs well with the orange. You can also use almond milk for a dairy-free alternative.
How do I store leftovers?
To keep your Orange Creamsicle Dream Bars fresh, wrap them tightly in plastic wrap or store them in an airtight container. They’ll stay delicious for up to two weeks in the freezer.
Can I use other fruits in this recipe?
<pDefinitely! Feel free to experiment with other fruits like mango or pineapple. Just remember to adjust the sweetness based on the fruit you choose. The possibilities are endless!
What’s the best way to cut these bars?
Let the bars sit at room temperature for a few minutes before cutting. This will make slicing easier and give you those perfect, clean edges. A sharp knife is key for a neat cut!
Final Thoughts
Creating these Orange Creamsicle Dream Bars is more than just a cooking project; it’s a joyful experience that brings smiles to faces. The vibrant flavors of orange and cream evoke memories of carefree summer days, making each bite a delightful escape. Whether you’re serving them at a family gathering or enjoying a quiet moment on your porch, these bars are sure to brighten your day. Plus, they’re so easy to make that you’ll find yourself whipping them up again and again. So, gather your ingredients and let the fun begin—your taste buds will thank you!
Print
Orange Creamsicle Dream Bars that Satisfy Every Craving!
- Total Time: 4 hours 15 minutes
- Yield: 12 bars 1x
- Diet: Vegetarian
Description
Delicious and refreshing Orange Creamsicle Dream Bars that combine the flavors of orange and cream for a perfect summer treat.
Ingredients
- 1 cup orange juice
- 1 cup heavy cream
- 1/2 cup sugar
- 1 teaspoon vanilla extract
- 1/4 cup orange zest
- 1/2 cup crushed ice
Instructions
- In a mixing bowl, combine orange juice, heavy cream, sugar, vanilla extract, and orange zest.
- Mix until the sugar is dissolved and the mixture is well combined.
- Add crushed ice to the mixture and stir until evenly distributed.
- Pour the mixture into a baking dish and spread it evenly.
- Freeze for at least 4 hours or until solid.
- Cut into bars and serve chilled.
Notes
- For a stronger orange flavor, add more orange zest.
- These bars can be stored in the freezer for up to 2 weeks.
- Feel free to substitute heavy cream with coconut cream for a dairy-free option.
- Prep Time: 15 minutes
- Cook Time: 0 minutes
- Category: Dessert
- Method: Freezing
- Cuisine: American
Nutrition
- Serving Size: 1 bar
- Calories: 150
- Sugar: 12g
- Sodium: 30mg
- Fat: 10g
- Saturated Fat: 6g
- Unsaturated Fat: 4g
- Trans Fat: 0g
- Carbohydrates: 15g
- Fiber: 0g
- Protein: 1g
- Cholesterol: 30mg