

Introduction to Oreo Valentine Bark
Valentine’s Day is just around the corner, and if you’re like me, you want to create something special without spending hours in the kitchen. That’s where Oreo Valentine Bark comes in! This delightful treat combines the classic flavors of Oreos with a sweet chocolate coating, making it a perfect gift for loved ones or a fun dessert for family gatherings. Plus, it’s incredibly easy to whip up, even on the busiest of days. Trust me, this recipe will impress everyone, and you’ll have a delicious treat ready in no time!
Why You’ll Love This Oreo Valentine Bark
This Oreo Valentine Bark is a game-changer for busy moms and professionals alike. It’s quick to make, taking just about 15 minutes of prep time, and requires no baking! The combination of creamy white chocolate and crunchy Oreos creates a delightful contrast that’s hard to resist. Plus, it’s customizable, so you can add your favorite sprinkles or candy melts. It’s a sweet treat that brings joy without the stress!
Ingredients for Oreo Valentine Bark
Gathering the right ingredients is the first step to creating your delicious Oreo Valentine Bark. Here’s what you’ll need:
- Oreo cookies: The star of the show! These classic cookies add a delightful crunch and rich flavor.
- White chocolate chips: They provide a creamy, sweet coating that perfectly complements the Oreos.
- Pink or red candy melts: These add a pop of color and a fun drizzle on top. You can find them at craft stores or online.
- Sprinkles (optional): A fun way to add some sparkle and festivity to your bark. Choose heart-shaped or colorful sprinkles for a Valentine’s touch!
Feel free to get creative! You can swap the white chocolate for dark or milk chocolate if you prefer. The exact quantities for each ingredient are listed at the bottom of the article, ready for printing. Happy baking!
How to Make Oreo Valentine Bark
Now that you have your ingredients ready, let’s dive into the fun part—making your Oreo Valentine Bark! Follow these simple steps, and you’ll have a delightful treat in no time.
Step 1: Prepare Your Baking Sheet
Start by lining a baking sheet with parchment paper. This makes cleanup a breeze and prevents the bark from sticking. Just cut a piece of parchment to fit the sheet, and you’re good to go!
Step 2: Crush the Oreo Cookies
Next, it’s time to crush those Oreos! You can place them in a zip-top bag and use a rolling pin to smash them into small pieces. Alternatively, you can use a food processor for a finer crumb. Just be careful not to turn them into dust—some chunks add a nice texture!
Step 3: Melt the White Chocolate Chips
Now, let’s melt the white chocolate chips. Place them in a microwave-safe bowl and heat in 30-second intervals, stirring in between. This helps prevent burning. When it’s smooth and creamy, you’re ready for the next step!
Step 4: Combine Ingredients
Pour the melted white chocolate over the crushed Oreos. Use a spatula to mix everything together until the Oreos are well coated. This is where the magic happens—every bite will be a delicious blend of chocolate and cookie!
Step 5: Spread the Mixture
Spread the Oreo mixture evenly onto your prepared baking sheet. Use the spatula to smooth it out into an even layer. Aim for about half an inch thick, so it sets nicely without being too thin.
Step 6: Drizzle with Candy Melts
Next, melt your pink or red candy melts in the microwave, just like you did with the white chocolate. Once melted, drizzle it over the Oreo mixture using a spoon or a piping bag for a fun design. This adds a lovely pop of color!
Step 7: Add Sprinkles
Now for the fun part—adding sprinkles! While the candy melts are still warm, sprinkle your favorite toppings on top. Heart-shaped sprinkles are perfect for Valentine’s Day, but feel free to get creative!
Step 8: Refrigerate and Set
Place the baking sheet in the refrigerator for about 30 minutes. This helps the bark set properly. You’ll know it’s ready when it’s firm to the touch. Patience is key here!
Step 9: Break and Serve
Once set, take the bark out of the fridge. Use your hands to break it into pieces. You can make them as big or small as you like. Serve them on a pretty plate, and watch everyone enjoy your delicious creation!
Tips for Success
- Make sure your baking sheet is completely lined with parchment for easy removal.
- Don’t overheat the chocolate; stir frequently to keep it smooth.
- Use a sturdy spatula for mixing to ensure all Oreos are coated.
- Experiment with different sprinkles or toppings for a unique look.
- Store any leftovers in an airtight container to keep them fresh.
Equipment Needed
- Baking sheet: A standard size works well, but you can use any flat surface.
- Parchment paper: If you don’t have this, aluminum foil can be a good substitute.
- Microwave-safe bowl: Any heatproof bowl will do.
- Spatula: A sturdy spoon can also help mix and spread.
- Zip-top bag or food processor: For crushing Oreos, either works perfectly!
Variations of Oreo Valentine Bark
- Dark Chocolate Delight: Swap the white chocolate for dark chocolate for a richer flavor that pairs beautifully with Oreos.
- Nutty Twist: Add chopped nuts like almonds or walnuts for an extra crunch and a nutty flavor.
- Minty Fresh: Use mint-flavored Oreos and drizzle with green candy melts for a refreshing twist.
- Gluten-Free Option: Choose gluten-free Oreos to make this treat suitable for those with gluten sensitivities.
- Fruit Infusion: Incorporate dried fruits like cranberries or cherries for a sweet and tangy contrast.
Serving Suggestions for Oreo Valentine Bark
- Pair with a glass of cold milk for a classic treat that everyone loves.
- Serve alongside fresh strawberries or raspberries for a fruity contrast.
- Present on a decorative platter with a sprinkle of extra sprinkles for a festive touch.
- Wrap pieces in cellophane bags tied with ribbon for a sweet gift.
- Enjoy with a cup of hot cocoa for a cozy dessert experience.
FAQs about Oreo Valentine Bark
Can I use different types of cookies for this recipe?
Absolutely! While Oreos are the classic choice, you can experiment with other cookies like chocolate chip or peanut butter cookies. Just keep in mind that the flavor will change, but it can be just as delicious!
How long does Oreo Valentine Bark last?
When stored in an airtight container, your Oreo Valentine Bark can last up to a week. Just make sure to keep it in a cool, dry place to maintain its freshness.
Can I make this treat ahead of time?
Yes! This is one of the best things about Oreo Valentine Bark. You can prepare it a day or two in advance, making it a perfect option for busy schedules. Just store it properly until you’re ready to serve.
What can I do if my chocolate seizes while melting?
If your chocolate seizes, don’t panic! You can try adding a small amount of vegetable oil or shortening to help smooth it out. Stir well until it’s back to a creamy consistency.
Is Oreo Valentine Bark suitable for kids to help make?
Definitely! This recipe is simple and fun, making it a great activity for kids. Just supervise them while melting the chocolate, and let them have fun with the sprinkles!
Final Thoughts
Making Oreo Valentine Bark is more than just whipping up a sweet treat; it’s about creating moments of joy and connection. Whether you’re surprising your loved ones or enjoying a cozy night in, this delightful recipe brings smiles all around. The simplicity of the process allows you to focus on what truly matters—spending time with family and friends. Plus, the vibrant colors and delicious flavors make it a feast for the eyes and the taste buds. So, roll up your sleeves, gather your ingredients, and let the love flow through your kitchen with this charming dessert!
Print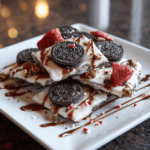
Oreo Valentine Bark: Create a Sweet Treat Today!
- Total Time: 50 minutes
- Yield: 12 servings 1x
- Diet: Vegetarian
Description
Oreo Valentine Bark is a delightful and easy-to-make treat perfect for Valentine’s Day, combining the classic flavors of Oreos with a sweet chocolate coating.
Ingredients
- 1 package of Oreo cookies
- 2 cups of white chocolate chips
- 1 cup of pink or red candy melts
- Sprinkles (optional)
Instructions
- Line a baking sheet with parchment paper.
- Crush the Oreo cookies into small pieces.
- Melt the white chocolate chips in a microwave-safe bowl, stirring every 30 seconds until smooth.
- Pour the melted white chocolate over the crushed Oreos and mix until well combined.
- Spread the mixture evenly onto the prepared baking sheet.
- Melt the pink or red candy melts and drizzle over the Oreo mixture.
- Add sprinkles on top if desired.
- Refrigerate for about 30 minutes or until set.
- Break into pieces and serve.
Notes
- Store in an airtight container for up to a week.
- Feel free to customize with different types of chocolate or toppings.
- Prep Time: 15 minutes
- Cook Time: 5 minutes
- Category: Dessert
- Method: No-bake
- Cuisine: American
Nutrition
- Serving Size: 1 piece
- Calories: 150
- Sugar: 10g
- Sodium: 50mg
- Fat: 7g
- Saturated Fat: 4g
- Unsaturated Fat: 2g
- Trans Fat: 0g
- Carbohydrates: 20g
- Fiber: 1g
- Protein: 1g
- Cholesterol: 5mg


