Introduction to Oven-Baked Cheesy Tacos
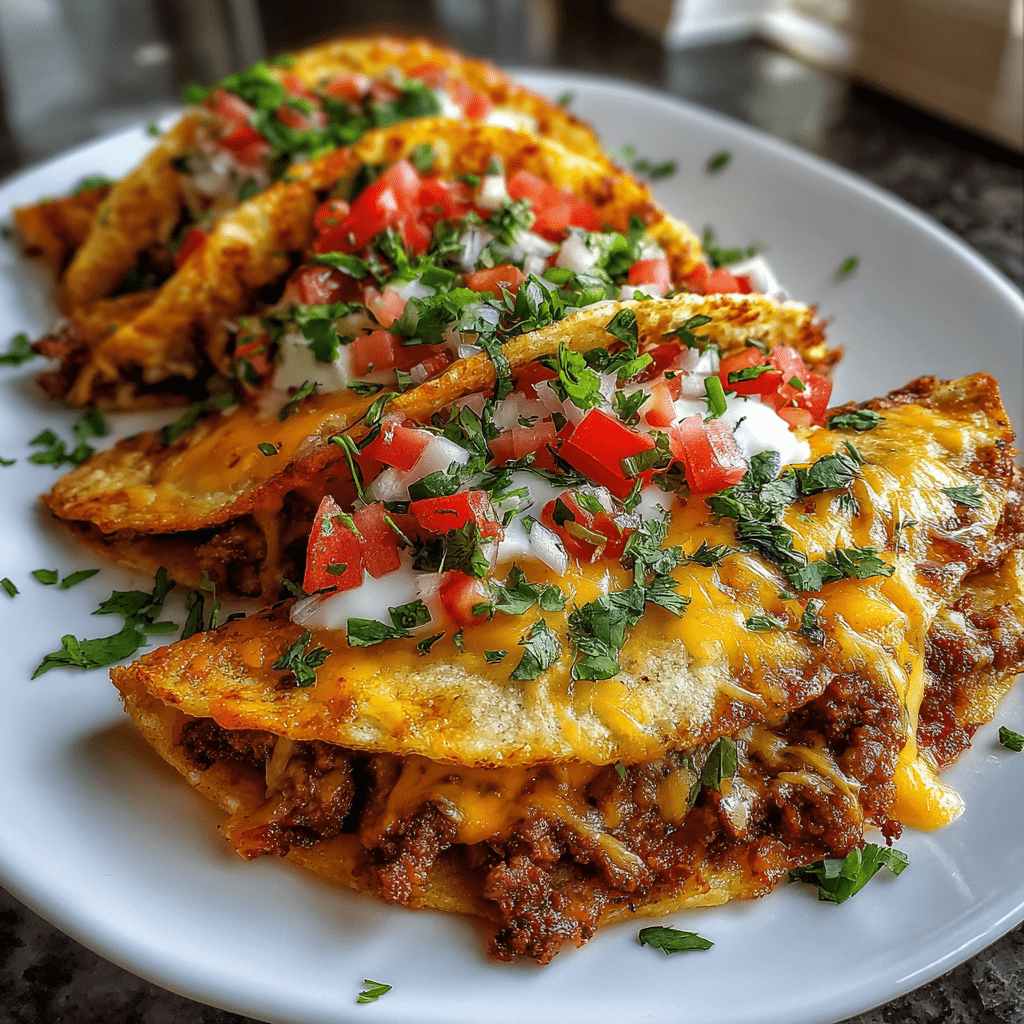
As a busy mom, I know how challenging it can be to whip up a meal that pleases everyone. That’s where my Oven-Baked Cheesy Tacos come in! This dish is not just a quick solution for a hectic weeknight; it’s a delightful way to bring the family together around the dinner table. Imagine crispy taco shells filled with seasoned beef and melted cheese, all baked to perfection. It’s comfort food that’s easy to make and even easier to love. Trust me, your loved ones will be asking for seconds!
Why You’ll Love This Oven-Baked Cheesy Tacos
These Oven-Baked Cheesy Tacos are a lifesaver for busy nights! They come together in just 30 minutes, making them perfect for those evenings when time is tight. The combination of crispy shells and gooey cheese creates a flavor explosion that everyone will adore. Plus, they’re customizable! You can easily swap ingredients to suit your family’s tastes. It’s a win-win for both busy moms and picky eaters!
Ingredients for Oven-Baked Cheesy Tacos
Gathering the right ingredients is the first step to creating these delicious Oven-Baked Cheesy Tacos. Here’s what you’ll need:
- Taco shells: The crispy base for your tacos. You can use traditional corn or flour shells, depending on your preference.
- Ground beef: This is the star protein of the dish. You can substitute it with ground turkey or even plant-based meat for a lighter option.
- Taco seasoning: A blend of spices that adds a burst of flavor. You can use store-bought or make your own with chili powder, cumin, and garlic powder.
- Shredded cheddar cheese: This melty goodness is essential for that cheesy topping. Feel free to mix in Monterey Jack or pepper jack for a twist.
- Shredded lettuce: Adds a fresh crunch. You can also use spinach or arugula for a different flavor profile.
- Diced tomatoes: These juicy bites bring a burst of freshness. Consider using cherry tomatoes for a sweeter taste.
- Sour cream: A creamy topping that balances the flavors. Greek yogurt is a great substitute if you want a healthier option.
- Chopped green onions: These add a mild onion flavor and a pop of color. You can also use diced red onions for a sharper taste.
For exact quantities, check the bottom of the article where you can find everything listed for easy printing. Feel free to get creative with your toppings and make these tacos your own!
How to Make Oven-Baked Cheesy Tacos
Making Oven-Baked Cheesy Tacos is a breeze! Follow these simple steps, and you’ll have a delicious meal ready in no time. Let’s dive in!
Step 1: Preheat the Oven
First things first, preheat your oven to 350°F (175°C). Preheating is crucial because it ensures even cooking. You want those taco shells to get crispy and the cheese to melt perfectly. Trust me, it makes a world of difference!
Step 2: Cook the Ground Beef
Next, grab a skillet and cook the ground beef over medium heat. Use a wooden spoon to break it apart as it cooks. You want it browned and crumbly, with no pink left. This usually takes about 5-7 minutes. Make sure to drain any excess fat for a leaner taco!
Step 3: Season the Beef
Now, it’s time to add flavor! Sprinkle the taco seasoning over the cooked beef. Stir it in well, allowing the spices to coat the meat evenly. This seasoning is what transforms plain beef into a fiesta of flavors. You can even add a splash of water to help the spices stick!
Step 4: Fill the Taco Shells
Take your taco shells and start filling them with the seasoned beef. Aim for an even amount in each shell, but don’t overfill! A little space at the top allows for cheese and toppings later. Plus, it keeps everything from spilling out when you bite into them!
Step 5: Add Cheese
Now comes the best part—cheese! Generously sprinkle shredded cheddar cheese over each filled taco. Cheese is the glue that holds everything together and adds that gooey goodness we all love. It will melt beautifully in the oven, creating a cheesy blanket over your tacos.
Step 6: Bake the Tacos
Place the filled taco shells on a baking sheet and pop them in the preheated oven. Bake for 10-15 minutes, or until the cheese is melted and bubbly. Keep an eye on them to avoid burning. You want that golden, crispy perfection!
Step 7: Add Fresh Toppings
Once out of the oven, it’s time to dress your tacos! Top them with shredded lettuce, diced tomatoes, a dollop of sour cream, and chopped green onions. Fresh toppings not only add flavor but also make your tacos look vibrant and inviting. Enjoy every bite!
Tips for Success
- Use a non-stick baking sheet to prevent sticking and make cleanup easier.
- Don’t skip preheating; it’s key for crispy shells and melted cheese.
- Mix in some black beans or corn for added texture and nutrition.
- Let the tacos cool for a minute before serving to avoid burns.
- Encourage family members to customize their toppings for a fun taco night!
Equipment Needed
- Skillet: A non-stick skillet works best for browning the beef. A regular skillet will do, too.
- Baking sheet: Use a rimmed baking sheet to catch any drips. A regular sheet works fine as well.
- Wooden spoon: Perfect for breaking up the meat while cooking. A spatula can also work.
- Measuring cups: Handy for portioning toppings. You can use your eyes if you prefer!
Variations of Oven-Baked Cheesy Tacos
- Chicken Tacos: Swap out ground beef for shredded rotisserie chicken for a quicker option.
- Vegetarian Tacos: Use black beans, lentils, or sautéed veggies like bell peppers and zucchini for a meatless delight.
- Spicy Tacos: Add diced jalapeños or a sprinkle of cayenne pepper to the beef for an extra kick.
- Cheesy Quesadilla Tacos: Use flour tortillas instead of taco shells and fold them like quesadillas for a twist.
- Gluten-Free Tacos: Opt for corn taco shells and ensure your seasoning is gluten-free for a safe option.
- Breakfast Tacos: Fill the shells with scrambled eggs, cheese, and your favorite breakfast meats for a morning treat.
Serving Suggestions for Oven-Baked Cheesy Tacos
- Side Salad: Pair your tacos with a fresh garden salad for a light and crunchy contrast.
- Mexican Rice: Serve with flavorful Mexican rice to soak up all the delicious taco juices.
- Refreshing Drinks: Enjoy with iced tea or a fruity margarita for a festive touch.
- Presentation: Serve on a colorful platter, garnished with lime wedges for a pop of color.
FAQs about Oven-Baked Cheesy Tacos
Can I make Oven-Baked Cheesy Tacos ahead of time?
Absolutely! You can prepare the taco filling and fill the shells in advance. Just cover them and store in the fridge. When you’re ready to eat, pop them in the oven for a quick reheat!
What can I use instead of ground beef?
If ground beef isn’t your thing, try ground turkey, shredded chicken, or even a mix of beans and veggies for a vegetarian option. The flavor will still be fantastic!
How do I store leftovers?
Store any leftover Oven-Baked Cheesy Tacos in an airtight container in the fridge. They’ll last for about 2-3 days. Reheat in the oven for the best results!
Can I freeze these tacos?
Yes! You can freeze the filled taco shells before baking. Just wrap them tightly in plastic wrap and foil. When you’re ready, bake them straight from the freezer, adding a few extra minutes to the cooking time.
What toppings do you recommend for these tacos?
Fresh toppings make all the difference! I love adding shredded lettuce, diced tomatoes, sour cream, and chopped green onions. You can also throw on some avocado or salsa for an extra kick!
Final Thoughts
Oven-Baked Cheesy Tacos are more than just a meal; they’re a celebration of family time and shared laughter. I cherish the moments when my loved ones gather around the table, eagerly digging into these cheesy delights. The joy of seeing everyone enjoy a dish I created is truly priceless. Plus, the ease of preparation means I can spend less time in the kitchen and more time making memories. So, whether it’s a busy weeknight or a fun family gathering, these tacos are sure to bring smiles and satisfaction to your home. Enjoy every cheesy bite!
Print
Oven-Baked Cheesy Tacos: A Delicious Family Favorite!
- Total Time: 30 minutes
- Yield: 4 servings 1x
- Diet: Gluten Free
Description
Oven-Baked Cheesy Tacos are a delicious and easy-to-make family favorite, combining crispy taco shells with a cheesy filling and baked to perfection.
Ingredients
- 12 taco shells
- 1 lb ground beef
- 1 packet taco seasoning
- 1 cup shredded cheddar cheese
- 1 cup shredded lettuce
- 1 cup diced tomatoes
- 1/2 cup sour cream
- 1/4 cup chopped green onions
Instructions
- Preheat the oven to 350°F (175°C).
- In a skillet, cook the ground beef over medium heat until browned.
- Add the taco seasoning to the beef and mix well.
- Fill each taco shell with the seasoned beef.
- Top each taco with shredded cheddar cheese.
- Place the filled taco shells on a baking sheet.
- Bake in the preheated oven for 10-15 minutes, or until the cheese is melted and bubbly.
- Remove from the oven and top with lettuce, tomatoes, sour cream, and green onions before serving.
Notes
- Feel free to customize the toppings based on your family’s preferences.
- For a spicier kick, add jalapeños or hot sauce.
- These tacos can be made ahead of time and reheated in the oven.
- Prep Time: 15 minutes
- Cook Time: 15 minutes
- Category: Main Dish
- Method: Baking
- Cuisine: Mexican
Nutrition
- Serving Size: 2 tacos
- Calories: 350
- Sugar: 2g
- Sodium: 600mg
- Fat: 20g
- Saturated Fat: 10g
- Unsaturated Fat: 8g
- Trans Fat: 0g
- Carbohydrates: 30g
- Fiber: 3g
- Protein: 20g
- Cholesterol: 60mg

