

Introduction to Peanut Butter Chocolate Swirl Scones
As a busy mom, I know how precious those few moments of peace can be, especially in the morning rush. That’s why I’m excited to share my recipe for Peanut Butter Chocolate Swirl Scones! These delightful treats are not just a quick solution for breakfast; they’re also a sweet way to impress your loved ones. Imagine the aroma of freshly baked scones wafting through your home, inviting everyone to the table. With just a handful of ingredients and a little love, you can whip up these irresistible scones that are perfect for any occasion!
Why You’ll Love This Peanut Butter Chocolate Swirl Scones
These Peanut Butter Chocolate Swirl Scones are a game-changer for busy mornings! They come together in just 35 minutes, making them a quick and easy option for breakfast or a snack. The combination of creamy peanut butter and rich chocolate creates a flavor explosion that will have your family begging for more. Plus, they’re perfect for meal prep, so you can enjoy them throughout the week!
Ingredients for Peanut Butter Chocolate Swirl Scones
Gathering the right ingredients is the first step to creating these delightful Peanut Butter Chocolate Swirl Scones. Here’s what you’ll need:
- All-purpose flour: This is the base of your scones, providing structure and a light texture.
- Sugar: A touch of sweetness to balance the flavors and enhance the scone’s golden crust.
- Baking powder: This leavening agent helps the scones rise, giving them that fluffy, tender bite.
- Salt: Just a pinch to elevate the flavors and bring out the richness of the peanut butter and chocolate.
- Unsalted butter: Cold and cubed, it adds richness and flakiness to the scones. Make sure it’s cold for the best texture!
- Milk: This moistens the dough, creating a tender crumb. You can use whole milk or any milk alternative you prefer.
- Creamy peanut butter: The star of the show! It adds a nutty flavor and a delightful swirl throughout the scone.
- Chocolate chips: Choose semi-sweet or dark chocolate for a rich contrast to the peanut butter. They melt beautifully and create pockets of gooey goodness.
For those looking to mix things up, consider using dark chocolate chips for a deeper flavor or whole wheat flour for a healthier twist. You can find all the exact measurements at the bottom of the article, ready for printing!
How to Make Peanut Butter Chocolate Swirl Scones
Now that you have your ingredients ready, let’s dive into the fun part—making these Peanut Butter Chocolate Swirl Scones! Follow these simple steps, and you’ll have a batch of warm, delicious scones in no time.
Step 1: Preheat the Oven
First things first, preheat your oven to 400°F (200°C). Preheating is crucial because it ensures that your scones bake evenly and rise beautifully. A hot oven creates that perfect golden crust while keeping the inside tender and fluffy.
Step 2: Mix Dry Ingredients
In a large bowl, combine the all-purpose flour, sugar, baking powder, and salt. Whisk them together until they’re well blended. This step is essential for distributing the baking powder evenly, which helps your scones rise. A good mix here sets the foundation for a light and airy texture!
Step 3: Incorporate Butter
Next, add the cold, cubed butter to the dry mixture. Using a pastry cutter or your fingers, mix until the mixture resembles coarse crumbs. You want to see small bits of butter throughout. This is what creates those flaky layers in your scones. Remember, the colder the butter, the better!
Step 4: Add Milk
Now, pour in the milk and stir gently until just combined. Be careful not to overmix! Overmixing can lead to tough scones, and we want them to be light and tender. Just mix until you don’t see any dry flour—it’s okay if the dough is a bit shaggy.
Step 5: Fold in Peanut Butter and Chocolate Chips
Here comes the fun part! Gently fold in the creamy peanut butter and chocolate chips. Use a spatula to incorporate them without overworking the dough. Folding helps maintain that light texture while ensuring every bite is filled with peanut butter and chocolate goodness.
Step 6: Knead the Dough
Turn the dough out onto a floured surface. Knead it gently just a few times until it comes together. Remember, the key is to be gentle! Too much kneading can make your scones tough, and we want them to be soft and tender.
Step 7: Shape and Cut
Shape the dough into a circle about 1-inch thick. Then, using a sharp knife or a pizza cutter, cut it into wedges. You can make 8 wedges for a classic scone shape. Place them on a baking sheet lined with parchment paper, leaving some space between each piece.
Step 8: Bake
Pop the scones into your preheated oven and bake for 15-20 minutes. Keep an eye on them! They’re done when they’re golden brown on top and a toothpick inserted in the center comes out clean. The smell will be heavenly, trust me!
Step 9: Cool and Serve
Once baked, let the scones cool on the baking sheet for a few minutes before transferring them to a wire rack. This cooling time is important; it allows the flavors to settle and enhances the overall taste. Serve them warm for the best experience!
Tips for Success
- Use cold ingredients for a flaky texture—especially the butter and milk.
- Don’t overmix the dough; it should be slightly shaggy for tender scones.
- Experiment with different chocolate types for unique flavors.
- For a golden finish, brush the tops with a little milk before baking.
- Store leftover scones in an airtight container to keep them fresh.
Equipment Needed
- Mixing bowl: A large bowl for combining ingredients. A smaller bowl can work too!
- Pastry cutter: Ideal for cutting in butter. You can also use your fingers or a fork.
- Baking sheet: A standard sheet works well. Line it with parchment paper for easy cleanup.
- Wire rack: Perfect for cooling scones. A plate can substitute in a pinch.
Variations
- Nutty Twist: Add chopped nuts like walnuts or pecans for an extra crunch and flavor.
- Fruit Infusion: Incorporate dried fruits such as cranberries or raisins for a sweet and chewy surprise.
- Gluten-Free Option: Substitute all-purpose flour with a gluten-free blend for a delicious alternative.
- Vegan Version: Use plant-based butter and a non-dairy milk to make these scones vegan-friendly.
- Spiced Delight: Add a pinch of cinnamon or nutmeg to the dry ingredients for a warm, cozy flavor.
Serving Suggestions
- Pair your scones with a hot cup of coffee or tea for a delightful breakfast experience.
- Serve with a dollop of whipped cream or a drizzle of honey for added sweetness.
- For a brunch spread, arrange scones on a beautiful platter with fresh fruit.
- Consider adding a side of yogurt for a creamy contrast to the scones.
FAQs about Peanut Butter Chocolate Swirl Scones
Can I make these scones ahead of time?
Absolutely! You can prepare the dough in advance and refrigerate it for up to 24 hours. Just shape the scones and store them in the fridge. When you’re ready to bake, pop them in the oven straight from the fridge. They’ll be just as delicious!
What can I substitute for peanut butter?
If you have a nut allergy or simply want to switch things up, try using sunflower seed butter or almond butter. Both options will give you a unique flavor while still keeping that creamy texture.
How do I store leftover scones?
To keep your Peanut Butter Chocolate Swirl Scones fresh, store them in an airtight container at room temperature for up to three days. If you want to keep them longer, freeze them in a freezer-safe bag for up to a month. Just reheat them in the oven for a few minutes before serving!
Can I add more chocolate chips?
Of course! If you’re a chocolate lover, feel free to add more chocolate chips. Just remember that too much chocolate can make the scones a bit too rich, so balance is key!
What’s the best way to enjoy these scones?
These scones are best enjoyed warm, straight from the oven. Pair them with a cup of coffee or tea, and you’ll have a delightful treat that’s perfect for breakfast or an afternoon snack!
Final Thoughts
Making Peanut Butter Chocolate Swirl Scones is more than just baking; it’s about creating moments of joy in your busy life. The delightful aroma that fills your kitchen, the smiles on your family’s faces, and the satisfaction of serving something homemade are truly priceless. These scones are perfect for breakfast, snacks, or even a sweet treat during a hectic day. With their rich flavors and tender texture, they’re bound to become a family favorite. So, roll up your sleeves, embrace the mess, and enjoy the delicious journey of baking these irresistible scones!
Print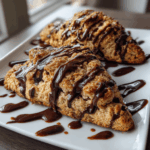
Peanut Butter Chocolate Swirl Scones: Irresistibly Delicious!
- Total Time: 35 minutes
- Yield: 8 scones 1x
- Diet: Vegetarian
Description
Delicious scones swirled with peanut butter and chocolate, perfect for breakfast or a snack.
Ingredients
- 2 cups all-purpose flour
- 1/4 cup sugar
- 1 tablespoon baking powder
- 1/2 teaspoon salt
- 1/2 cup unsalted butter, cold and cubed
- 1/2 cup milk
- 1/2 cup creamy peanut butter
- 1/2 cup chocolate chips
Instructions
- Preheat the oven to 400°F (200°C).
- In a large bowl, mix flour, sugar, baking powder, and salt.
- Add cold butter and mix until the mixture resembles coarse crumbs.
- Stir in milk until just combined.
- Fold in peanut butter and chocolate chips.
- Turn the dough onto a floured surface and knead gently.
- Shape the dough into a circle and cut into wedges.
- Place on a baking sheet and bake for 15-20 minutes until golden brown.
- Let cool slightly before serving.
Notes
- For a richer flavor, use dark chocolate chips.
- Store leftovers in an airtight container for up to 3 days.
- These scones are best served warm.
- Prep Time: 15 minutes
- Cook Time: 20 minutes
- Category: Baked Goods
- Method: Baking
- Cuisine: American
Nutrition
- Serving Size: 1 scone
- Calories: 250
- Sugar: 10g
- Sodium: 200mg
- Fat: 12g
- Saturated Fat: 6g
- Unsaturated Fat: 4g
- Trans Fat: 0g
- Carbohydrates: 30g
- Fiber: 2g
- Protein: 5g
- Cholesterol: 30mg


