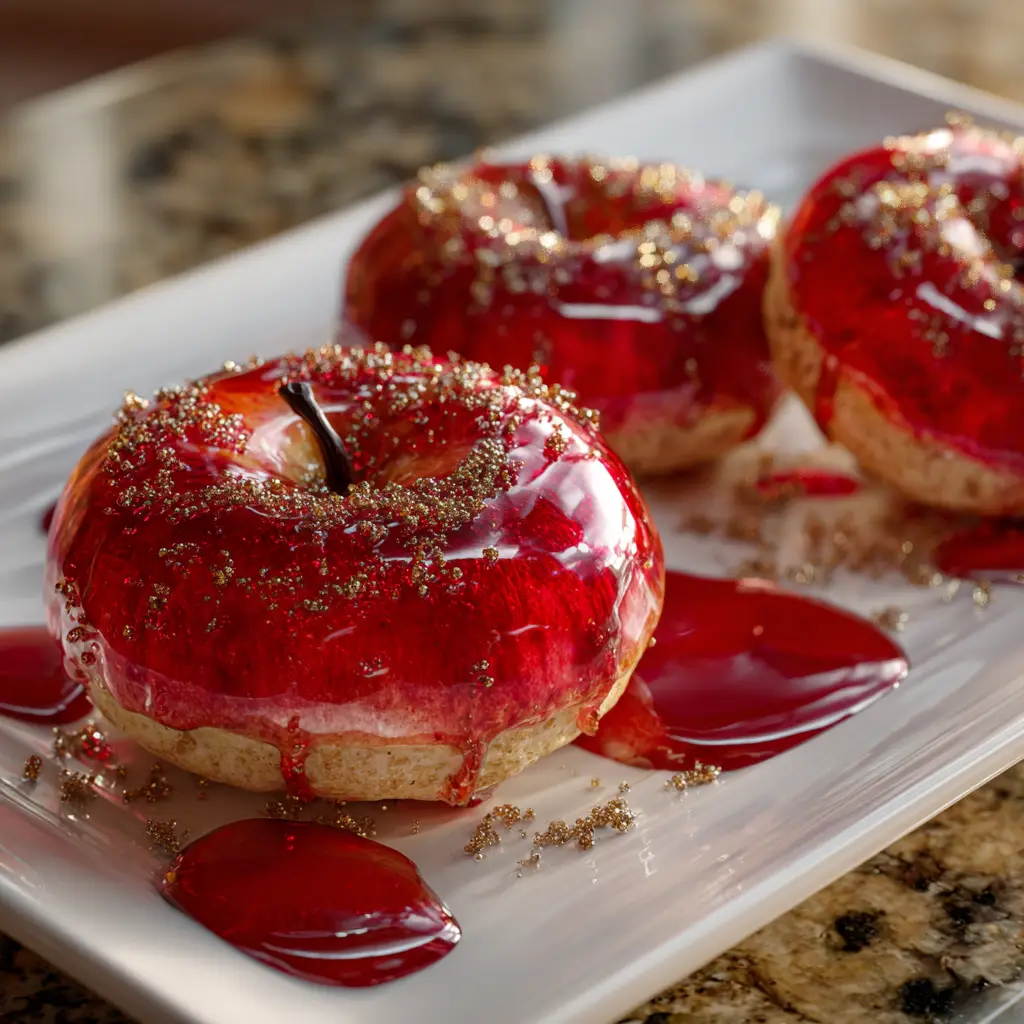
Introduction to Poison Apple Candy Cookies
As the leaves turn and the air gets crisp, I find myself craving something sweet and a little spooky. That’s where my Poison Apple Candy Cookies come in! These delightful treats are not just a feast for the eyes; they’re a quick solution for busy days filled with Halloween festivities. Whether you’re looking to impress your kids or bring a smile to your friends, these cookies are sure to do the trick. With their vibrant colors and delicious flavors, they’re perfect for any gathering, making them a must-try this season!
Why You’ll Love This Poison Apple Candy Cookies
These Poison Apple Candy Cookies are a delightful blend of ease and flavor. They come together quickly, making them perfect for busy moms like me who juggle a million things. Plus, the taste is simply irresistible! With a soft, chewy texture and a sweet candy coating, they’ll have everyone asking for seconds. Trust me, these cookies are not just treats; they’re a fun way to celebrate the season!
Ingredients for Poison Apple Candy Cookies
Gathering the right ingredients is the first step to creating these enchanting Poison Apple Candy Cookies. Here’s what you’ll need:
- Unsalted butter: This adds richness and helps create a soft texture.
- Granulated sugar: For sweetness and a lovely crisp edge.
- Brown sugar: It brings moisture and a hint of caramel flavor.
- Large eggs: They bind the ingredients together and add structure.
- Vanilla extract: A splash of this elevates the flavor profile.
- All-purpose flour: The base of our cookie dough, providing structure.
- Baking soda: This leavening agent helps the cookies rise and become fluffy.
- Salt: Just a pinch enhances all the flavors beautifully.
- Red candy melts: These give the cookies their signature poison apple look.
- Green candy melts: Perfect for creating the stem effect on top.
- Black sprinkles: A spooky touch that adds a fun crunch.
Feel free to get creative! You can swap out the candy melts for different colors to match your theme or even use chocolate for a richer flavor. For those with dietary restrictions, consider gluten-free flour or vegan butter as alternatives. The exact quantities for each ingredient are listed at the bottom of the article for your convenience.
How to Make Poison Apple Candy Cookies
Now that we have our ingredients ready, let’s dive into the fun part—making these Poison Apple Candy Cookies! Follow these simple steps, and you’ll have a batch of spooky treats in no time.
Step 1: Preheat the Oven
First things first, preheat your oven to 350°F (175°C). Preheating is crucial because it ensures even baking. If you skip this step, your cookies might end up unevenly cooked. Trust me, no one wants a gooey center when they’re expecting a soft, chewy cookie!
Step 2: Cream the Butter and Sugars
In a large bowl, cream together the softened unsalted butter, granulated sugar, and brown sugar until smooth. This process is key to achieving that perfect cookie texture. The air you incorporate while creaming helps the cookies rise, giving them a light and fluffy feel. It’s like giving your cookies a little workout!
Step 3: Add Eggs and Vanilla
Next, add the large eggs and vanilla extract to the mixture. Eggs are the glue that holds everything together, while vanilla adds a warm, inviting flavor. Mix until everything is well combined. You’ll notice the batter becoming richer and more aromatic—this is a good sign!
Step 4: Combine Dry Ingredients
In a separate bowl, whisk together the all-purpose flour, baking soda, and salt. This step is essential because it ensures that the baking soda is evenly distributed throughout the flour. If you skip this, you might end up with pockets of baking soda in your cookies, which is not a pleasant surprise!
Step 5: Form the Dough
Gradually add the dry ingredients to the wet mixture, mixing until a dough forms. Once combined, roll the dough into small balls, about the size of a tablespoon. Place them on a baking sheet lined with parchment paper. Make sure to leave some space between each ball, as they will spread while baking. It’s like giving them room to breathe!
Step 6: Bake the Cookies
Now it’s time to bake! Pop the baking sheet into your preheated oven and let the cookies bake for 10-12 minutes. Keep an eye on them; you want the edges to be lightly golden. If you see that, they’re ready to come out. Remember, they’ll continue to cook a bit after you take them out, so don’t overbake!
Step 7: Cool the Cookies
Once baked, let the cookies cool completely on a wire rack. This step is crucial before decorating. If you try to dip them in candy melts while they’re warm, you’ll end up with a melty mess. Patience is key here, my friend!
Step 8: Decorate with Candy Melts
While the cookies cool, melt the red candy melts in a microwave-safe bowl. Heat them in short bursts, stirring in between, until smooth. Once cooled, dip the tops of the cookies into the melted candy. This gives them that signature poison apple look. It’s like giving your cookies a shiny red coat!
Step 9: Add Finishing Touches
Finally, drizzle the green candy melts over the red coating to create a stem effect. Then, sprinkle black sprinkles on top for that spooky finish. These little details make all the difference, turning your cookies into a festive masterpiece. Just like that, your Poison Apple Candy Cookies are ready to impress!
Tips for Success
- Make sure your butter is softened for easy creaming.
- Use a cookie scoop for uniform cookie sizes.
- Don’t skip the cooling step; it prevents melting during decoration.
- Experiment with different candy melt colors for fun variations.
- Store cookies in an airtight container to keep them fresh longer.
Equipment Needed
- Baking sheet: A standard one works, but a silicone mat can prevent sticking.
- Parchment paper: Great for easy cleanup and preventing cookies from sticking.
- Mixing bowls: Use any size, but a large one is best for creaming.
- Wire rack: Essential for cooling cookies evenly.
- Microwave-safe bowl: Perfect for melting candy melts.
Variations of Poison Apple Candy Cookies
- Chocolate Chip Poison Apples: Add semi-sweet chocolate chips to the dough for a delicious twist.
- Gluten-Free Option: Substitute all-purpose flour with a gluten-free blend for a safe treat.
- Vegan Version: Use vegan butter and flax eggs instead of regular eggs for a plant-based delight.
- Spiced Cookies: Add a teaspoon of cinnamon or nutmeg to the dough for a warm, cozy flavor.
- Nutty Addition: Incorporate chopped nuts like walnuts or pecans for added crunch and flavor.
Serving Suggestions for Poison Apple Candy Cookies
- Pair these cookies with a warm cup of apple cider for a cozy fall treat.
- Serve alongside a scoop of vanilla ice cream for a delightful dessert experience.
- Present them on a spooky-themed platter for Halloween parties.
- Wrap them in clear bags with festive ribbons for a fun gift idea.
FAQs about Poison Apple Candy Cookies
As you embark on your baking adventure with these Poison Apple Candy Cookies, you might have a few questions. Here are some common queries I’ve encountered, along with helpful answers to guide you along the way!
Can I use different colors of candy melts?
Absolutely! Feel free to experiment with various colors of candy melts. This is a fun way to customize your cookies for different occasions, like using green for a witchy theme or orange for a pumpkin vibe!
How should I store the cookies?
To keep your Poison Apple Candy Cookies fresh, store them in an airtight container at room temperature. They’ll stay delicious for about a week, but I doubt they’ll last that long!
Can I freeze these cookies?
Yes, you can freeze the cookies! Just make sure they are completely cooled and decorated. Place them in a single layer in a freezer-safe container. They can last up to three months in the freezer.
What if I don’t have a wire rack?
No worries! If you don’t have a wire rack, you can cool the cookies on the baking sheet for a few minutes before transferring them to a plate. Just be careful not to let them sit too long, or they might stick!
Can I make the dough ahead of time?
Definitely! You can prepare the dough in advance and refrigerate it for up to 48 hours. Just let it sit at room temperature for a bit before rolling and baking. This is a great time-saver for busy days!
Final Thoughts
Creating these Poison Apple Candy Cookies is more than just baking; it’s about making memories. The joy of watching my kids’ faces light up as they see these spooky treats is priceless. Each bite is a delightful mix of sweetness and fun, perfect for any Halloween gathering or festive occasion. Plus, the simplicity of the recipe means I can whip them up even on the busiest days. So, gather your loved ones, roll up your sleeves, and dive into this delicious adventure. Trust me, these cookies will become a cherished tradition in your home!
Print
Poison Apple Candy Cookies: A Spooky Sweet Treat!
- Total Time: 32 minutes
- Yield: 24 cookies 1x
- Diet: Vegetarian
Description
Poison Apple Candy Cookies are a fun and spooky treat perfect for Halloween or any festive occasion. These cookies are decorated to resemble poison apples, making them both delicious and visually appealing.
Ingredients
- 1 cup unsalted butter, softened
- 1 cup granulated sugar
- 1 cup brown sugar, packed
- 2 large eggs
- 1 teaspoon vanilla extract
- 3 cups all-purpose flour
- 1 teaspoon baking soda
- 1/2 teaspoon salt
- 1 cup red candy melts
- 1/2 cup green candy melts
- 1/4 cup black sprinkles
Instructions
- Preheat your oven to 350°F (175°C).
- In a large bowl, cream together the softened butter, granulated sugar, and brown sugar until smooth.
- Add the eggs and vanilla extract, mixing until well combined.
- In a separate bowl, whisk together the flour, baking soda, and salt.
- Gradually add the dry ingredients to the wet ingredients, mixing until a dough forms.
- Roll the dough into small balls and place them on a baking sheet lined with parchment paper.
- Bake for 10-12 minutes or until the edges are lightly golden.
- Let the cookies cool completely on a wire rack.
- Melt the red candy melts in a microwave-safe bowl, then dip the tops of the cooled cookies into the melted candy.
- Drizzle the green candy melts over the red candy coating to create a stem effect.
- Sprinkle black sprinkles on top for a spooky finish.
Notes
- Make sure to let the cookies cool completely before dipping them in candy melts.
- You can use different colors of candy melts for a unique twist.
- Store cookies in an airtight container to keep them fresh.
- Prep Time: 20 minutes
- Cook Time: 12 minutes
- Category: Dessert
- Method: Baking
- Cuisine: American
Nutrition
- Serving Size: 1 cookie
- Calories: 150
- Sugar: 10g
- Sodium: 50mg
- Fat: 7g
- Saturated Fat: 4g
- Unsaturated Fat: 2g
- Trans Fat: 0g
- Carbohydrates: 20g
- Fiber: 1g
- Protein: 2g
- Cholesterol: 30mg