Introduction to Pumpkin Patch Dirt Cups
As the leaves turn and the air gets crisp, I find myself craving cozy treats that bring a smile to my family’s faces. That’s where these delightful Pumpkin Patch Dirt Cups come in! They’re not just a dessert; they’re a fun, interactive experience for everyone. Perfect for busy days, these no-bake cups are quick to whip up and can be made ahead of time. Whether you’re hosting a fall gathering or just want to surprise your loved ones, these cups are sure to impress. Let’s dive into this festive treat that captures the spirit of autumn!
Why You’ll Love This Pumpkin Patch Dirt Cups
These Pumpkin Patch Dirt Cups are a breeze to make, which is a lifesaver for busy moms like me! With just a few simple ingredients, you can create a dessert that’s not only delicious but also visually appealing. The combination of creamy chocolate pudding and crunchy cookies is a crowd-pleaser. Plus, the kids will love the fun decorations, making it a perfect treat for family gatherings or Halloween parties!
Ingredients for Pumpkin Patch Dirt Cups
Gathering the right ingredients is half the fun! Here’s what you’ll need to create these delightful Pumpkin Patch Dirt Cups:
- Chocolate pudding mix: This is the star of the show, providing a rich and creamy base that everyone loves.
- Milk: Essential for mixing with the pudding to achieve that smooth texture. You can use any type of milk you prefer, including almond or oat milk for a dairy-free option.
- Crushed chocolate sandwich cookies: These add a delightful crunch and mimic the look of dirt. Feel free to use gluten-free cookies if needed!
- Whipped topping: This lightens up the pudding and adds a fluffy texture. You can opt for a dairy-free whipped topping if you’re looking for alternatives.
- Gummy worms: These are the fun, whimsical touch that kids adore! They add a playful element to your dessert.
- Mini pumpkins: Perfect for decoration, these little guys bring the pumpkin patch theme to life. You can find them at craft stores or even make your own from fondant!
For exact quantities, check the bottom of the article where you can find everything listed for easy printing. Now, let’s get ready to create some delicious memories!
How to Make Pumpkin Patch Dirt Cups
Now that we have our ingredients ready, let’s get to the fun part—making these delightful Pumpkin Patch Dirt Cups! Follow these simple steps, and you’ll have a festive treat that’s sure to impress.
Step 1: Prepare the Pudding Mixture
Start by grabbing a mixing bowl. Whisk together the chocolate pudding mix and milk until it’s smooth and creamy. I love using a whisk for this; it really helps to break up any lumps. You want a velvety texture that will be the base of your delicious cups!
Step 2: Fold in the Whipped Topping
Next, gently fold in the whipped topping. This step is crucial! Use a spatula to combine the two mixtures without deflating the whipped topping. You want to keep that light, airy texture. It’s like adding a cloud to your chocolate pudding—so dreamy!
Step 3: Layer the Ingredients
Now, it’s time to layer! Grab your clear cups and start with a generous scoop of the chocolate pudding mixture. Then, sprinkle a layer of crushed chocolate sandwich cookies on top. Repeat this process until your cups are filled, leaving some space at the top for the fun decorations. The layers create a beautiful visual that’s as tasty as it is pretty!
Step 4: Create the Dirt Effect
To give your cups that authentic “dirt” look, top them with more crushed cookies. This is where the magic happens! The dark cookie crumbs mimic soil, making your dessert look like a mini pumpkin patch. It’s a simple touch that adds so much character!
Step 5: Add Fun Decorations
Now for the best part—decorating! Place gummy worms on top, letting them wiggle out of the “dirt.” Then, add mini pumpkins for that festive flair. You can arrange them however you like; it’s all about having fun and being creative!
Step 6: Chill Before Serving
Finally, pop your cups in the refrigerator for at least 30 minutes. Chilling helps the flavors meld together and gives the pudding a chance to set. Plus, it’s a great way to keep them cool and refreshing for your guests!
Tips for Success
- Make sure to whisk the pudding mix and milk thoroughly to avoid lumps.
- Use clear cups to showcase the beautiful layers of your Pumpkin Patch Dirt Cups.
- For a fun twist, try adding crushed candy bars or sprinkles between the layers.
- Chill the cups longer if you have time; it enhances the flavors even more.
- Get the kids involved in decorating; it’s a great way to create memories!
Equipment Needed
- Mixing bowl: A medium-sized bowl works best, but any bowl will do.
- Whisk: A hand whisk is ideal, but a fork can work in a pinch.
- Spatula: Use a rubber spatula for folding in the whipped topping.
- Clear cups: Any clear cups will showcase your layers beautifully; mason jars are a fun alternative!
- Refrigerator: Essential for chilling your cups before serving.
Variations
- Chocolate Mint: Add a few drops of mint extract to the pudding mixture for a refreshing twist.
- Peanut Butter Delight: Swirl in some creamy peanut butter with the whipped topping for a nutty flavor.
- Healthier Option: Use sugar-free pudding mix and light whipped topping to cut down on calories.
- Fruit Layer: Incorporate a layer of diced bananas or strawberries for a fruity surprise.
- Gluten-Free: Substitute regular cookies with gluten-free chocolate sandwich cookies to accommodate dietary needs.
Serving Suggestions for Pumpkin Patch Dirt Cups
- Pair with warm apple cider for a cozy fall vibe.
- Serve alongside a platter of fresh fruit for a balanced treat.
- For a festive touch, use themed napkins and plates.
- Consider adding a scoop of vanilla ice cream on the side for extra indulgence.
- Display on a rustic wooden board for a charming presentation.
FAQs about Pumpkin Patch Dirt Cups
As I’ve shared this delightful recipe, I’ve noticed some common questions pop up. Here are a few FAQs about Pumpkin Patch Dirt Cups that might help you out!
Can I make Pumpkin Patch Dirt Cups in advance?
Absolutely! These cups can be made a day ahead. Just keep them covered in the refrigerator until you’re ready to serve. This makes them a perfect option for busy days or last-minute gatherings!
What can I use instead of chocolate sandwich cookies?
If you’re looking for alternatives, crushed graham crackers or even vanilla wafers can work well. They’ll give a different flavor but still create that fun “dirt” effect!
How can I make these cups healthier?
For a healthier twist, consider using sugar-free pudding mix and light whipped topping. You can also add fresh fruit layers for added nutrition and flavor!
Can I customize the decorations?
Definitely! Feel free to get creative with your decorations. Use candy corn, chocolate spiders, or even edible glitter to make your Pumpkin Patch Dirt Cups uniquely yours!
Are these cups suitable for kids?
Yes! Kids love the fun and interactive nature of these cups. They can help with layering and decorating, making it a great family activity!
Final Thoughts
Creating these Pumpkin Patch Dirt Cups is more than just whipping up a dessert; it’s about making memories with your loved ones. The joy on my kids’ faces as they dig into their cups is priceless. This recipe brings a touch of whimsy to our fall gatherings, sparking laughter and conversation. Plus, it’s a fantastic way to involve the whole family in the kitchen. So, whether you’re celebrating Halloween or simply enjoying the season, these delightful cups are sure to bring warmth and happiness to your table. Let’s embrace the spirit of fall together, one delicious bite at a time!
Print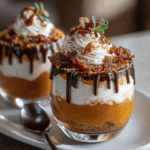
Pumpkin Patch Dirt Cups: A Fun Fall Treat Recipe!
- Total Time: 30 minutes
- Yield: 4 servings 1x
- Diet: Vegetarian
Description
Pumpkin Patch Dirt Cups are a fun and festive dessert perfect for fall gatherings, featuring layers of chocolate pudding, crushed cookies, and pumpkin-themed decorations.
Ingredients
- 1 package chocolate pudding mix
- 2 cups milk
- 1 package crushed chocolate sandwich cookies
- 1 cup whipped topping
- Gummy worms (for decoration)
- Mini pumpkins (for decoration)
Instructions
- In a mixing bowl, whisk together the chocolate pudding mix and milk until smooth.
- Fold in the whipped topping until well combined.
- In clear cups, layer the chocolate pudding mixture and crushed cookies.
- Top with additional crushed cookies to resemble dirt.
- Decorate with gummy worms and mini pumpkins on top.
- Chill in the refrigerator for at least 30 minutes before serving.
Notes
- For a healthier option, consider using sugar-free pudding mix.
- These cups can be made a day in advance for convenience.
- Feel free to customize decorations based on your preferences.
- Prep Time: 15 minutes
- Cook Time: 0 minutes
- Category: Dessert
- Method: No-bake
- Cuisine: American
Nutrition
- Serving Size: 1 cup
- Calories: 250
- Sugar: 15g
- Sodium: 200mg
- Fat: 10g
- Saturated Fat: 5g
- Unsaturated Fat: 3g
- Trans Fat: 0g
- Carbohydrates: 35g
- Fiber: 2g
- Protein: 3g
- Cholesterol: 15mg