

Introduction to Russian Piroshki (Meat Hand Pies)
Welcome to the delightful world of Russian piroshki! These savory meat hand pies are not just a treat for the taste buds; they’re a warm hug on a plate. As a busy mom, I know how precious time can be, and this recipe is a quick solution for those hectic days when you want to impress your loved ones without spending hours in the kitchen. With their golden crust and flavorful filling, Russian piroshki are perfect for snacks, meals, or even a cozy gathering. Let’s dive into this culinary adventure together!
Why You’ll Love This Russian Piroshki (Meat Hand Pies)
These Russian piroshki are a game-changer for busy lives! They’re easy to make, and the dough comes together quickly, making them perfect for a last-minute meal. The taste? Absolutely irresistible! With a flaky crust and savory filling, they’ll have your family asking for seconds. Plus, they’re versatile—great for lunchboxes or as a snack. Trust me, once you try them, they’ll become a staple in your kitchen!
Ingredients for Russian Piroshki (Meat Hand Pies)
Gathering the right ingredients is the first step to creating these delightful Russian piroshki. Here’s what you’ll need:
- All-purpose flour: This is the backbone of your dough, giving it structure and a lovely texture.
- Milk: Warm milk helps activate the yeast, making the dough soft and fluffy.
- Butter: Melted butter adds richness and flavor to the dough, making it irresistible.
- Salt: A pinch of salt enhances the overall flavor of the piroshki.
- Sugar: Just a touch of sugar helps activate the yeast and balances the savory filling.
- Active dry yeast: This is what makes your dough rise, creating that light, airy texture.
- Ground beef: The star of the filling! You can also use ground turkey or chicken for a lighter option.
- Onion: Finely chopped onion adds sweetness and depth to the meat filling.
- Egg: An egg wash gives the piroshki a beautiful golden color when baked.
Feel free to get creative! You can substitute the meat with vegetables for a vegetarian twist or even add herbs and spices to the filling for extra flavor. If you’re looking for exact measurements, don’t worry! They’re available at the bottom of the article for easy printing.
How to Make Russian Piroshki (Meat Hand Pies)
Now that we have our ingredients ready, let’s roll up our sleeves and dive into making these delicious Russian piroshki! Follow these simple steps, and you’ll be enjoying warm, flaky hand pies in no time.
Step 1: Prepare the Yeast Mixture
Start by combining warm milk, sugar, and active dry yeast in a bowl. The milk should feel warm to the touch, but not hot—think of a cozy bath for the yeast! Let this mixture sit for about 5-10 minutes until it becomes frothy. This step is crucial; it’s like waking up the yeast and getting it ready to work its magic in your dough.
Step 2: Make the Dough
In a large mixing bowl, combine the all-purpose flour and salt. Then, add the melted butter and the frothy yeast mixture. Mix everything together until it forms a rough dough. Now, it’s time to knead! Turn the dough out onto a floured surface and knead it for about 5-7 minutes until it’s smooth and elastic. This is where the fun begins—feel free to channel your inner baker!
Step 3: Let the Dough Rise
Once your dough is smooth, place it in a lightly greased bowl and cover it with a clean kitchen towel. Find a warm spot in your kitchen—maybe near the oven or on a sunny windowsill. Let the dough rise for about 1 hour, or until it has doubled in size. This is the perfect time to sip a cup of tea and imagine how delicious your piroshki will be!
Step 4: Cook the Filling
While the dough is rising, let’s prepare the filling. In a skillet over medium heat, cook the finely chopped onion until it becomes translucent. This usually takes about 3-4 minutes. Then, add the ground beef to the skillet, breaking it apart with a spatula. Cook until the meat is browned and fully cooked through. Season with salt and pepper to taste. The aroma will fill your kitchen, making it hard to resist sneaking a taste!
Step 5: Shape the Piroshki
Once the dough has risen, punch it down gently to release the air. Divide the dough into small balls, about the size of a golf ball. Roll each ball out into a circle on a floured surface. Place a spoonful of the meat filling in the center of each circle. Fold the dough over the filling, pinching the edges to seal them tightly. Think of it as giving each piroshki a little hug!
Step 6: Bake the Piroshki
Preheat your oven to 375°F (190°C). Line a baking sheet with parchment paper and place the shaped piroshki on it, leaving some space between each one. Brush the tops with a beaten egg for that beautiful golden color. Bake for 20-25 minutes, or until they’re golden brown and irresistible. The moment you pull them out of the oven, you’ll be greeted with a warm, savory aroma that will make your heart sing!
Tips for Success
- Make sure your milk is warm, not hot, to activate the yeast properly.
- Don’t skip the rising time; it’s essential for fluffy piroshki.
- Use a light touch when sealing the edges to prevent any filling from escaping.
- Experiment with different fillings like mushrooms or cheese for variety.
- Brush the piroshki with egg wash for a beautiful, shiny finish.
Equipment Needed
- Mixing bowl: A large bowl for combining ingredients. A sturdy pot works too!
- Skillet: For cooking the filling. A non-stick pan is ideal.
- Rolling pin: To roll out the dough. A wine bottle can be a fun substitute!
- Baking sheet: For baking the piroshki. Any flat oven-safe dish will do.
- Parchment paper: To prevent sticking. Aluminum foil can work in a pinch.
Variations of Russian Piroshki (Meat Hand Pies)
- Vegetarian Piroshki: Swap the ground beef for a mix of sautéed mushrooms, spinach, and cheese for a delicious meat-free option.
- Spicy Piroshki: Add some diced jalapeños or crushed red pepper flakes to the meat filling for a kick of heat.
- Herbed Piroshki: Incorporate fresh herbs like dill or parsley into the meat mixture for an aromatic twist.
- Cheesy Piroshki: Mix in shredded cheese, such as cheddar or mozzarella, with the meat filling for a gooey surprise.
- Sweet Piroshki: For a dessert version, fill the dough with sweetened fruit, like apples or cherries, and sprinkle with cinnamon.
Serving Suggestions for Russian Piroshki (Meat Hand Pies)
- Serve warm with a dollop of sour cream for a creamy contrast.
- Pair with a fresh garden salad for a light, balanced meal.
- Enjoy alongside a cup of borscht for a traditional Russian experience.
- Garnish with fresh herbs like dill for a pop of color.
- Offer a selection of dipping sauces, like mustard or spicy ketchup, for added flavor.
FAQs about Russian Piroshki (Meat Hand Pies)
Can I make Russian piroshki ahead of time?
Absolutely! You can prepare the piroshki and freeze them before baking. Just place them on a baking sheet, freeze until solid, then transfer to a freezer bag. When you’re ready to enjoy, bake them straight from the freezer, adding a few extra minutes to the baking time.
What can I use instead of ground beef?
If ground beef isn’t your thing, feel free to substitute it with ground turkey, chicken, or even a mix of sautéed vegetables. The beauty of Russian piroshki is their versatility!
How do I store leftover piroshki?
Store any leftover piroshki in an airtight container in the refrigerator for up to three days. You can reheat them in the oven for a few minutes to restore their crispy texture.
Can I make the dough without yeast?
While traditional piroshki use yeast for that fluffy texture, you can try a quick dough using baking powder instead. Just remember, the texture will be different—more biscuit-like than fluffy!
What are some good dipping sauces for piroshki?
For a delightful pairing, serve your piroshki with sour cream, mustard, or a spicy ketchup. You can also try a tangy yogurt sauce for a refreshing twist!
Final Thoughts
Making Russian piroshki is more than just cooking; it’s about creating memories in the kitchen. The joy of watching your family gather around the table, savoring these warm, flaky hand pies, is truly priceless. Each bite is a reminder of love and tradition, bringing a taste of Russia right into your home. Whether you’re enjoying them as a snack or a meal, these piroshki are sure to become a cherished recipe in your family. So roll up your sleeves, embrace the process, and let the delightful aroma fill your kitchen. Happy baking!
Print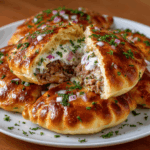
Russian Piroshki (Meat Hand Pies) You’ll Love to Bake!
- Total Time: 1 hour 55 minutes
- Yield: 12 piroshki 1x
- Diet: Gluten Free
Description
Delicious Russian piroshki filled with savory meat, perfect for baking and enjoying as a snack or meal.
Ingredients
- 2 cups all-purpose flour
- 1/2 cup milk
- 1/4 cup butter
- 1/2 teaspoon salt
- 1 tablespoon sugar
- 1 packet active dry yeast
- 1/2 pound ground beef
- 1/2 onion, finely chopped
- 1 egg (for egg wash)
Instructions
- In a bowl, combine warm milk, sugar, and yeast. Let it sit for 5-10 minutes until frothy.
- In a large mixing bowl, combine flour and salt. Add melted butter and the yeast mixture. Knead until a smooth dough forms.
- Cover the dough and let it rise in a warm place for about 1 hour or until doubled in size.
- In a skillet, cook the chopped onion until translucent, then add ground beef and cook until browned. Season with salt and pepper.
- Preheat the oven to 375°F (190°C).
- Once the dough has risen, punch it down and divide it into small balls. Roll each ball into a circle.
- Place a spoonful of the meat mixture in the center of each circle, fold over, and pinch the edges to seal.
- Place the piroshki on a baking sheet lined with parchment paper. Brush with beaten egg.
- Bake for 20-25 minutes or until golden brown.
Notes
- Feel free to substitute the meat with vegetables for a vegetarian option.
- These piroshki can be frozen before baking for later use.
- Serve warm with sour cream or your favorite dipping sauce.
- Prep Time: 30 minutes
- Cook Time: 25 minutes
- Category: Snack
- Method: Baking
- Cuisine: Russian
Nutrition
- Serving Size: 1 piroshki
- Calories: 250
- Sugar: 1g
- Sodium: 300mg
- Fat: 12g
- Saturated Fat: 5g
- Unsaturated Fat: 6g
- Trans Fat: 0g
- Carbohydrates: 30g
- Fiber: 2g
- Protein: 10g
- Cholesterol: 40mg


