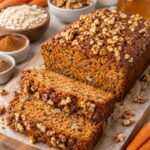
Ingredients
- 1 cup oats
- 1 cup shredded carrots
- 1 teaspoon cinnamon
- ¼ teaspoon nutmeg
- ¼ cup chopped walnuts, plus extra for topping
- 2 eggs
- ½ cup milk
- 2 to 3 tablespoons honey or maple syrup
- 1 teaspoon baking powder
You will also need a little oil or butter, or parchment paper, to prepare your pan.
Instructions
Preheat the oven to 350°F (175°C). Grease a small cake pan or line it with parchment paper. A small round pan, a small square pan, or a small loaf pan all work well. Parchment makes it easy to lift the cake out once it has cooled.
Add the oats to a blender and blend until they become a fine flour. This usually takes about 30 to 60 seconds. The finer the oat flour, the softer and more cake-like the final texture will be.
Add the eggs, milk, honey or maple syrup, cinnamon, nutmeg, and baking powder to the blender with the oat flour. Blend until smooth. Scrape down the sides if needed to make sure no dry oat flour is stuck to the walls of the blender.
Transfer the batter to a bowl and fold in the shredded carrots and chopped walnuts. Folding by hand keeps the carrots and nuts intact so you get a pleasant texture in every bite. Stir gently until everything is evenly distributed.
Pour the batter into the prepared pan and spread it evenly. Sprinkle extra walnuts over the top. The nuts will toast as the cake bakes and give it a lovely finish.
Bake for 25 to 35 minutes, or until the center is set and a toothpick inserted into the cake comes out clean. Baking time will depend on the size and depth of your pan. A smaller, deeper pan generally needs more time than a wider, shallower one. If the top is browning too quickly, loosely tent the cake with foil.
Let the cake cool before slicing. Enjoy it warm or chilled. Cooling allows the crumb to set, so the slices hold together cleanly. A cake that is cooled for at least 15 to 20 minutes slices much better than one cut straight from the oven.