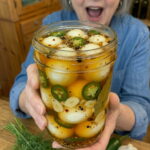
Ingredients
For the Pickled Eggs
- 12 hard-boiled eggs, peeled
- 8 fresh jalapeños, sliced into rounds
- 4 cloves garlic, thinly sliced
- 1 small red onion, thinly sliced
- 1 teaspoon whole black peppercorns
- 1 teaspoon mustard seeds
- ½ teaspoon crushed red pepper flakes
- 2 bay leaves
For the Cowboy Candy Brine
- 1½ cups white vinegar
- ½ cup water
- ¾ cup granulated sugar
- ¼ cup honey
- 1½ tablespoons kosher salt
- 2 tablespoons apple cider vinegar
- ½ teaspoon turmeric
- ½ teaspoon celery seeds
- ½ teaspoon mustard seeds
- ¼ teaspoon ground ginger
A few notes on why these ingredients matter: the combination of white vinegar and apple cider vinegar gives the brine both a sharp, clean tang and a slightly fruity, rounded acidity. Turmeric contributes a warm, earthy note along with that signature golden color often associated with cowboy candy, while celery seeds and ground ginger add subtle background complexity that keeps the brine from tasting one-dimensionally sweet. The combination of sugar and honey, just like in classic cowboy candy, is what gives this brine its glossy, almost syrupy texture once it has cooled and coated the eggs and jalapeños.
Instructions
Start with a clean glass jar or airtight pickling container large enough to hold all 12 peeled hard-boiled eggs comfortably. Making sure your jar and lid are thoroughly washed (ideally sterilized in hot water) is an important first step for food safety, since these eggs will be stored and enjoyed over the course of a week.
Place the peeled hard-boiled eggs into the jar. Then layer the sliced jalapeños, garlic, red onion, black peppercorns, mustard seeds, crushed red pepper flakes, and bay leaves between and around the eggs. Distributing the aromatics throughout the jar, rather than dumping them all on top, helps ensure that every egg gets surrounded by flavor rather than just the top layer.
In a medium saucepan, combine the white vinegar, water, granulated sugar, honey, kosher salt, apple cider vinegar, turmeric, celery seeds, mustard seeds, and ground ginger.
Bring the mixture to a gentle boil over medium heat, stirring occasionally until the sugar and salt have completely dissolved into the liquid. You’ll notice the brine start to turn a warm golden color as the turmeric blooms into the liquid.
Reduce the heat and let the brine simmer gently for 3 to 4 minutes. This short simmer allows the spices to fully infuse the liquid and gives it that classic cowboy candy depth of flavor — sweet, tangy, and just a little spicy, with warm background notes from the ginger and turmeric.
Remove the saucepan from the heat and let the brine cool slightly before pouring. A brine that’s too hot can start to cook the outside of the eggs further, which can lead to a rubbery texture — letting it cool for a few minutes helps protect that tender egg texture you want.
Carefully pour the warm cowboy candy brine over the eggs and jalapeños until everything is completely submerged. Make sure the liquid reaches all the way to the top of the jar so no egg or pepper is left exposed to air.
Gently press the jalapeños and eggs down with a clean spoon or utensil to release any trapped air bubbles and help the brine settle evenly throughout the jar. This step helps ensure consistent flavor from the top of the jar to the bottom.
Allow the jar to cool to room temperature on the counter before sealing it tightly with an airtight lid. Sealing while still warm can trap steam and excess condensation inside the jar, which isn’t ideal for long-term storage.
Refrigerate for at least 3 days before serving — this is the minimum time needed for the eggs to really take on flavor from the brine. For deeper sweet, spicy, and garlicky flavor, let the eggs pickle for 5 to 7 days. The longer they sit, the more the vinegar and spices penetrate the eggs, giving you that signature bold, tangy, almost candied bite all the way through.