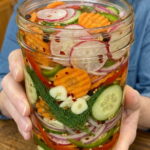
Ingredients
This recipe is broken into two components: the mixed vegetables and aromatics, and the simple, classic pickling brine.
For the Vegetables
2 cups mixed vegetables such as cucumbers, carrots, radishes, onions, and bell peppers, thinly sliced — This flexible mix of vegetables offers a variety of textures, colors, and flavors. Slicing everything thinly ensures quick, even pickling.
3 cloves garlic, thinly sliced — Fresh garlic infuses the brine with savory depth that complements the fresh, crisp vegetables.
3 to 4 sprigs fresh dill — Fresh dill provides that classic, aromatic dill pickle flavor that pairs beautifully with nearly any vegetable combination.
1/2 teaspoon black peppercorns — Whole peppercorns add warm, slightly floral heat to the brine.
1/2 teaspoon mustard seeds — Mustard seeds are a pickling staple, contributing subtle tang and a bit of texture to the jar.
1/4 teaspoon red pepper flakes — A touch of red pepper flakes adds a gentle background heat that keeps the flavor interesting without overwhelming the fresh vegetables.
For the Brine
1 cup white vinegar — White vinegar provides the sharp, clean acidity that’s essential to a proper quick pickle.
1/2 cup water — Water dilutes the vinegar slightly, softening the acidity so the other flavors can shine through.
1 1/2 tablespoons kosher salt — Salt is essential for both flavor and the pickling process, helping season the vegetables all the way through.
1 teaspoon granulated sugar — A small amount of sugar helps balance the sharp acidity of the vinegar without making the pickles taste sweet.
Instructions
This recipe is about as simple as pickling gets, coming together with minimal hands-on time and no cooking of the vegetables themselves. Here’s exactly how to make it from start to finish.
Wash and slice your chosen mix of vegetables thinly and evenly. Thin, consistent slices pickle much more quickly than thicker pieces, which is especially important for a recipe designed to be ready in as little as an hour.
Pack the sliced vegetables into a clean glass jar, tucking in the sliced garlic, fresh dill sprigs, black peppercorns, mustard seeds, and red pepper flakes as you go. Distributing the aromatics evenly throughout the jar ensures every piece gets plenty of flavor contact.
In a small saucepan, combine the white vinegar, water, salt, and sugar. This simple combination of acid, salt, and a touch of sugar forms the base of a well-balanced pickling brine.
Place the saucepan over medium heat and warm the mixture gently, stirring until the salt and sugar have completely dissolved. It’s important not to bring this brine to a hard boil; a gentle warm-through is all that’s needed to dissolve the salt and sugar without altering the brine’s flavor or the vegetables’ crunch.
Pour the warm brine over the vegetables in the jar, making sure they are completely covered and submerged in liquid. Any vegetables poking above the brine line are more likely to discolor or spoil, so top off with a little extra brine if needed.
Let the jar cool on the counter until it reaches room temperature. Allowing the jar to cool before sealing helps prevent excess condensation from building up inside once closed.
Once cooled, cover the jar tightly with a lid and transfer it to the refrigerator. Let the vegetables pickle for at least 1 hour, which is enough time for them to absorb some of the tangy, garlicky brine and take on a pleasant pickled flavor.
For deeper, more pronounced flavor, refrigerate the jar for several hours or overnight. The longer the vegetables sit in the brine, the more developed and well-rounded the tangy, garlicky, herby flavor becomes.
Once ready, keep the jar refrigerated and enjoy these quick pickled vegetables with sandwiches, burgers, tacos, salads, charcuterie boards, barbecue dishes, or straight from the jar.