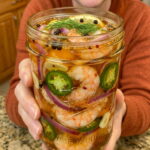
Ingredients
This recipe is broken into two components: the shrimp and aromatics, and the tangy, slightly sweet, spiced brine.
For the Shrimp
1 pound large shrimp, peeled and deveined — Large shrimp are ideal for this recipe, offering a satisfying bite-sized portion that’s easy to skewer or pick up by hand at a party.
1 fresh jalapeño, thinly sliced — Fresh jalapeño brings real, building heat and a fresh, slightly grassy spice that defines this recipe’s bold flavor.
1/2 small red onion, thinly sliced — Red onion adds a sharp, slightly sweet bite and a beautiful pop of color throughout the jar.
3 cloves garlic, thinly sliced — Fresh garlic infuses the brine with savory depth that balances the bright acidity and sweetness.
3 sprigs fresh dill — Fresh dill provides a classic, aromatic, herby flavor that pairs beautifully with both the shrimp and the tangy brine.
1/2 teaspoon black peppercorns — Whole peppercorns add warm, slightly floral heat to the brine.
1/2 teaspoon mustard seeds — Mustard seeds are a pickling staple, contributing subtle tang and a bit of texture to the jar.
1/4 teaspoon red pepper flakes — Red pepper flakes reinforce the heat from the fresh jalapeño, adding an extra layer of spice throughout the brine.
For the Brine
1 cup white vinegar — White vinegar provides the sharp, clean acidity that’s essential to a great pickled shrimp.
1/2 cup water — Water dilutes the vinegar slightly, softening the acidity so the other flavors can shine through.
2 tablespoons granulated sugar — A touch of sugar balances out the heat and acidity, giving the dish its signature sweet-and-spicy character.
1 1/2 teaspoons kosher salt — Salt is essential for seasoning both the shrimp and the brine.
1 tablespoon fresh lemon juice — Fresh lemon juice brightens the brine with a fresh, zesty acidity that complements the vinegar beautifully.
1/2 teaspoon Old Bay seasoning — Old Bay is a classic pairing with shrimp, contributing a warm, savory, slightly spicy seafood seasoning blend that ties the whole dish together.
Instructions
This recipe involves a quick cook of the shrimp followed by an easy marinating process. Here’s exactly how to make it from start to finish.
Bring a pot of lightly salted water to a gentle boil. Add the peeled and deveined shrimp and cook for 2 to 3 minutes, just until they turn pink and opaque. Shrimp cook very quickly, so keep a close eye on them to avoid overcooking, which can result in a tough, rubbery texture.
As soon as the shrimp are cooked, immediately transfer them to a bowl of ice water. This stops the cooking process right away, helping preserve their tender, juicy texture. Once cooled, drain the shrimp well and pat them dry with paper towels.
Pack the cooked shrimp into a clean glass jar along with the sliced jalapeño, sliced red onion, sliced garlic, fresh dill sprigs, black peppercorns, mustard seeds, and red pepper flakes. Layering the shrimp and aromatics together ensures every piece gets plenty of flavor contact.
In a saucepan, combine the white vinegar, water, sugar, kosher salt, lemon juice, and Old Bay seasoning. This blend of acid, sweetness, salt, and warm spice forms the flavorful base of the pickling brine.
Place the saucepan over medium heat and warm the mixture, stirring until the sugar and salt have completely dissolved. It’s important not to bring this brine to a hard boil; a gentle warm-through is all that’s needed to dissolve the sugar and salt without further cooking the shrimp.
Carefully pour the warm brine over the shrimp in the jar, making sure everything is well covered by the liquid.
Let the jar cool on the counter until it reaches room temperature. Allowing the jar to cool before sealing and refrigerating helps prevent excess condensation and keeps the shrimp food-safe.
Once cooled, cover the jar tightly with a lid and transfer it to the refrigerator.
Let the shrimp chill for at least 4 hours, though overnight is preferable, to allow the shrimp to fully absorb the sweet, spicy, tangy flavors of the brine.
Keep the jar refrigerated and serve the pickled shrimp cold as an appetizer, party snack, or addition to a larger seafood platter.