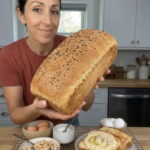
Ingredients
You need just three ingredients to prepare this simple loaf.
- 2 cans white beans or cannellini beans, 15 ounces each: Drain and rinse thoroughly before blending.
- 4 large eggs: Help bind the beans together and give the bread structure.
- 2 teaspoons baking powder: Provides lift and helps the loaf become lighter during baking.
You will also need parchment paper and a loaf pan for baking. These are preparation supplies rather than ingredients in the three-ingredient recipe.
Instructions
This recipe is straightforward, but a few details make a significant difference in the final texture. Follow the instructions carefully for a loaf that slices more easily and holds together well.
Step 1: Preheat the Oven
Preheat your oven to 350°F (175°C).
Line a loaf pan with parchment paper, leaving enough overhang to help lift the bread out after baking.
Parchment paper helps prevent sticking, which is particularly helpful for flourless loaves because their soft interior may cling to an unlined pan.
Step 2: Drain and Rinse the Beans
Open both cans of white beans and drain away the liquid.
Rinse the beans thoroughly under cool running water. Allow them to drain well, then gently pat them dry with a clean kitchen towel or paper towel.
Removing excess surface moisture helps keep the batter from becoming unnecessarily watery.
The beans do not need to be completely dehydrated. Simply remove the liquid clinging to their surfaces and allow any remaining water to drain away.
Step 3: Blend the Beans and Eggs
Place the drained white beans and four large eggs in a food processor or blender.
Blend until the mixture is as smooth as possible, scraping down the sides if necessary.
A smooth batter helps create a more uniform loaf. If whole beans or large pieces remain, they can create uneven areas in the finished bread.
Depending on the power of your blender, you may need to pause and scrape the sides once or twice. Avoid adding water unless absolutely necessary, because additional liquid may make the loaf too moist.
Step 4: Add the Baking Powder
Add the baking powder to the blended bean-and-egg mixture.
Blend briefly until the baking powder is evenly distributed.
Avoid blending for an unnecessarily long time after adding it. Once the baking powder is incorporated, move directly to the next step so that the leavening can do its work during baking.
Step 5: Transfer the Batter to the Loaf Pan
Pour the batter into the prepared loaf pan.
Use a spatula to scrape the blender or food processor clean and smooth the top of the batter.
The mixture will resemble a thick, smooth batter rather than traditional kneaded bread dough. This is normal because the recipe does not contain flour or gluten.
Place the pan on a stable oven rack, keeping it level so the batter bakes evenly.
Step 6: Bake Until the Center Is Set
Bake at 350°F (175°C) for approximately 45–55 minutes.
The exact baking time depends on your oven, loaf pan dimensions, and the moisture content of the beans.
As the bread bakes, the eggs set, the bean mixture firms up, and the baking powder helps create some lift.
The loaf is ready when the center feels firm and a toothpick inserted into the middle comes out without wet batter. If the center remains soft or the toothpick shows uncooked mixture, continue baking and check again after a few minutes.
If the top browns before the center is set, loosely cover the loaf with foil for the remaining baking time.
Step 7: Cool in the Pan
Remove the bread from the oven and let it rest in the pan for 10–15 minutes.
This brief cooling period allows the loaf to settle and makes it easier to remove without breaking.
Do not rush to slice it while it is extremely hot. The interior continues to firm up as the bread cools.
Step 8: Transfer to a Wire Rack
Carefully lift the bread out using the parchment paper and transfer it to a wire rack.
Allow it to cool completely before slicing.
This step is particularly important for flourless bread. Cutting it too early can produce a soft, gummy center or cause the slices to crumble because the interior has not fully stabilized.