Ingredients
- 3 cups (390 g) all-purpose flour, plus extra for dusting. Bread flour also works and gives a chewier crumb.
- 1 teaspoon instant yeast (or active dry yeast)
- 1½ teaspoons fine salt
- 1½ cups (355 ml) lukewarm water, about 100°F (38°C)
Instructions
In a large mixing bowl, combine the flour, yeast, and salt. Pour in the lukewarm water. Stir with a wooden spoon or dough whisk until no dry flour remains and you have a sticky, shaggy dough. This takes about a minute. Don’t worry if it looks messy and wet. That’s exactly what you want.
Cover the bowl with a plate, a damp towel, or plastic wrap. Leave it at room temperature for 2 to 3 hours, until the dough has doubled in size and is dotted with bubbles across the surface. In a cool kitchen, it may take closer to 4 hours.
For the best flavor, you can instead refrigerate the covered dough for 8 to 18 hours. The long, cold rise develops a tangier, more complex taste.
Dust a work surface lightly with flour. Scrape the dough out of the bowl. It will be loose and sticky, so flour your hands and the top of the dough as needed. Fold the edges toward the center a few times to form a rough round. Don’t knead it or press out all the air. Gentle handling keeps the bubbles that create an open, airy crumb.
Place the dough seam-side down on a sheet of parchment paper. Cover it loosely and let it rest for 30 minutes while the oven heats.
Place a Dutch oven with its lid in the oven and preheat to 450°F (230°C) for at least 30 minutes. The pot must be thoroughly hot. This sudden blast of heat is what gives the loaf its dramatic rise, called oven spring.
Use oven mitts to remove the hot pot carefully. Lift the dough by the parchment edges and lower it into the pot. For a decorative finish and controlled expansion, score the top with a sharp knife or razor blade, making one slash about ½ inch deep. Cover with the lid and return the pot to the oven.
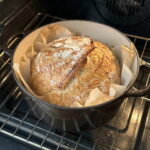
Bake covered for 30 minutes. The trapped steam keeps the crust soft at first so the loaf can expand fully. Then remove the lid and bake for another 10 to 15 minutes, until the crust is deep golden brown and crisp.
The bread is done when it sounds hollow if you tap the bottom, or when an instant-read thermometer reads about 205–210°F (96–99°C) in the center.
Lift the loaf out of the pot and place it on a wire rack. Resist slicing right away. Let it cool for at least 30 to 60 minutes. The inside is still finishing its cooking, and cutting too soon can leave the crumb gummy. As it cools, you’ll likely hear the crust crackle, which bakers call “singing.”