Ingredients
- 2 cups fresh garlic cloves, peeled
- 1 cup white vinegar with 5% acidity
- 1 cup water
- 1 tbsp granulated sugar
- 1 tbsp pickling salt
- 1 tsp cayenne pepper
- 1 tsp black peppercorns
- 1 tsp mustard seeds
- ½ tsp red pepper flakes
- 2 dried bay leaves
Instructions
This recipe takes just five steps. Allow time for peeling, then the rest moves quickly.
Peel the garlic cloves and remove any damaged pieces. Rinse briefly and pat dry. Peeling is the slowest part of this recipe, so plan ahead. A few tricks help: separate the cloves, trim off the root ends, then soak them in warm water for a few minutes to loosen the skins. You can also gently crush each clove with the flat side of a knife to pop the skin free.
In a saucepan, combine the white vinegar, water, sugar, pickling salt, cayenne pepper, black peppercorns, mustard seeds, red pepper flakes, and bay leaves. Bring to a gentle boil, stirring until the sugar and salt dissolve. Use a non-reactive saucepan, such as stainless steel, enamel-coated, or glass. Aluminum and unlined copper can react with vinegar and affect flavor and color.
Add the peeled garlic cloves to the brine and simmer gently for 1 to 2 minutes. Avoid prolonged cooking to help preserve their texture. This short simmer softens the raw bite and helps the cloves absorb the brine, but longer cooking would make them mushy.
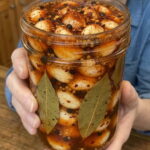
Transfer the garlic and hot brine into a clean, heat-safe glass jar. Make sure the cloves are completely covered by the liquid. Let the mixture cool briefly, then cover. Use a clean jar that has been washed in hot, soapy water and rinsed well. Press the garlic down gently so every clove stays under the brine, since exposed cloves can spoil more easily.
Refrigerate promptly and allow the garlic to pickle for at least 3 to 5 days before tasting. The flavor will become more pronounced as it sits. Be patient. The garlic tastes good after a few days, but the heat and tang deepen and balance beautifully over the first week or two.