Garlic Dill Refrigerator Pickled Green Beans: The Crunchy Homemade Snack You’ll Always Want on Hand
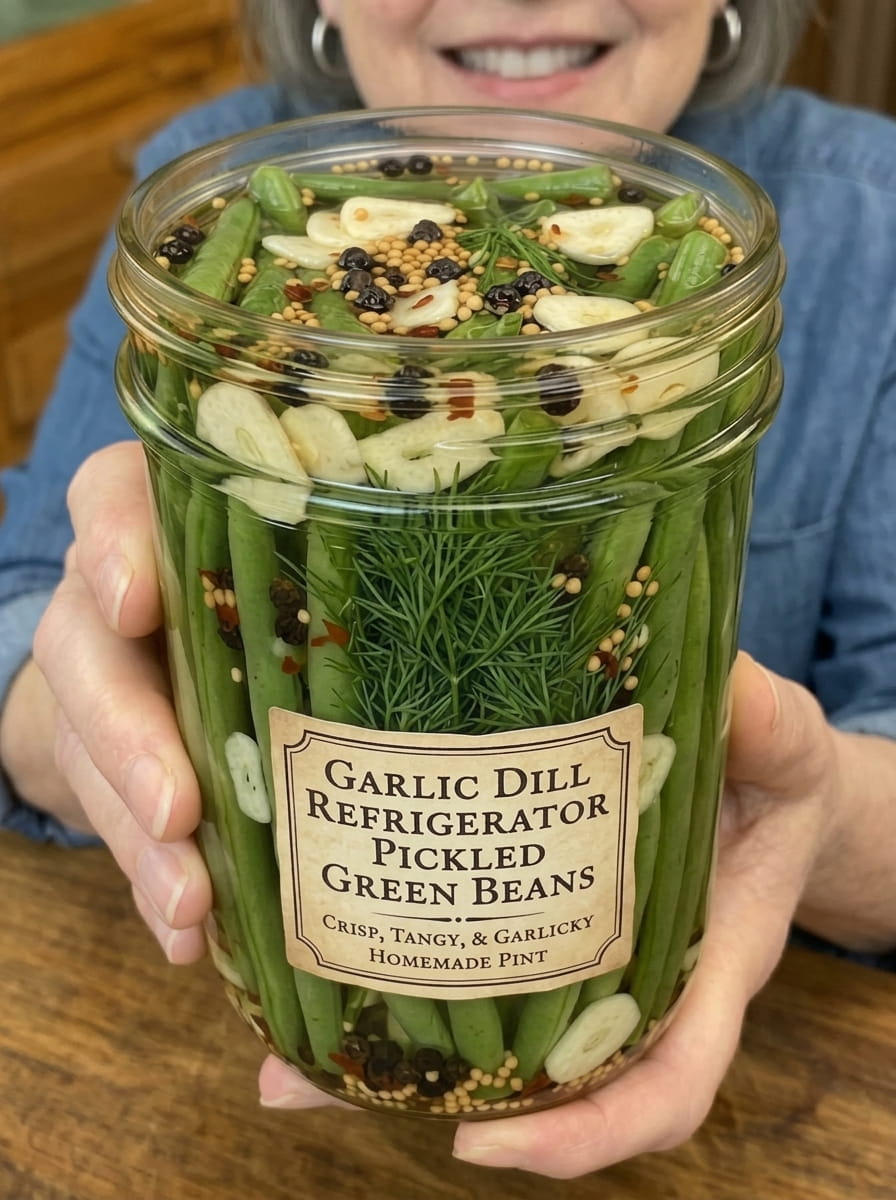
If you love the satisfying snap of a great dill pickle but want to try something a little different, these Garlic Dill Refrigerator Pickled Green Beans are exactly what you’re looking for. Crisp, tangy, garlicky, and packed with fresh dill flavor, this easy homemade pickle transforms simple green beans into a crunchy, savory snack that’s every bit as addictive as a classic cucumber dill pickle, with a fun, fresh twist. Fresh green beans soak up a savory vinegar brine infused with garlic, dill, and warm pickling spices, resulting in a crisp, flavorful bite that’s ready in as little as 24 hours.
Whether you’ve heard of “dilly beans” before and always wanted to try making them yourself, or you’re simply looking for a new way to use up a bumper crop of fresh green beans, this recipe is easy, approachable, and endlessly rewarding. Below, you’ll find a complete ingredient breakdown, detailed step-by-step instructions, expert tips for the best crunch and flavor, storage guidance, serving suggestions, and answers to the most frequently asked questions about making pickled green beans at home.
Why You’ll Love This Garlic Dill Refrigerator Pickled Green Beans Recipe
These pickled green beans, sometimes affectionately called “dilly beans,” have earned a loyal following among home cooks and pickling enthusiasts, and this recipe shows exactly why.
The crunch is unbeatable. Because this is a raw-pack refrigerator pickle, meaning the green beans go into the jar raw rather than being cooked or blanched first, the beans retain an incredibly satisfying, crisp snap that makes them wonderfully addictive to eat.
The flavor is classic and well-balanced. Fresh garlic and dill infuse the tangy vinegar brine with savory, herby depth, while a touch of sugar and warm spices like mustard seeds and black peppercorns round out the flavor, creating a pickle that’s tangy, garlicky, and deeply satisfying.
It’s incredibly easy to make. With no cooking of the green beans required and just a quick warm-through of the brine, this recipe comes together with minimal hands-on time and no special canning equipment.
It’s a great way to use up fresh green beans. If you’ve grown your own green beans or picked up a large batch at the farmers market, pickling them is one of the best ways to extend their shelf life while creating a genuinely delicious snack.
It’s a fun, unique addition to any spread. While cucumber pickles are a classic, pickled green beans bring something a little different to the table, both in flavor and in their striking, elongated presentation standing up in a jar.
It’s naturally low-calorie and healthy. With no added fat and just a touch of sugar, these pickled green beans make a satisfying, crunchy snack that fits easily into a variety of eating styles.
What Are Dilly Beans?
Dilly beans are a beloved American pickling tradition, particularly popular in New England and other regions with a strong home canning culture. The concept is simple: fresh green beans are packed into jars with garlic and fresh dill, then covered in a tangy vinegar brine and left to pickle. The result is a crisp, garlicky, herby pickled bean that’s become a staple at potlucks, picnics, and alongside classic American comfort foods.
This recipe uses the refrigerator pickling method rather than traditional water bath canning, which means the green beans are packed raw into the jar and covered with a warm brine, then stored in the refrigerator rather than processed for shelf-stable storage. This method is faster, simpler, and doesn’t require any specialized canning equipment, while still delivering that same classic garlicky, dill-forward flavor.
Ingredients You’ll Need
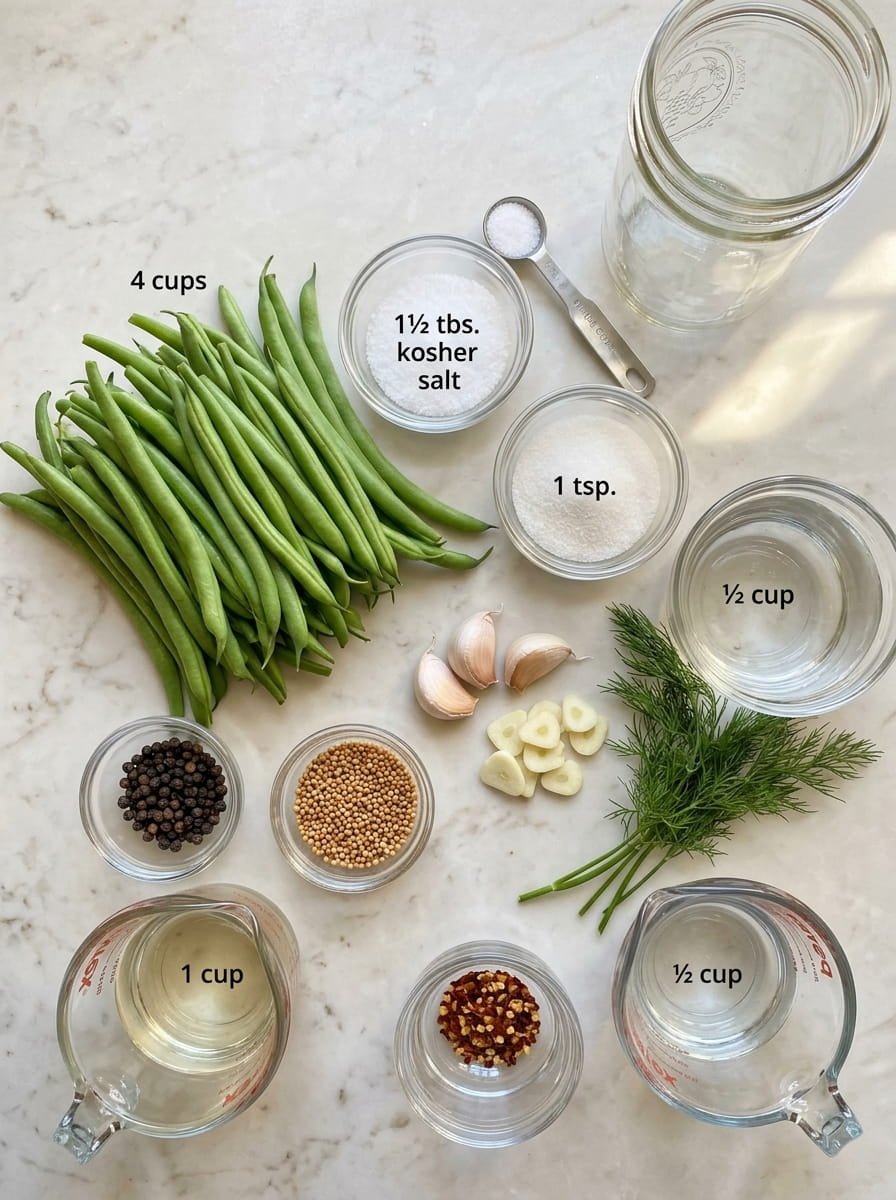
This recipe uses a short, straightforward ingredient list that highlights the natural crunch and flavor of fresh green beans.
4 cups fresh green beans, trimmed — Fresh, firm green beans are essential to this recipe. Trimming the ends and choosing beans that fit your jar with a little room at the top will make packing them much easier.
3 cloves garlic, thinly sliced — Fresh garlic infuses the brine with savory depth, a hallmark flavor of classic dilly beans.
3 to 4 sprigs fresh dill — Fresh dill is essential for that classic, aromatic dill pickle flavor. Using whole sprigs rather than chopped dill allows for easy removal later if desired, and looks beautiful in the jar.
1 cup white vinegar — White vinegar provides the sharp, clean acidity that’s essential to a proper pickle.
1/2 cup water — Water dilutes the vinegar slightly, softening the acidity so the other flavors can shine through.
1 1/2 tablespoons kosher salt — Salt is essential for both flavor and the pickling process, helping season the beans all the way through.
1 teaspoon granulated sugar — A small amount of sugar helps balance the sharp acidity of the vinegar without making the beans taste sweet.
1/2 teaspoon black peppercorns — Whole peppercorns add warm, slightly floral heat to the brine.
1/2 teaspoon mustard seeds — Mustard seeds are a classic pickling spice, contributing subtle tang and texture.
1/4 teaspoon red pepper flakes — A touch of red pepper flakes adds a gentle, background heat that keeps the flavor interesting.
How to Make Garlic Dill Refrigerator Pickled Green Beans (Step-by-Step)
This recipe is refreshingly simple and comes together with very little hands-on time, since the green beans go into the jar completely raw. Here’s exactly how to make it from start to finish.
Step 1: Prep the Green Beans
Wash the green beans thoroughly and trim the ends. If your beans are especially long, you can trim them further to fit neatly inside your jar, leaving about half an inch of space at the top.
Step 2: Pack the Jar
Pack the trimmed green beans upright into a clean glass jar, standing them on end for a classic presentation. Tuck the sliced garlic, fresh dill sprigs, black peppercorns, mustard seeds, and red pepper flakes into the jar among the beans, distributing them evenly for the best flavor throughout.
Step 3: Build the Brine
In a small saucepan, combine the white vinegar, water, kosher salt, and sugar. This simple combination of acid, salt, and a touch of sugar forms the base of a classic, well-balanced pickling brine.
Step 4: Warm the Brine
Place the saucepan over medium heat and warm the mixture, stirring until the salt and sugar have completely dissolved. It’s important not to bring this brine to a hard boil; you simply want it warm enough to dissolve the salt and sugar without cooking off too much liquid or altering the brine’s flavor.
Step 5: Pour the Brine Over the Beans
Carefully pour the warm brine over the green beans in the jar, making sure they are completely covered and submerged in liquid. Any beans poking above the brine line are more likely to discolor or spoil, so top off with a little extra brine if needed.
Step 6: Cool to Room Temperature
Let the jar cool on the counter until it reaches room temperature. Allowing the jar to cool before sealing helps prevent excess condensation from building up inside once closed.
Step 7: Cover and Refrigerate
Once cooled, cover the jar tightly with a lid and transfer it to the refrigerator. Let the green beans pickle for at least 24 hours, which allows the brine to begin flavoring the beans throughout.
Step 8: Let the Flavor Develop
For a deeper, more pronounced flavor, let the green beans pickle for 2 to 3 days before serving. The longer they sit in the refrigerator, the more the garlicky, dill-forward, tangy flavor develops.
Step 9: Serve and Enjoy
Once ready, serve your garlic dill pickled green beans chilled as a snack, alongside sandwiches and grilled meats, or arranged on appetizer and charcuterie boards.
Tips for the Best Pickled Green Beans
Use the freshest green beans possible. Fresh, firm, snappy green beans will give you the best crunch and texture once pickled. Avoid beans that are already starting to soften or wrinkle.
Trim beans to fit your jar with room to spare. Leaving a little space at the top of the jar, rather than packing the beans in all the way to the rim, helps ensure they stay fully submerged once the brine is added.
Don’t bring the brine to a hard boil. A gentle warm-through is all you need to dissolve the salt and sugar. Boiling the brine too vigorously can cause unnecessary evaporation and alter the final flavor balance.
Use whole dill sprigs for the best presentation and flavor. Fresh dill sprigs infuse the brine beautifully while also looking gorgeous in the jar, making this pickle as visually appealing as it is delicious.
Make sure the beans stay fully submerged. Any beans poking above the brine line are more likely to spoil or develop an off texture. Press them down gently or top off with extra brine as needed.
Be patient for the best flavor. While the beans are ready to eat after 24 hours, letting them sit for 2 to 3 days, or even up to a week, allows the garlicky, herby brine to fully penetrate every bean.
Sterilize your jars first. Starting with clean, sterilized glass jars helps the pickled green beans stay fresh longer and reduces the risk of contamination.
How to Store Garlic Dill Refrigerator Pickled Green Beans
This is a refrigerator pickle, not a shelf-stable canned product, which means it must be stored in the refrigerator at all times rather than on the counter or in the pantry. Properly stored in a sealed jar with the beans fully submerged in brine, these pickled green beans will typically keep well in the refrigerator for up to 3 to 4 weeks. Always use a clean utensil or fork when removing beans from the jar to avoid introducing bacteria that could shorten their shelf life, and watch for any signs of spoilage, such as an off smell, unusual discoloration, or mold, before eating.
Ways to Use Garlic Dill Refrigerator Pickled Green Beans
Part of what makes this recipe so rewarding is discovering all the different ways to enjoy these crunchy, garlicky beans. Here are some of the best serving ideas.
Straight from the jar — The simplest and most classic way to enjoy pickled green beans is chilled, straight out of the jar, as a crisp, tangy, low-calorie snack.
Bloody Mary garnish — Pickled green beans make a fantastic, crunchy garnish for a Bloody Mary, adding a tangy, savory bite alongside the classic celery stalk.
Salads — Chop pickled green beans and toss them into green salads, grain salads, or a classic green bean salad for extra tang and crunch.
Sandwiches — Layer whole or sliced pickled green beans onto sandwiches for a crisp, tangy addition that beats a regular pickle spear.
Appetizer and charcuterie boards — Arrange pickled green beans on a charcuterie or appetizer board for a striking, crunchy addition alongside cured meats, cheeses, and crackers.
Alongside grilled dishes — Serve pickled green beans as a tangy, crisp side alongside grilled chicken, steak, or burgers, where they help cut through rich, smoky flavors.
Deviled eggs or dips — Chop pickled green beans finely and mix them into deviled egg filling or a creamy dip for a tangy, garlicky twist.
Wrapped in prosciutto or bacon — For an elevated appetizer, wrap a few pickled green beans in a thin slice of prosciutto for a salty-tangy bite.
Frequently Asked Questions
Do I need to blanch the green beans before pickling? No, this recipe uses the raw-pack method, meaning the green beans go directly into the jar without being cooked first. This preserves their signature crisp, snappy texture.
Is this recipe shelf-stable, or does it need refrigeration? This is a refrigerator pickle, not a canned, shelf-stable product. It must be kept refrigerated at all times and doesn’t go through a water bath or pressure canning process. Traditional shelf-stable dilly beans require a separate, more precise canning process.
How spicy are these pickled green beans? As written, this recipe has a mild, background heat from the red pepper flakes. For a spicier version, add extra red pepper flakes or a few slices of fresh jalapeño or chili pepper to the jar.
Can I use yellow wax beans instead of green beans? Yes, yellow wax beans can be used in place of or alongside green beans for a colorful variation, and they pickle in much the same way.
How long do the beans need to sit before they’re ready to eat? At minimum, let the jar rest in the refrigerator for 24 hours before eating. For the best, most developed flavor, wait 2 to 3 days, or up to a week.
Why did my green beans turn out too soft? This can happen if the beans weren’t fresh and firm to begin with, or if the brine was poured over them while at a very hard, rolling boil. Use the freshest beans possible and make sure the brine is only gently warmed, not boiled vigorously.
Do I need special canning jars for this recipe? No. Standard clean glass jars with tight-fitting lids, such as tall mason jars, work perfectly well since this recipe doesn’t require pressure canning or water bath processing.
How long do pickled green beans stay fresh in the refrigerator? Properly stored in an airtight, sealed jar, these pickled green beans will generally stay fresh for up to 3 to 4 weeks in the refrigerator.
Can I reuse the brine for a second batch of green beans? It’s best to make a fresh batch of brine for each new batch of beans, since the used brine will have picked up moisture and lost some of its concentrated flavor and acidity.
Final Thoughts
This Garlic Dill Refrigerator Pickled Green Beans recipe proves that a few simple ingredients and a little patience can transform ordinary green beans into an irresistibly crisp, tangy, garlicky snack. The combination of fresh dill, savory garlic, and a well-balanced vinegar brine creates a pickle that’s just as satisfying straight from the jar as it is tucked into a sandwich or served as a Bloody Mary garnish. Once you make a batch of homemade dilly beans, it’s easy to see why this classic pickling tradition has stood the test of time, and you’ll likely find yourself keeping a jar in the fridge at all times.
Print
Garlic Dill Refrigerator Pickled Green Beans
Ingredients
This recipe uses a short, straightforward ingredient list that highlights the natural crunch and flavor of fresh green beans.
4 cups fresh green beans, trimmed — Fresh, firm green beans are essential to this recipe. Trimming the ends and choosing beans that fit your jar with a little room at the top will make packing them much easier.
3 cloves garlic, thinly sliced — Fresh garlic infuses the brine with savory depth, a hallmark flavor of classic dilly beans.
3 to 4 sprigs fresh dill — Fresh dill is essential for that classic, aromatic dill pickle flavor. Using whole sprigs rather than chopped dill allows for easy removal later if desired, and looks beautiful in the jar.
1 cup white vinegar — White vinegar provides the sharp, clean acidity that’s essential to a proper pickle.
1/2 cup water — Water dilutes the vinegar slightly, softening the acidity so the other flavors can shine through.
1 1/2 tablespoons kosher salt — Salt is essential for both flavor and the pickling process, helping season the beans all the way through.
1 teaspoon granulated sugar — A small amount of sugar helps balance the sharp acidity of the vinegar without making the beans taste sweet.
1/2 teaspoon black peppercorns — Whole peppercorns add warm, slightly floral heat to the brine.
1/2 teaspoon mustard seeds — Mustard seeds are a classic pickling spice, contributing subtle tang and texture.
1/4 teaspoon red pepper flakes — A touch of red pepper flakes adds a gentle, background heat that keeps the flavor interesting.
Instructions
This recipe is refreshingly simple and comes together with very little hands-on time, since the green beans go into the jar completely raw. Here’s exactly how to make it from start to finish.
Wash the green beans thoroughly and trim the ends. If your beans are especially long, you can trim them further to fit neatly inside your jar, leaving about half an inch of space at the top.
Pack the trimmed green beans upright into a clean glass jar, standing them on end for a classic presentation. Tuck the sliced garlic, fresh dill sprigs, black peppercorns, mustard seeds, and red pepper flakes into the jar among the beans, distributing them evenly for the best flavor throughout.
In a small saucepan, combine the white vinegar, water, kosher salt, and sugar. This simple combination of acid, salt, and a touch of sugar forms the base of a classic, well-balanced pickling brine.
Place the saucepan over medium heat and warm the mixture, stirring until the salt and sugar have completely dissolved. It’s important not to bring this brine to a hard boil; you simply want it warm enough to dissolve the salt and sugar without cooking off too much liquid or altering the brine’s flavor.
Carefully pour the warm brine over the green beans in the jar, making sure they are completely covered and submerged in liquid. Any beans poking above the brine line are more likely to discolor or spoil, so top off with a little extra brine if needed.
Let the jar cool on the counter until it reaches room temperature. Allowing the jar to cool before sealing helps prevent excess condensation from building up inside once closed.
Once cooled, cover the jar tightly with a lid and transfer it to the refrigerator. Let the green beans pickle for at least 24 hours, which allows the brine to begin flavoring the beans throughout.
For a deeper, more pronounced flavor, let the green beans pickle for 2 to 3 days before serving. The longer they sit in the refrigerator, the more the garlicky, dill-forward, tangy flavor develops.
Once ready, serve your garlic dill pickled green beans chilled as a snack, alongside sandwiches and grilled meats, or arranged on appetizer and charcuterie boards.