Italian Giardiniera Pickles: The Tangy, Crunchy Condiment Every Kitchen Needs
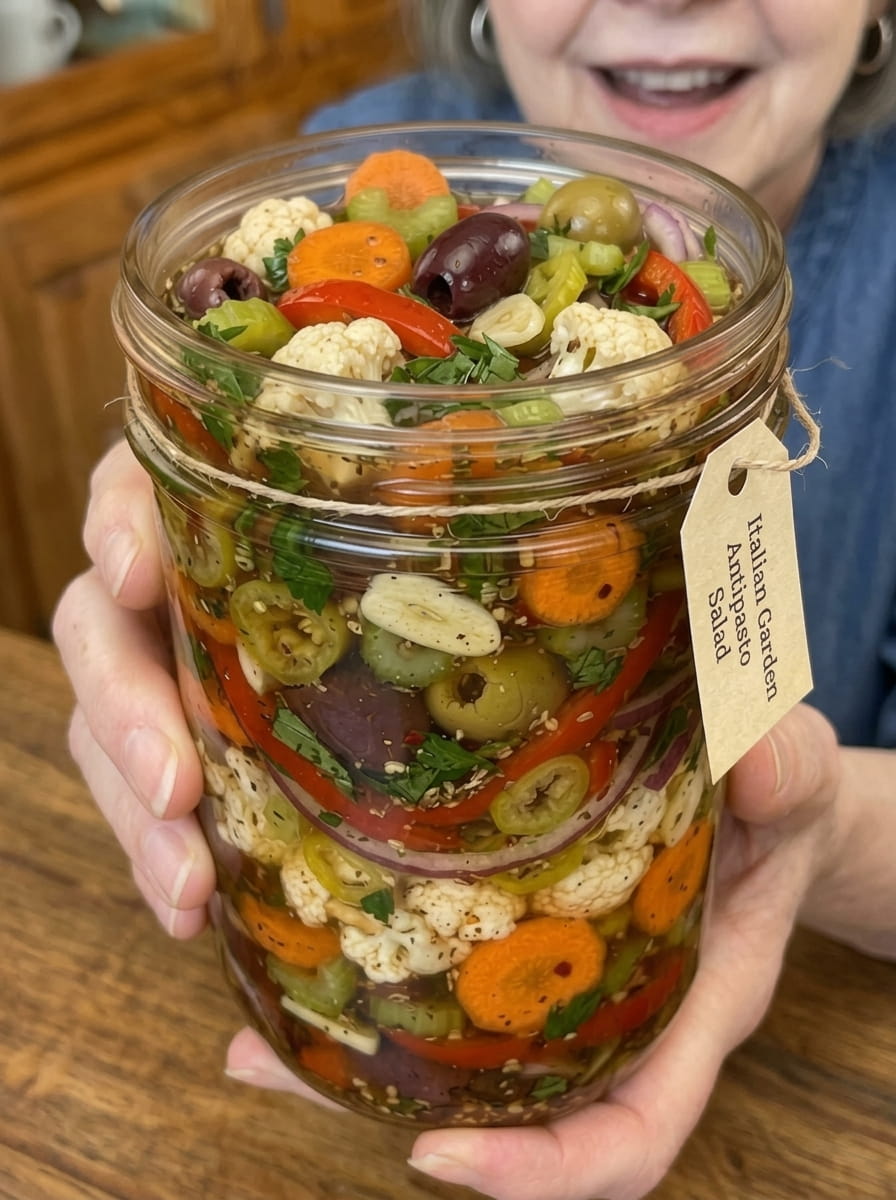
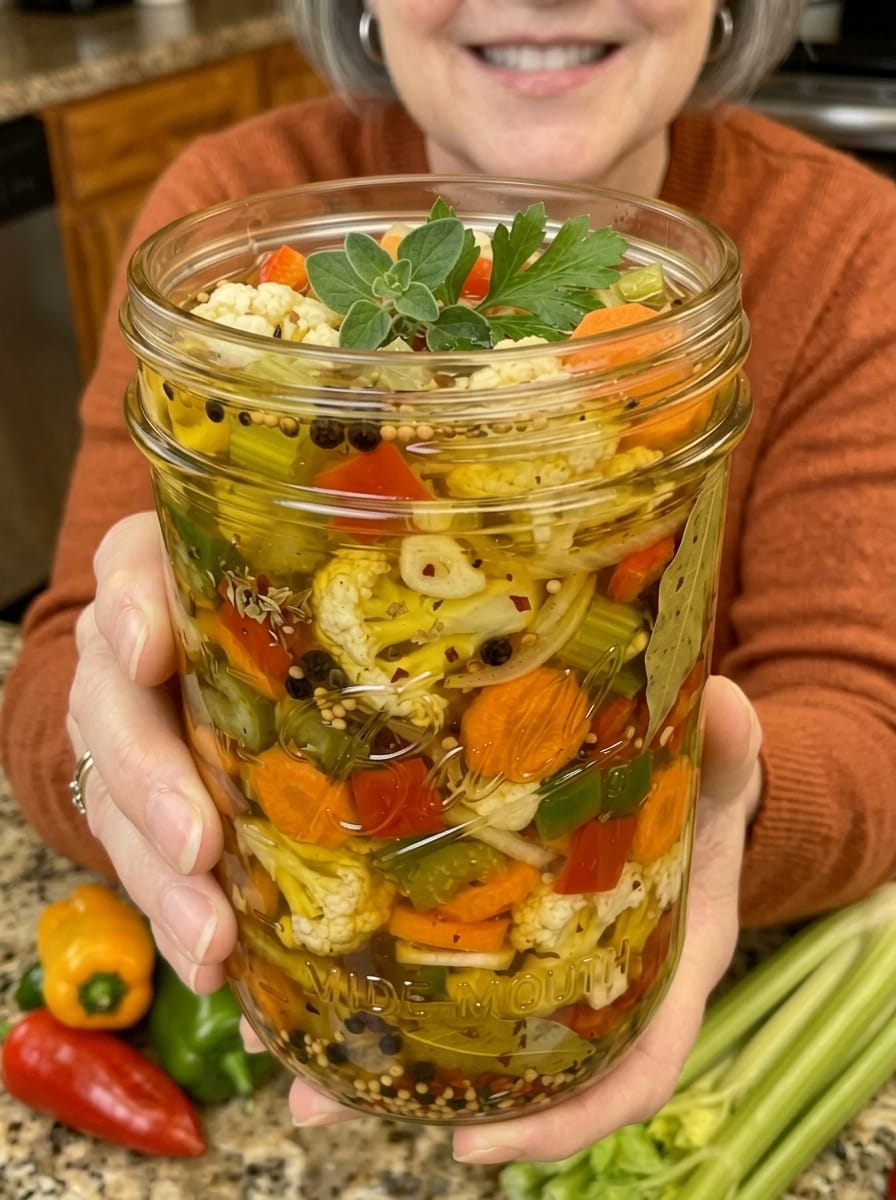
If you’ve ever ordered an Italian beef sandwich in Chicago, built an antipasto platter, or wondered what gives so many Italian-American dishes that irresistible tangy crunch, chances are you’ve encountered giardiniera. This homemade Italian Giardiniera Pickles recipe brings that same bold, tangy, colorful flavor straight to your own kitchen. Crisp cauliflower, carrots, bell peppers, celery, and onions are combined with garlic, herbs, and spices, then preserved in a zesty vinegar brine that turns simple vegetables into a crunchy, savory condiment you’ll want to put on everything.
Whether you grew up eating giardiniera on sandwiches, you’re building the ultimate antipasto spread, or you simply love a good tangy, spicy pickle, this recipe is easy to make, endlessly versatile, and far more flavorful than anything you’ll find pre-made at the store. Below you’ll find a full breakdown of the ingredients, detailed step-by-step instructions, expert tips for the best texture, storage guidance, serving ideas, and answers to the most common questions about making giardiniera at home.
Why You’ll Love This Italian Giardiniera Pickles Recipe
Giardiniera has earned a devoted following for good reason, and this homemade version delivers on every front.
It’s a true medley of flavor and texture. Unlike single-vegetable pickles, giardiniera combines several vegetables, each with its own texture and flavor. Cauliflower brings a satisfying crunch, carrots add sweetness, celery contributes a fresh, slightly peppery bite, and bell peppers bring color and mild sweetness. Combined with garlic and Italian herbs, every bite is different, yet everything works together in perfect harmony.
It’s a classic condiment with real staying power. Giardiniera has deep roots in Italian and Italian-American cuisine, and it’s become especially famous as a topping for Chicago-style Italian beef sandwiches. This homemade version captures that same authentic, tangy, herby flavor.
It’s endlessly versatile. This isn’t just a sandwich topping. Giardiniera can be added to antipasto platters, served alongside grilled meats, mixed into salads, or eaten straight from the jar as a crunchy, tangy snack.
It’s a colorful, beautiful addition to any table. With bright orange carrots, white cauliflower, red and green bell peppers, and pale onions and garlic, a jar of giardiniera looks as good as it tastes, making it a great addition to a grazing board or holiday spread.
It’s easy to customize. Love extra heat? Add more red pepper flakes or a few slices of fresh chili. Prefer a milder version? Simply reduce or omit the red pepper flakes. This recipe is a fantastic base you can adjust to your own taste.
It keeps well in the fridge. Once made, this pickle stays fresh for weeks, making it a great make-ahead project for meal prep, parties, or gifting.
What Is Giardiniera, Exactly?
Giardiniera (pronounced jar-din-YEHR-ah) is an Italian word that simply means “from the garden,” and it refers to a mix of pickled vegetables preserved in a vinegar brine, sometimes with oil added as well. Traditional Italian giardiniera typically includes vegetables like cauliflower, carrots, celery, and peppers, seasoned with herbs, garlic, and spices. There are many regional and personal variations, from mild versions served as a simple table condiment in Italy, to the famously spicy, oil-packed “hot giardiniera” popularized in Chicago, where it’s a signature topping for Italian beef sandwiches and a staple on pizza.
This recipe leans into a bright, tangy, herb-forward style, using a straightforward vinegar brine loaded with garlic, oregano, Italian seasoning, and a touch of heat from red pepper flakes, giving you a giardiniera that’s true to its roots while being simple enough to make in your own kitchen.
Ingredients You’ll Need
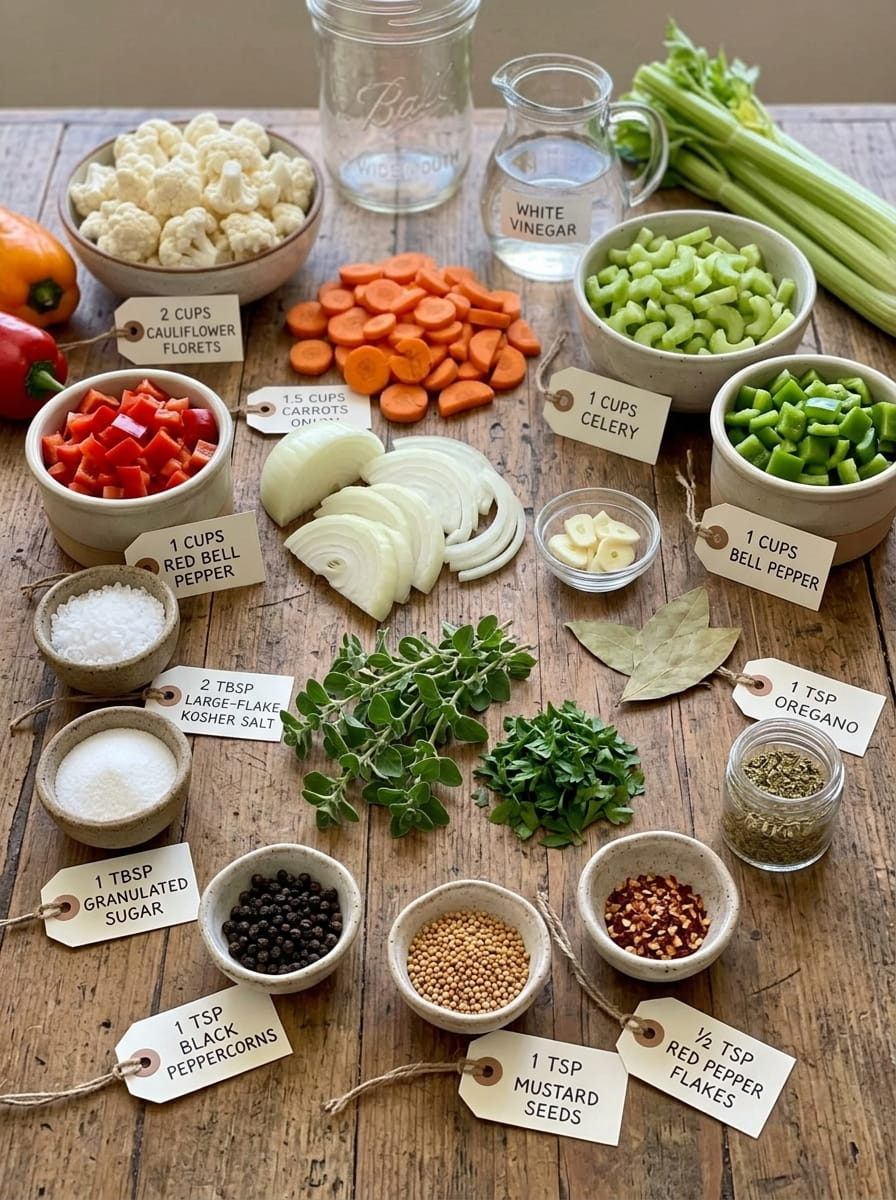
This recipe is broken into two components: the vegetables and aromatics, and the tangy pickling brine.
For the Pickled Vegetables
2 cups cauliflower florets — Cauliflower is a classic giardiniera ingredient, offering a satisfying crunch and a mild flavor that soaks up the tangy brine beautifully.
1 1/2 cups carrots, sliced — Carrots add natural sweetness, vibrant color, and a firm, crisp bite that holds up well to pickling.
1 cup celery, sliced — Celery contributes a fresh, slightly peppery crunch that balances out the richer, sweeter vegetables.
1 red bell pepper, sliced — Red bell pepper adds sweetness, color, and a tender-crisp texture.
1 green bell pepper, sliced — Green bell pepper brings a slightly more vegetal, savory flavor alongside the red pepper’s sweetness.
1 small yellow onion, thinly sliced — Onion adds sharpness and depth, softening slightly as it pickles while still retaining some bite.
3 cloves garlic, thinly sliced — Garlic infuses the entire jar with savory depth and pairs perfectly with the herbs and vinegar.
For the Brine
2 cups white vinegar — White vinegar provides the sharp, clean acidity that defines a good giardiniera.
1 cup water — Water dilutes the vinegar slightly, softening the acidity so the other flavors can shine through.
1 tablespoon kosher salt — Salt seasons the vegetables and brine while also supporting preservation.
1 tablespoon granulated sugar — A touch of sugar balances out the sharp vinegar and enhances the natural sweetness of the carrots and peppers.
1 teaspoon black peppercorns — Whole peppercorns add warm, slightly floral heat to the brine.
1 teaspoon dried oregano — Oregano brings a classic, earthy Italian herb flavor that’s essential to a good giardiniera.
1 teaspoon Italian seasoning — This herb blend layers in additional flavor complexity, typically including basil, thyme, rosemary, and marjoram.
1/2 teaspoon red pepper flakes — Red pepper flakes add a gentle, steady heat throughout the brine.
2 bay leaves — Bay leaves contribute a subtle herbal, aromatic depth to round out the spice blend.
How to Make Italian Giardiniera Pickles (Step-by-Step)
This recipe is simple to prepare and doesn’t require any special canning equipment, since it’s a refrigerator pickle rather than a shelf-stable canned product. Here’s exactly how to make it from start to finish.
Step 1: Prep the Vegetables
Wash all of your vegetables thoroughly, then cut the cauliflower, carrots, celery, and bell peppers into similar-sized pieces. Cutting everything to a roughly consistent size ensures even pickling and a more uniform texture throughout the jar. Thinly slice the onion and garlic as well.
Step 2: Blanch the Harder Vegetables
Bring a large pot of water to a boil. Add the cauliflower, carrots, and celery to the boiling water and blanch for 2 to 3 minutes. Blanching briefly softens these firmer vegetables just enough so they pickle properly while still retaining a satisfying crunch. Bell peppers, onion, and garlic are added later without blanching, since they’re more delicate and don’t need the same precooking.
Step 3: Shock the Vegetables
As soon as the cauliflower, carrots, and celery are done blanching, drain them immediately and rinse them under cold water. This stops the cooking process right away and locks in that tender-crisp texture that’s essential to good giardiniera. Skipping this step can lead to overcooked, mushy vegetables.
Step 4: Build the Brine
In a saucepan, combine the white vinegar, water, salt, sugar, black peppercorns, dried oregano, Italian seasoning, red pepper flakes, and bay leaves. This blend of acid, salt, sugar, and herbs is what gives the giardiniera its signature tangy, herby, Italian flavor.
Step 5: Simmer the Brine
Place the saucepan over medium heat and bring the brine to a gentle boil, stirring occasionally to fully dissolve the salt and sugar. Let it boil gently for a minute or two to allow the herbs and spices to infuse into the liquid.
Step 6: Pack the Jars
Divide the blanched cauliflower, carrots, and celery among clean glass jars, along with the sliced bell peppers, onion, and garlic. Distribute the vegetables evenly so each jar gets a good mix of colors, textures, and flavors.
Step 7: Pour the Brine
Carefully pour the hot brine over the vegetables in each jar, making sure everything is fully submerged in liquid. Any vegetables poking above the brine line are more likely to spoil quickly or develop an unpleasant texture, so pack the jars snugly and press the vegetables down gently if needed.
Step 8: Cool and Seal
Let the jars cool to room temperature on the counter before sealing them with tight-fitting lids. Sealing while the brine is still hot can trap excess condensation inside the jar, which isn’t ideal for a refrigerator pickle.
Step 9: Refrigerate and Wait
Once sealed, transfer the jars to the refrigerator. While the giardiniera is technically edible after a few hours, it’s best to let it pickle for at least 24 hours so the vegetables have time to fully absorb the tangy, herby brine. For the best flavor, let the jars rest for 3 to 5 days, or even up to a week, before serving.
Step 10: Serve and Enjoy
Once your giardiniera has had time to develop its flavor, it’s ready to serve alongside sandwiches, grilled meats, Italian dishes, or antipasto platters, or simply enjoyed straight from the jar.
Tips for the Best Giardiniera
Cut vegetables into uniform pieces. Consistent sizing ensures every piece pickles at the same rate and gives the finished jar a neat, professional look.
Don’t skip the blanching step. Briefly blanching the cauliflower, carrots, and celery softens them just enough to pickle properly while keeping that essential tender-crisp bite. Skipping this step can leave these firmer vegetables too crunchy and undercooked, or unevenly pickled.
Shock the vegetables in cold water immediately. This step halts the cooking process right away, preventing the vegetables from turning mushy or losing their vibrant color.
Adjust the heat to your preference. For a spicier, Chicago-style hot giardiniera, add extra red pepper flakes or a few slices of fresh chili pepper to the jar. For a milder version, reduce or omit the red pepper flakes entirely.
Make sure everything stays submerged. Any vegetables poking above the brine line are more prone to spoilage. Pack the jars snugly and, if needed, use a small clean weight to keep everything pushed down under the liquid.
Use a mix of colors. Using both red and green bell peppers not only adds flavor variation but also makes for a much more visually striking jar of pickled vegetables.
Be patient. While the giardiniera is safe to eat after 24 hours, the flavor genuinely improves with time. Waiting 3 to 5 days, or even a full week, allows the vinegar, garlic, and herbs to fully penetrate every vegetable.
How to Store Italian Giardiniera Pickles
This giardiniera is a refrigerator pickle, not a shelf-stable canned product, which means it must be stored in the refrigerator at all times rather than on the counter or in the pantry. Properly stored in a sealed jar with the vegetables fully submerged in brine, homemade giardiniera will typically keep well in the refrigerator for up to 3 to 4 weeks. Always use a clean utensil when removing vegetables from the jar to avoid introducing bacteria that could shorten its shelf life, and watch for any signs of spoilage, such as an off smell, unusual discoloration, or mold, before serving.
If you’d like to make an oil-packed version, similar to the style often served on Italian beef sandwiches, you can drain some of the brine from a portion of the giardiniera and mix it with olive oil just before serving, though the vinegar-only version will keep longer in the refrigerator.
Ways to Use Italian Giardiniera Pickles
Part of what makes giardiniera such a beloved condiment is its sheer versatility. Here are some of the best ways to enjoy it.
Italian beef sandwiches — Giardiniera is the classic topping for a Chicago-style Italian beef sandwich, adding tangy, herby crunch that cuts through the rich, savory meat.
Sandwiches and subs — Layer giardiniera onto any deli sandwich, sub, or panini for an extra punch of flavor and texture.
Antipasto platters — Giardiniera is a natural fit for any antipasto spread, pairing beautifully with cured meats, cheeses, olives, and crusty bread.
Grilled meats — Serve alongside grilled sausage, chicken, or steak for a tangy, acidic contrast that balances rich, smoky flavors.
Pizza topping — Scatter chopped giardiniera over pizza before or after baking for a spicy, tangy twist on a classic slice.
Pasta salads — Chop giardiniera and toss it into pasta salads for a burst of tangy, herby flavor and extra crunch.
Charcuterie boards — A small bowl of giardiniera adds color, crunch, and acidity to any charcuterie or grazing board.
Straight from the jar — Simple, quick, and satisfying: giardiniera makes a fantastic low-calorie snack straight out of the refrigerator.
Mixed into salads — Add chopped giardiniera to green salads or grain bowls for extra texture, tang, and Italian flavor.
Alongside eggs — Serve a spoonful of giardiniera next to scrambled eggs or an omelet for a tangy, herby breakfast upgrade.
Frequently Asked Questions
Why do I need to blanch the vegetables first? Blanching briefly softens the firmer vegetables, such as cauliflower, carrots, and celery, just enough so they pickle properly while still retaining a pleasant crunch. Without blanching, these vegetables can end up too tough or unevenly pickled.
Is this giardiniera shelf-stable, or does it need to be refrigerated? This is a refrigerator pickle, not a canned, shelf-stable product. It must be kept refrigerated at all times and doesn’t go through a water bath or pressure canning process.
How spicy is this giardiniera? As written, this recipe has a mild, background heat from the red pepper flakes. For a spicier, Chicago-style hot giardiniera, add extra red pepper flakes or a few slices of fresh chili pepper.
Can I add other vegetables? Yes. Green beans, small pickling cucumbers, jalapeños, or pearl onions can all be added or substituted based on your preferences.
Why did my vegetables turn out too soft? This usually happens if the vegetables are blanched for too long. Stick to the 2 to 3 minute blanching time and shock them immediately in cold water to stop the cooking process.
How long does the giardiniera need to sit before it’s ready to eat? At minimum, let the jars rest in the refrigerator for 24 hours before serving. For the best, most developed flavor, wait 3 to 5 days, or up to a week.
Can I make an oil-packed version like the kind served on Italian beef sandwiches? Yes. Simply drain some of the vinegar brine from a portion of the giardiniera and mix it with olive oil before serving. Keep in mind that an oil-packed version should still be refrigerated and used within a shorter time frame.
Do I need special canning jars for this recipe? No. Standard clean glass jars with tight-fitting lids, such as mason jars, work perfectly well since this recipe doesn’t require pressure canning or water bath processing.
Can I reuse the brine for a second batch of vegetables? It’s best to make a fresh batch of brine for each new batch of vegetables, since the used brine will have picked up moisture and lost some of its concentrated flavor and acidity.
Final Thoughts
This Italian Giardiniera Pickles recipe proves that a handful of fresh vegetables, a well-seasoned vinegar brine, and a little patience can produce a truly exceptional homemade condiment. The combination of crisp cauliflower, sweet carrots, fresh celery, colorful bell peppers, savory garlic, and classic Italian herbs creates a tangy, crunchy pickle that’s every bit as good on a sandwich as it is straight from the jar. Once you make a batch of this homemade giardiniera, it’s hard to go back to the store-bought version, and you’ll likely find yourself keeping a jar in the fridge at all times.
Print
Italian Giardiniera Pickles
Ingredients
This recipe is broken into two components: the vegetables and aromatics, and the tangy pickling brine.
For the Pickled Vegetables
2 cups cauliflower florets — Cauliflower is a classic giardiniera ingredient, offering a satisfying crunch and a mild flavor that soaks up the tangy brine beautifully.
1 1/2 cups carrots, sliced — Carrots add natural sweetness, vibrant color, and a firm, crisp bite that holds up well to pickling.
1 cup celery, sliced — Celery contributes a fresh, slightly peppery crunch that balances out the richer, sweeter vegetables.
1 red bell pepper, sliced — Red bell pepper adds sweetness, color, and a tender-crisp texture.
1 green bell pepper, sliced — Green bell pepper brings a slightly more vegetal, savory flavor alongside the red pepper’s sweetness.
1 small yellow onion, thinly sliced — Onion adds sharpness and depth, softening slightly as it pickles while still retaining some bite.
3 cloves garlic, thinly sliced — Garlic infuses the entire jar with savory depth and pairs perfectly with the herbs and vinegar.
For the Brine
2 cups white vinegar — White vinegar provides the sharp, clean acidity that defines a good giardiniera.
1 cup water — Water dilutes the vinegar slightly, softening the acidity so the other flavors can shine through.
1 tablespoon kosher salt — Salt seasons the vegetables and brine while also supporting preservation.
1 tablespoon granulated sugar — A touch of sugar balances out the sharp vinegar and enhances the natural sweetness of the carrots and peppers.
1 teaspoon black peppercorns — Whole peppercorns add warm, slightly floral heat to the brine.
1 teaspoon dried oregano — Oregano brings a classic, earthy Italian herb flavor that’s essential to a good giardiniera.
1 teaspoon Italian seasoning — This herb blend layers in additional flavor complexity, typically including basil, thyme, rosemary, and marjoram.
1/2 teaspoon red pepper flakes — Red pepper flakes add a gentle, steady heat throughout the brine.
2 bay leaves — Bay leaves contribute a subtle herbal, aromatic depth to round out the spice blend.
Instructions
This recipe is simple to prepare and doesn’t require any special canning equipment, since it’s a refrigerator pickle rather than a shelf-stable canned product. Here’s exactly how to make it from start to finish.
Wash all of your vegetables thoroughly, then cut the cauliflower, carrots, celery, and bell peppers into similar-sized pieces. Cutting everything to a roughly consistent size ensures even pickling and a more uniform texture throughout the jar. Thinly slice the onion and garlic as well.
Bring a large pot of water to a boil. Add the cauliflower, carrots, and celery to the boiling water and blanch for 2 to 3 minutes. Blanching briefly softens these firmer vegetables just enough so they pickle properly while still retaining a satisfying crunch. Bell peppers, onion, and garlic are added later without blanching, since they’re more delicate and don’t need the same precooking.
As soon as the cauliflower, carrots, and celery are done blanching, drain them immediately and rinse them under cold water. This stops the cooking process right away and locks in that tender-crisp texture that’s essential to good giardiniera. Skipping this step can lead to overcooked, mushy vegetables.
In a saucepan, combine the white vinegar, water, salt, sugar, black peppercorns, dried oregano, Italian seasoning, red pepper flakes, and bay leaves. This blend of acid, salt, sugar, and herbs is what gives the giardiniera its signature tangy, herby, Italian flavor.
Place the saucepan over medium heat and bring the brine to a gentle boil, stirring occasionally to fully dissolve the salt and sugar. Let it boil gently for a minute or two to allow the herbs and spices to infuse into the liquid.
Divide the blanched cauliflower, carrots, and celery among clean glass jars, along with the sliced bell peppers, onion, and garlic. Distribute the vegetables evenly so each jar gets a good mix of colors, textures, and flavors.
Carefully pour the hot brine over the vegetables in each jar, making sure everything is fully submerged in liquid. Any vegetables poking above the brine line are more likely to spoil quickly or develop an unpleasant texture, so pack the jars snugly and press the vegetables down gently if needed.
Let the jars cool to room temperature on the counter before sealing them with tight-fitting lids. Sealing while the brine is still hot can trap excess condensation inside the jar, which isn’t ideal for a refrigerator pickle.
Once sealed, transfer the jars to the refrigerator. While the giardiniera is technically edible after a few hours, it’s best to let it pickle for at least 24 hours so the vegetables have time to fully absorb the tangy, herby brine. For the best flavor, let the jars rest for 3 to 5 days, or even up to a week, before serving.
Once your giardiniera has had time to develop its flavor, it’s ready to serve alongside sandwiches, grilled meats, Italian dishes, or antipasto platters, or simply enjoyed straight from the jar.