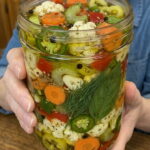
Ingredients
This recipe uses a colorful mix of vegetables combined with a tangy vinegar brine and finished with olive oil for classic Italian flavor. Here’s what you’ll need:
- 2 cups cauliflower florets
- 1 cup carrots, sliced
- 1 cup celery, sliced
- 1 cup red bell pepper, diced
- 1 cup green bell pepper, diced
- ½ cup banana peppers, sliced
- ¼ cup jalapeños, thinly sliced
- 4 garlic cloves, thinly sliced
- 1½ cups white vinegar
- 1½ cups water
- 2 tbsp kosher salt
- 1 tbsp granulated sugar
- 1 tsp black peppercorns
- 1 tsp dried oregano
- ½ tsp red pepper flakes
- ½ cup extra-virgin olive oil
Instructions
Wash all the vegetables and cut them into bite-size pieces. Uniform sizing helps everything pickle evenly and makes for easier eating once the giardiniera is ready.
Place the cauliflower, carrots, celery, bell peppers, banana peppers, and jalapeños in a large bowl. Sprinkle generously with kosher salt and toss well to coat. Cover the bowl and refrigerate for 8 to 12 hours.
This initial salt-brining step is a crucial part of what makes giardiniera so crisp. The salt draws out excess moisture from the vegetables, firming up their texture and helping them stay crunchy even after the pickling process, rather than turning soft or waterlogged.
After the salt-brining period, drain the vegetables thoroughly and rinse them briefly with cold water to remove excess salt. Make sure they’re well-drained before moving on to the next step.
In a saucepan, combine the white vinegar, water, granulated sugar, black peppercorns, dried oregano, and red pepper flakes. Bring the mixture to a gentle boil, stirring until the sugar dissolves completely.
Add the drained, rinsed vegetables directly into the boiling brine and simmer for just 2 to 3 minutes. The goal here is to slightly soften the vegetables while keeping them crisp — you’re not fully cooking them, just giving them a quick head start on absorbing flavor.
Place the thinly sliced garlic into clean glass jars, then pack the vegetables tightly on top. Packing the vegetables snugly helps ensure the jars hold enough brine to fully cover everything while maximizing how much giardiniera you can fit into each jar.
Pour the hot pickling brine over the vegetables until they are completely submerged.
Let the jars cool to room temperature on the counter. This step helps prevent thermal shock and allows the olive oil (added next) to be incorporated properly without breaking down from residual heat.
Once the jars have cooled, add the extra-virgin olive oil to each jar. The oil rises to the top and adds richness, classic Italian flavor, and an extra layer of preservation.
Seal the jars tightly and transfer them to the refrigerator.
Allow the giardiniera to marinate for at least 24 to 48 hours before serving. This resting period lets the vegetables fully absorb the tangy, herby, garlicky brine. For even deeper flavor, many people find that giardiniera tastes best after 4 to 5 days in the fridge.