
Peanut Butter Pumpkin Dog Cookies 🎃🐾🐶
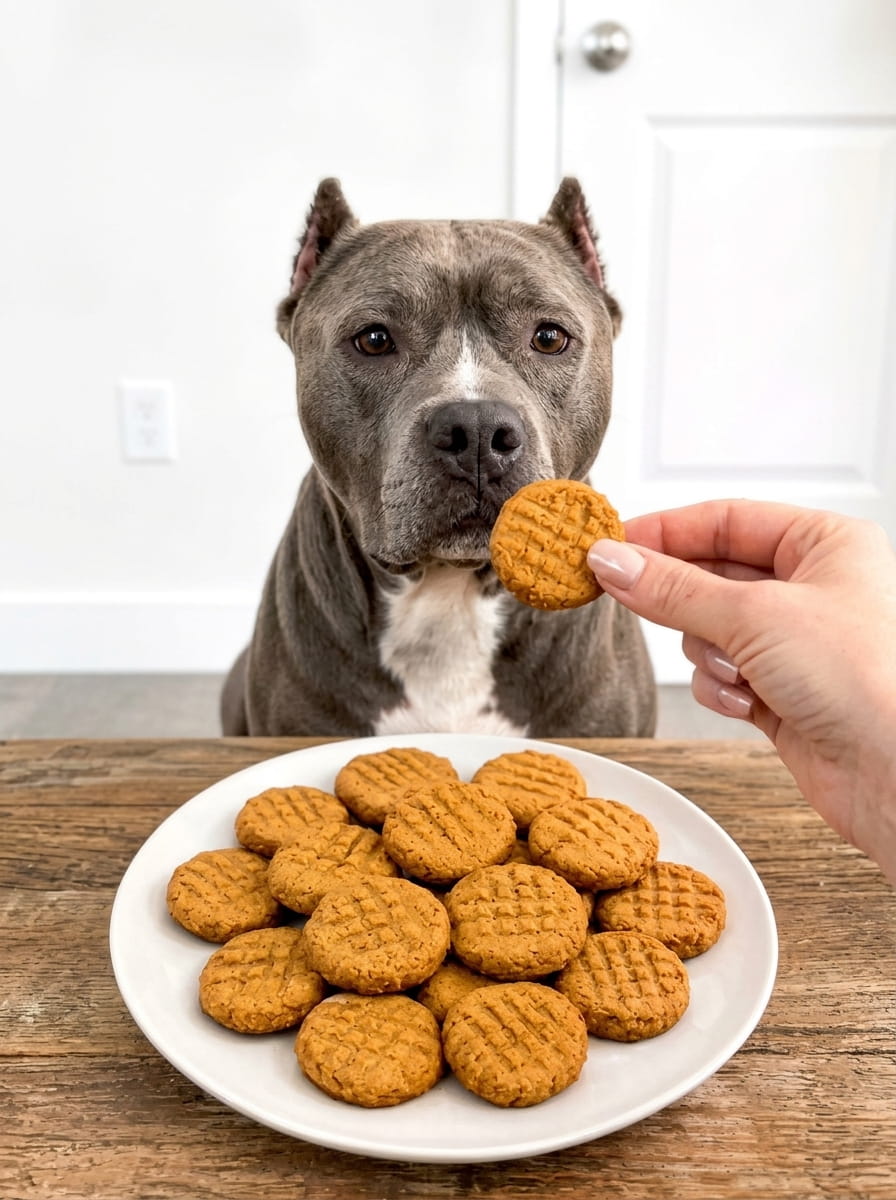
If your dog comes running at the sound of the pantry door, these pumpkin dog cookies are an easy way to say thank you for all that tail wagging. They’re made with real pumpkin, natural peanut butter, and whole wheat flour, and they bake into golden little biscuits with lightly browned edges and a firm, slightly crumbly texture. A gentle fork crosshatch gives them that classic homemade cookie look, with no frosting or toppings needed.
The ingredient list is short and the method is simple: stir, roll, cut or scoop, and bake. You control what goes into the dough, which is a big reason many owners prefer baking treats at home.
This guide covers the full recipe, step-by-step instructions, and tips for getting the texture right. Because this is pet food, it also covers the safety points that matter most, especially checking the peanut butter label for xylitol, choosing plain pumpkin, and keeping portions sensible. You’ll also find variations, storage advice, and answers to common questions.
Recipe at a Glance
- Makes: 25-30 small cookies
- Prep time: 15 minutes
- Bake time: 20-25 minutes
- Oven temperature: 350°F (175°C)
- Difficulty: Very easy
Why You’ll Love These Pumpkin Peanut Butter Dog Cookies
Just a few ingredients. Pumpkin, peanut butter, whole wheat flour, and an optional egg are all you need, plus a splash of water.
Simple to make. One bowl, one spoon, and one baking sheet.
Wholesome and homemade. No fillers, artificial colors, or mystery ingredients.
Pumpkin adds fiber. Plain pumpkin is a popular ingredient in dog treats because it is a good fiber source and is generally gentle on the stomach.
Dogs love the flavor. Peanut butter is a favorite for many dogs, and pumpkin adds a mild, naturally sweet taste.
Easy to size. Make tiny training bites for small dogs or larger biscuits for big dogs.
Great for gifting. Pack them in a bag or jar with a ribbon for a dog-loving friend.
Keeps well. The firm texture stores better than soft treats.
Ingredients for Peanut Butter Pumpkin Dog Cookies
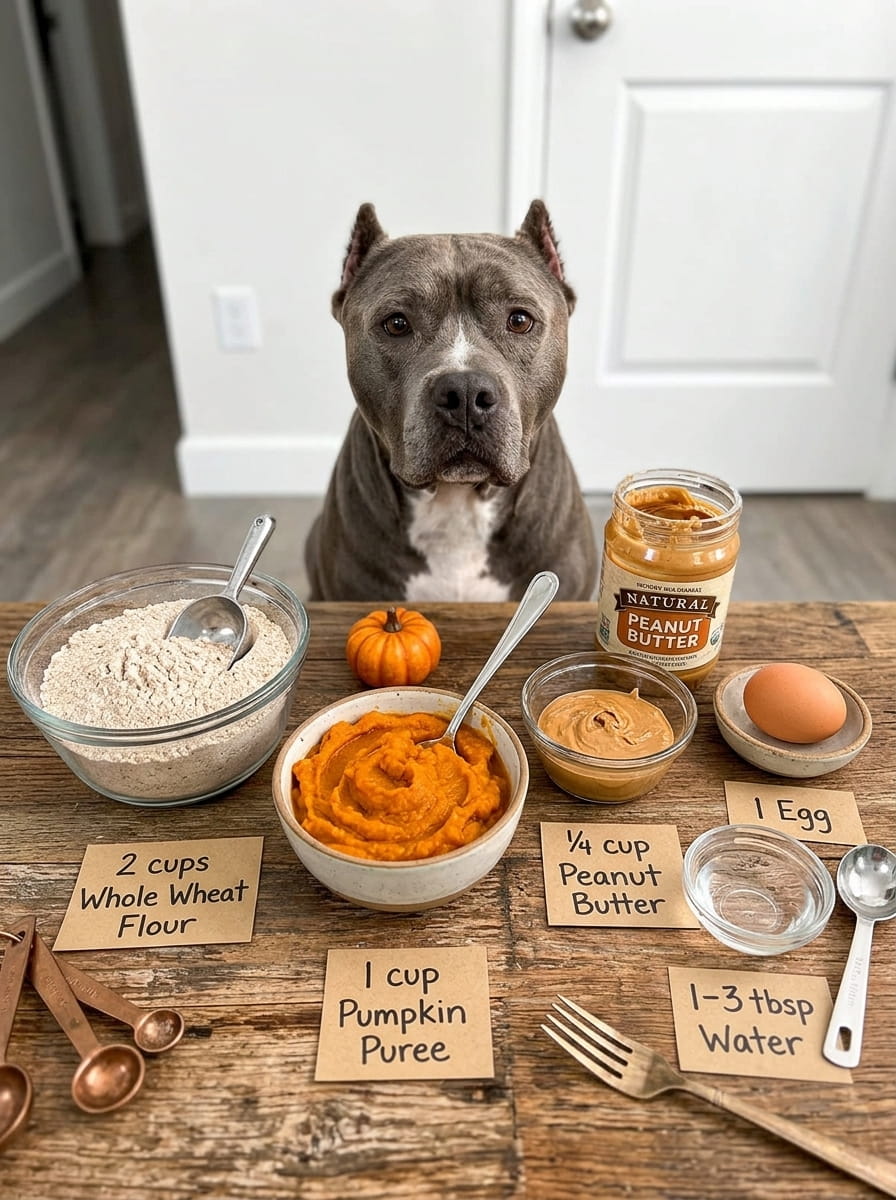
- 1 cup (245 g) plain pumpkin puree
- ¼ cup (64 g) natural peanut butter
- 2 cups (240 g) whole wheat flour
- 1 egg (optional, for extra binding)
- 1-3 tablespoons water, as needed
Ingredient Notes and Safety Tips
Pumpkin puree. Choose 100% pumpkin with no other ingredients. Pumpkin pie filling is not the same thing. It typically contains sugar and spices such as nutmeg, which you don’t want in dog treats. Check the label before you buy.
Natural peanut butter. This is the ingredient to read most carefully:
- Check the label for xylitol. Xylitol (sometimes listed as “birch sugar”) is an artificial sweetener that is highly toxic to dogs, even in small amounts. It has appeared in some peanut butter brands, so never assume. If xylitol is on the label, do not use that jar.
- Choose a peanut butter with only peanuts, and perhaps a little salt, on the ingredient list.
- Avoid products with added sugar, sweeteners, or flavorings.
- Peanut butter is high in fat and calories, so it should be used in small amounts. That’s another reason this recipe uses just ¼ cup for the whole batch.
Whole wheat flour. It gives the cookies structure and a slightly nutty flavor. Many dogs tolerate wheat well, but some dogs have wheat or grain sensitivities. If your dog has known allergies, check with your vet, or see the grain-free note in the variations below.
Egg (optional). The egg helps bind the dough and gives a slightly firmer, richer cookie. Cooked eggs are generally safe for dogs. If you leave it out, the dough may need a bit more flour or less water.
Water. Add it a tablespoon at a time. Pumpkin puree varies in moisture, so the amount you need will change from batch to batch.
A note about “dog-safe” food. Every dog is different. Allergies, sensitive stomachs, weight concerns, and medical conditions can change which foods are appropriate. If you’re unsure, a quick conversation with your vet is worthwhile.
Equipment You’ll Need
- A large mixing bowl and spoon
- A baking sheet
- Parchment paper or a silicone baking mat
- A fork (for the crosshatch)
- A rolling pin and cookie cutter (optional), or a small scoop
- A wire cooling rack
- An airtight container for storage
How to Make Peanut Butter Pumpkin Dog Cookies (Step by Step)
Before you begin, preheat your oven to 350°F (175°C) and line a baking sheet with parchment paper.
Step 1: Mix the Wet Ingredients
In a large bowl, stir together the pumpkin puree and natural peanut butter until smooth and evenly combined. If you’re using the egg, add it now and mix well. If your peanut butter is stiff, warm it for 10-15 seconds in the microwave so it stirs in easily.
Step 2: Add the Flour
Add the whole wheat flour to the bowl, about half at a time. Stir until a stiff dough begins to form. The dough should be thick and slightly sticky, but firm enough to hold its shape.
Step 3: Adjust the Consistency
If the dough is too dry or crumbly, add water 1 tablespoon at a time, up to 3 tablespoons, mixing between additions. If it’s too sticky to handle, add a tablespoon of flour. Aim for a dough you can roll or shape without it clinging to your hands.
Step 4: Shape the Cookies
You have two easy options:
Roll and cut: Dust a clean surface with flour. Roll the dough to about ¼ inch thick and cut out shapes with a small cookie cutter, such as a bone or round.
Scoop and flatten: Roll the dough into small balls, about 1 inch across, and place them on the baking sheet. Flatten each one gently with the palm of your hand.
Space the cookies about 1 inch apart. They won’t spread much.
Step 5: Add the Crosshatch
Dip a fork in a little flour so it doesn’t stick, then press it gently across the top of each cookie, and again at a right angle, to make a crosshatch pattern. This is the classic look and also helps flatten the cookies for even baking.
Step 6: Bake
Bake for 20-25 minutes, until the cookies are golden with lightly browned edges and feel firm when touched. For a crunchier cookie, leave them in the turned-off oven with the door slightly open for another 10-15 minutes.
Step 7: Cool Completely
Transfer the cookies to a wire rack and let them cool completely before serving. They will continue to firm up as they cool. Don’t offer them warm, as the cookies are easier on your dog’s mouth, and the texture is better, once cooled.
Expert Tips for the Best Dog Cookies
1. Read the peanut butter label every time. Brands change their recipes. Check for xylitol on each new jar.
2. Use plain pumpkin, not pie filling. This is the other key label check.
3. Add water slowly. Too much makes a sticky dough that’s hard to roll. You can always add more, but you can’t take it out.
4. Roll evenly. Cookies of uniform thickness bake at the same rate.
5. Flour your tools. A little flour on the rolling pin, cutter, and fork keeps the dough from sticking.
6. Match the size to your dog. Tiny cookies suit small dogs and training; larger biscuits suit big dogs.
7. Bake until firm. A fully baked, firm cookie keeps better and is less likely to mold in storage.
8. Cool before storing. Warm cookies sealed in a container trap moisture and can go soft or spoil faster.
9. Break big cookies up. For small dogs or seniors, break the cookie into smaller pieces.
How Much Should You Feed?
Treats should be just that, treats. A commonly cited veterinary guideline is that treats should make up no more than about 10% of a dog’s daily calories, with the rest coming from a complete and balanced dog food.
- Small dogs and puppies: One small cookie, or even half, as an occasional snack.
- Medium and large dogs: One or two cookies at a time.
- Start small. Offer one cookie the first time and watch for signs of stomach upset.
- Don’t overdo it. Too much peanut butter adds a lot of fat and calories, and too much pumpkin can cause loose stools.
If your dog has health conditions, is on a prescription diet, is overweight, or is very young or senior, check with your veterinarian before adding new treats.
Recipe Variations and Add-Ins
Introduce new ingredients one at a time, and check with your vet if your dog has special dietary needs.
Add a little banana. Mash half a ripe banana into the wet ingredients for extra sweetness. Keep portions small because of the sugar.
Add shredded carrot. About ¼ cup of finely grated carrot adds texture and color.
Add rolled oats. Replace ½ cup of the flour with plain rolled oats for a heartier cookie.
Add a pinch of cinnamon. A tiny pinch of plain cinnamon is fine for most dogs. Never use nutmeg, which is toxic to dogs in larger amounts.
Try a grain-free version. Replace the whole wheat flour with chickpea flour, oat flour, or another dog-appropriate flour. The texture and water needed will change, so test a small batch. Ask your vet whether a grain-free diet makes sense for your dog.
Use a different nut butter. Plain, unsweetened sunflower seed butter or almond butter (check for xylitol and other additives) can replace the peanut butter.
Make them vegan. Skip the egg. The cookies are naturally vegan without it.
Make mini training treats. Roll the dough thin and cut it into small squares with a knife or pizza cutter before baking.
Make larger biscuits. Use a bigger cutter for big dogs, and bake an extra 5-10 minutes.
Ingredients to Avoid in Homemade Dog Treats
When you start making your own dog treats, it helps to know which common foods can be harmful. Never add:
- Xylitol (found in some peanut butters, yogurts, gums, and baked goods)
- Chocolate and cocoa
- Grapes and raisins
- Onions, garlic, chives, and leeks
- Macadamia nuts
- Nutmeg and large amounts of strong spices
- Alcohol and caffeine
- Excess salt or sugar
If your dog eats something toxic, contact your veterinarian or a pet poison helpline right away rather than waiting for symptoms.
How to Store Dog Cookies
Room temperature: Once completely cooled, store the cookies in an airtight container for up to 5-7 days. Because the recipe contains pumpkin and, optionally, egg, cookies with a softer center are best kept in the fridge.
Refrigerator: Store in an airtight container for up to 2 weeks, especially in warm or humid weather.
Freezer: Freeze cooled cookies in a freezer-safe bag for up to 3 months. Thaw at room temperature before serving.
Check before serving. Throw out any cookies that show mold, smell off, or feel slimy.
Gifting: If you’re giving the cookies to a friend, include a note about the ingredients (especially peanut butter and wheat) and the storage advice, since some dogs have allergies.
Why Pumpkin and Peanut Butter Are Popular in Dog Treats
Pumpkin is widely used in dog treats and food because it’s rich in fiber and is generally easy on the stomach. Plain pumpkin is low in calories compared with many store-bought treats.
Peanut butter is a favorite flavor for many dogs and helps bind the dough. It’s best used in small amounts since it’s high in fat. Always choose a xylitol-free, unsweetened variety.
Whole wheat flour provides structure and some fiber. Many dogs digest it well, though some have grain sensitivities.
Together, these ingredients make a simple, appealing cookie without relying on added sugars or artificial flavors.
Frequently Asked Questions
Can dogs eat peanut butter?
Most dogs can, in moderation. The critical point is to avoid any product containing xylitol, which is highly toxic to dogs. Choose a plain peanut butter with only peanuts, and maybe salt.
Is pumpkin good for dogs?
Plain, cooked pumpkin is generally safe and often used to add fiber. Avoid pumpkin pie filling, which has sugar and spices.
Can I use pumpkin pie filling?
No. Use only 100% plain pumpkin puree.
Can puppies eat these cookies?
Many puppies can have a small piece, but their stomachs are sensitive and their nutritional needs are specific. Check with your vet first.
Do I need to use the egg?
No. It’s optional. The egg helps bind the dough, but the recipe works without it. You may need a little less water or a little more flour.
Can I use regular flour instead of whole wheat?
You can use whole wheat flour, oat flour, or another dog-appropriate flour. Whole wheat gives the best structure and flavor. Avoid self-rising flour, which contains salt and leavening.
Is this recipe grain-free?
No. It uses whole wheat flour. See the variations for grain-free options, and ask your vet if your dog needs a special diet.
Why is my dough too dry or too sticky?
Pumpkin puree and peanut butter vary in moisture. Add water a tablespoon at a time if it’s dry, or a little flour if it’s sticky.
How do I make the cookies crunchier?
Bake until firm, then let them dry out in the turned-off oven with the door slightly ajar for 10-15 minutes.
How many cookies can my dog have a day?
Treats should be a small part of the diet, generally no more than about 10% of daily calories. For most dogs, one or two small cookies as an occasional snack is plenty.
What if my dog gets an upset stomach?
Stop feeding the cookies and talk to your veterinarian, especially if symptoms continue. Your dog may be sensitive to wheat, peanut butter, or a change in diet.
What if my dog has a peanut or wheat allergy?
Skip this recipe and ask your vet for safe alternatives.
Can I add salt or sugar?
No. Dogs don’t need added salt or sugar, and too much can be harmful.
Can I freeze the dough?
Yes. Wrap the dough tightly and freeze for up to 2 months. Thaw in the fridge before rolling and baking.
Do these cookies replace a meal?
No. They’re an occasional treat, not nutritionally complete. Your dog should still eat a complete and balanced diet.
Final Thoughts
These peanut butter pumpkin dog cookies show that making something special for your dog doesn’t need to be complicated. With plain pumpkin, natural peanut butter, and whole wheat flour, you can bake golden, crunchy homemade biscuits that dogs love and owners feel good about.
Read your labels, especially for xylitol in the peanut butter, keep portions small, and introduce the cookies gradually. Do that, and you’ll have a simple, wholesome way to reward your best friend. ❤️🐶
If you bake these cookies, leave a comment and a star rating, and tell us how your pup liked them. Share the recipe with a fellow dog lover. 🎃🐾
Print
Peanut Butter Pumpkin Dog Cookies
Ingredients
- 1 cup (245 g) plain pumpkin puree
- ¼ cup (64 g) natural peanut butter
- 2 cups (240 g) whole wheat flour
- 1 egg (optional, for extra binding)
- 1–3 tablespoons water, as needed
Instructions
Before you begin, preheat your oven to 350°F (175°C) and line a baking sheet with parchment paper.
In a large bowl, stir together the pumpkin puree and natural peanut butter until smooth and evenly combined. If you’re using the egg, add it now and mix well. If your peanut butter is stiff, warm it for 10-15 seconds in the microwave so it stirs in easily.
Add the whole wheat flour to the bowl, about half at a time. Stir until a stiff dough begins to form. The dough should be thick and slightly sticky, but firm enough to hold its shape.
If the dough is too dry or crumbly, add water 1 tablespoon at a time, up to 3 tablespoons, mixing between additions. If it’s too sticky to handle, add a tablespoon of flour. Aim for a dough you can roll or shape without it clinging to your hands.
You have two easy options:
Roll and cut: Dust a clean surface with flour. Roll the dough to about ¼ inch thick and cut out shapes with a small cookie cutter, such as a bone or round.
Scoop and flatten: Roll the dough into small balls, about 1 inch across, and place them on the baking sheet. Flatten each one gently with the palm of your hand.
Space the cookies about 1 inch apart. They won’t spread much.
Dip a fork in a little flour so it doesn’t stick, then press it gently across the top of each cookie, and again at a right angle, to make a crosshatch pattern. This is the classic look and also helps flatten the cookies for even baking.
Bake for 20-25 minutes, until the cookies are golden with lightly browned edges and feel firm when touched. For a crunchier cookie, leave them in the turned-off oven with the door slightly open for another 10-15 minutes.
Transfer the cookies to a wire rack and let them cool completely before serving. They will continue to firm up as they cool. Don’t offer them warm, as the cookies are easier on your dog’s mouth, and the texture is better, once cooled.