Ingredients
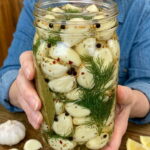
This recipe uses a short, simple ingredient list that yields big, bold flavor. Here’s what goes into a batch of homemade pickled garlic:
- 3 cups fresh garlic cloves, peeled
- 1½ cups white vinegar
- 1½ cups water
- 2 tbsp granulated sugar
- 1 tbsp kosher salt
- 1 tsp black peppercorns
- 1 tsp mustard seeds
- 2–3 sprigs fresh thyme
- 2 bay leaves
- ½ tsp red pepper flakes
Understanding Each Ingredient’s Role
- Fresh garlic cloves are, of course, the star of the show. Using fresh, firm cloves ensures the best texture and flavor once pickled.
- White vinegar provides the sharp, tangy backbone of the pickling liquid and acts as a natural preservative.
- Water dilutes the vinegar slightly, preventing the pickling liquid from being overly acidic while still maintaining enough acidity for proper pickling and preservation.
- Granulated sugar balances the sharpness of the vinegar with a touch of sweetness, softening garlic’s natural bite.
- Kosher salt enhances flavor throughout the brine and helps draw out moisture from the garlic, aiding in the pickling process.
- Black peppercorns add a subtle, warm spice note that complements the garlic without overpowering it.
- Mustard seeds contribute a mild tang and gentle pop of texture, common in classic pickling blends.
- Fresh thyme infuses the brine with an earthy, aromatic herbal note.
- Bay leaves add subtle depth and a slightly savory, herbal complexity to the overall flavor.
- Red pepper flakes bring a gentle chili kick that builds slowly, adding warmth without overwhelming heat.
Instructions
Peel the garlic cloves and trim off any damaged or discolored ends. If you’re working with a large quantity, consider using a quick trick to speed up peeling: place unpeeled cloves in a sealed container and shake vigorously for about 30 seconds — the skins often loosen and slip right off.
In a saucepan, combine the white vinegar, water, granulated sugar, kosher salt, black peppercorns, mustard seeds, fresh thyme sprigs, bay leaves, and red pepper flakes.
Bring the mixture to a gentle boil over medium heat, stirring occasionally until the sugar and salt fully dissolve. This step ensures the pickling liquid is well-seasoned and ready to properly flavor the garlic.
Once the pickling liquid reaches a boil, add the peeled garlic cloves directly into the saucepan. Let them simmer gently for about 2 minutes. This brief cooking time softens the garlic’s raw bite just slightly while keeping the cloves crisp and firm — you’re not trying to fully cook the garlic, just give it a head start on absorbing flavor.
Remove the saucepan from the heat and let the mixture cool slightly before transferring it to a jar. This short cooling period helps prevent thermal shock when the hot liquid meets a room-temperature glass jar.
Carefully transfer the garlic cloves along with the herbs, peppercorns, and mustard seeds into a clean glass jar. Distributing the herbs and spices throughout the jar (rather than leaving them all in the saucepan) helps ensure every clove gets maximum flavor exposure.
Pour the warm pickling liquid over the garlic cloves until they are completely submerged. Full submersion is key to even pickling and helps prevent spoilage.
Seal the jar with a tight-fitting lid and let it cool to room temperature on the counter before refrigerating.
Refrigerate the jar for at least 24 to 48 hours before serving. This resting period is essential — it’s when the garlic truly absorbs the tangy, herby, slightly spicy flavors of the brine. While you can technically eat it sooner, waiting the full 48 hours results in a noticeably more flavorful, well-rounded product.