

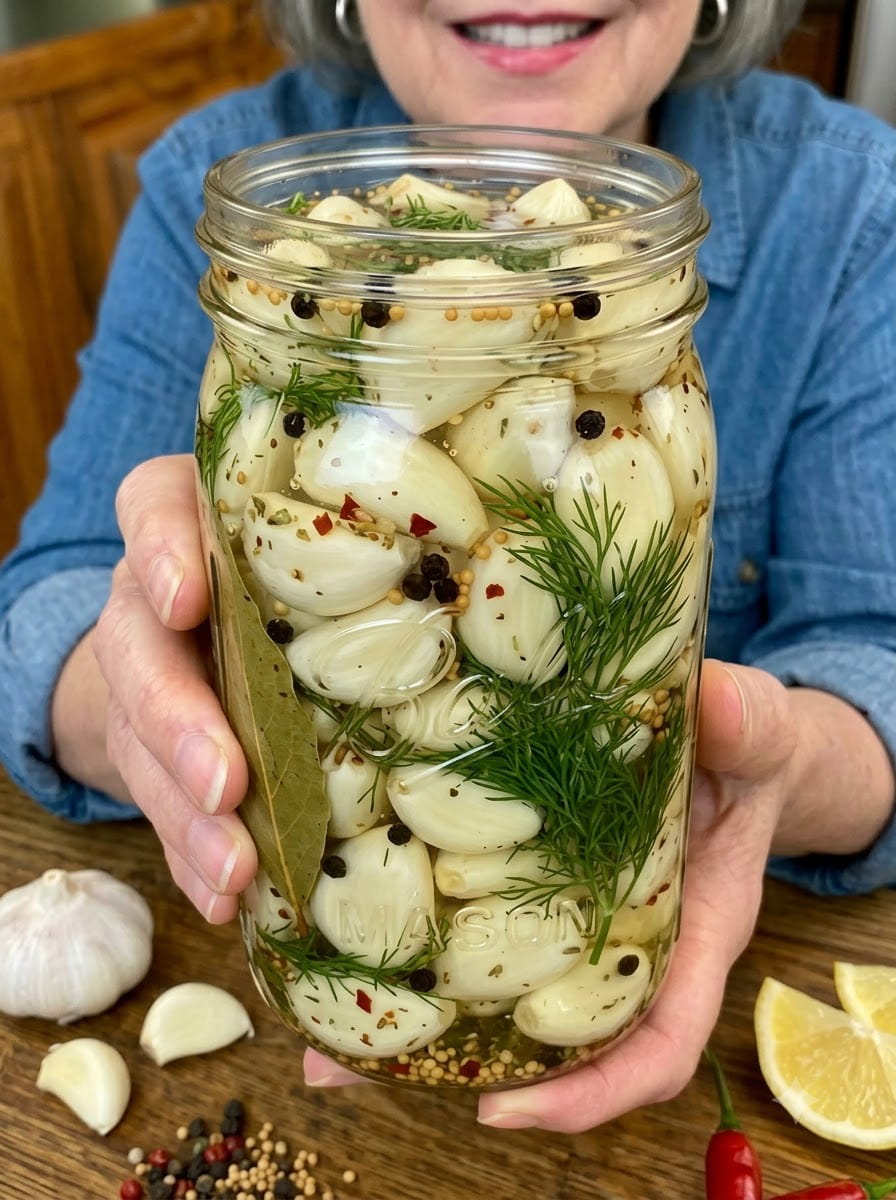
Pickled Garlic: The Crisp, Tangy, Slightly Sweet Refrigerator Pickle Every Garlic Lover Needs
Meta Description: Learn how to make homemade Pickled Garlic with this easy recipe. Crisp, tangy, slightly sweet, and infused with herbs and a gentle chili kick — perfect for snacking or cooking.
If you’re a true garlic lover, this recipe is about to become one of your kitchen staples. Pickled Garlic transforms raw garlic cloves into something completely different: crisp, tangy, slightly sweet bites infused with fragrant herbs and just a touch of chili heat. It’s a refrigerator pickle that’s as easy to make as it is addictive to eat, and once you have a jar on hand, you’ll find yourself reaching for it constantly — whether you’re snacking straight from the jar or using it to add a bold flavor boost to your favorite dishes.
Unlike raw garlic, which can be sharp and overpowering, pickled garlic mellows significantly during the pickling process. The vinegar, sugar, and salt work together to soften garlic’s intensity while still preserving its signature flavor, resulting in cloves that are tangy, subtly sweet, and deeply savory all at once. Add in herbs like thyme and bay leaf, plus a hint of red pepper flakes, and you’ve got a condiment that’s bursting with complexity in every single bite.
This guide covers everything you need to know to make perfect pickled garlic at home, from ingredient breakdowns and step-by-step instructions to storage tips, flavor variations, and the best ways to use it in your everyday cooking.
Why You Should Be Making Pickled Garlic at Home
Store-bought pickled garlic exists, but homemade versions are almost always better — fresher, more customizable, and far more flavorful. Here’s why this recipe deserves a permanent spot in your kitchen rotation:
- Incredibly simple to make. With just a handful of pantry staples and a short simmer time, this recipe comes together quickly with minimal hands-on effort.
- Mellows garlic’s sharp bite. The pickling process softens garlic’s raw intensity, making it easier to enjoy on its own or in larger quantities.
- Long fridge life. Once made, pickled garlic keeps well in the refrigerator for weeks, giving you a ready-to-use flavor booster whenever you need it.
- Endlessly versatile. Use it as a snack, a garnish, or a flavor-packed addition to sandwiches, salads, pastas, and more.
- Customizable flavor and heat. Easily adjust the herbs, spices, and chili level to match your personal taste.
- Great for gifting. A jar of homemade pickled garlic makes a thoughtful, unique gift for any fellow garlic enthusiast.
Ingredients You’ll Need
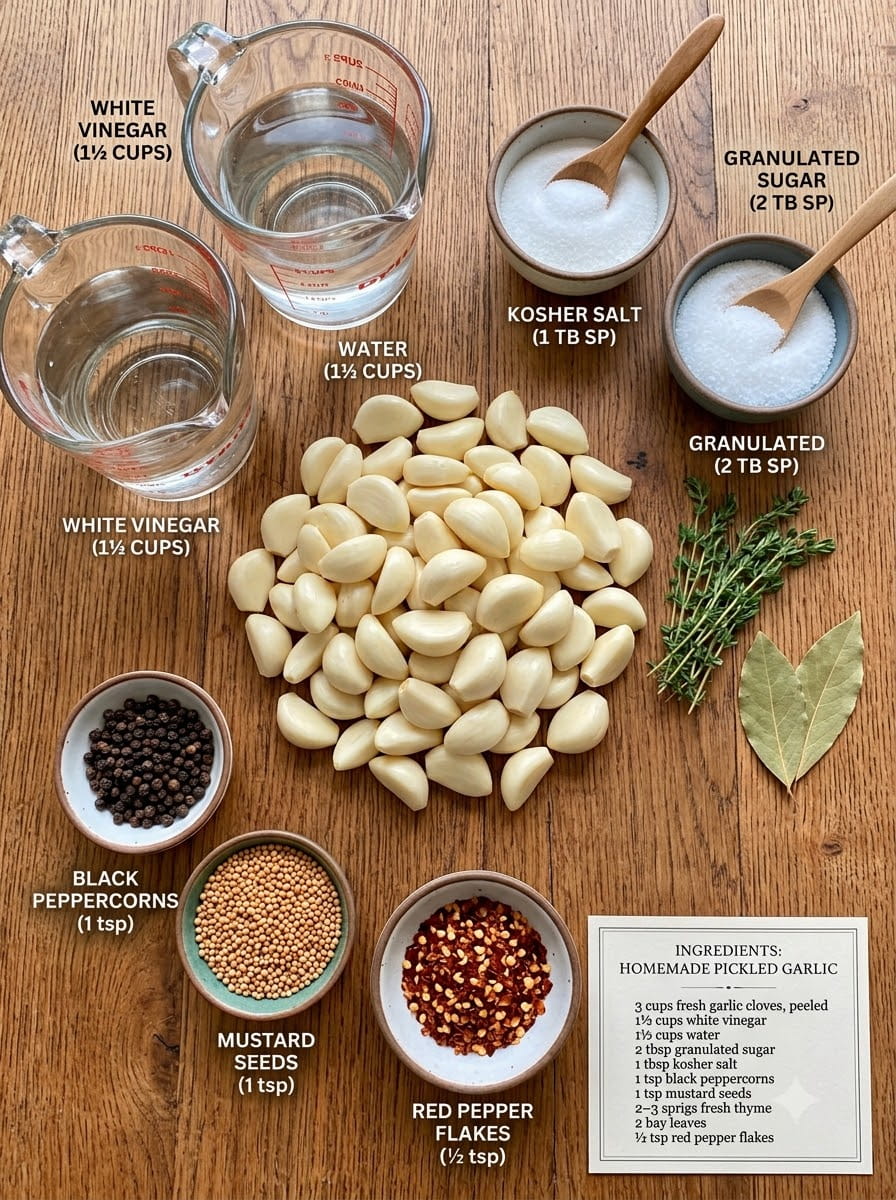
This recipe uses a short, simple ingredient list that yields big, bold flavor. Here’s what goes into a batch of homemade pickled garlic:
- 3 cups fresh garlic cloves, peeled
- 1½ cups white vinegar
- 1½ cups water
- 2 tbsp granulated sugar
- 1 tbsp kosher salt
- 1 tsp black peppercorns
- 1 tsp mustard seeds
- 2–3 sprigs fresh thyme
- 2 bay leaves
- ½ tsp red pepper flakes
Understanding Each Ingredient’s Role
- Fresh garlic cloves are, of course, the star of the show. Using fresh, firm cloves ensures the best texture and flavor once pickled.
- White vinegar provides the sharp, tangy backbone of the pickling liquid and acts as a natural preservative.
- Water dilutes the vinegar slightly, preventing the pickling liquid from being overly acidic while still maintaining enough acidity for proper pickling and preservation.
- Granulated sugar balances the sharpness of the vinegar with a touch of sweetness, softening garlic’s natural bite.
- Kosher salt enhances flavor throughout the brine and helps draw out moisture from the garlic, aiding in the pickling process.
- Black peppercorns add a subtle, warm spice note that complements the garlic without overpowering it.
- Mustard seeds contribute a mild tang and gentle pop of texture, common in classic pickling blends.
- Fresh thyme infuses the brine with an earthy, aromatic herbal note.
- Bay leaves add subtle depth and a slightly savory, herbal complexity to the overall flavor.
- Red pepper flakes bring a gentle chili kick that builds slowly, adding warmth without overwhelming heat.
Step-by-Step Instructions
Making pickled garlic at home is a straightforward process that mostly involves boiling a brine, simmering the garlic briefly, and letting time do the rest of the work.
Step 1: Prep the Garlic
Peel the garlic cloves and trim off any damaged or discolored ends. If you’re working with a large quantity, consider using a quick trick to speed up peeling: place unpeeled cloves in a sealed container and shake vigorously for about 30 seconds — the skins often loosen and slip right off.
Step 2: Build the Pickling Liquid
In a saucepan, combine the white vinegar, water, granulated sugar, kosher salt, black peppercorns, mustard seeds, fresh thyme sprigs, bay leaves, and red pepper flakes.
Bring the mixture to a gentle boil over medium heat, stirring occasionally until the sugar and salt fully dissolve. This step ensures the pickling liquid is well-seasoned and ready to properly flavor the garlic.
Step 3: Simmer the Garlic
Once the pickling liquid reaches a boil, add the peeled garlic cloves directly into the saucepan. Let them simmer gently for about 2 minutes. This brief cooking time softens the garlic’s raw bite just slightly while keeping the cloves crisp and firm — you’re not trying to fully cook the garlic, just give it a head start on absorbing flavor.
Step 4: Cool Slightly
Remove the saucepan from the heat and let the mixture cool slightly before transferring it to a jar. This short cooling period helps prevent thermal shock when the hot liquid meets a room-temperature glass jar.
Step 5: Transfer to a Jar
Carefully transfer the garlic cloves along with the herbs, peppercorns, and mustard seeds into a clean glass jar. Distributing the herbs and spices throughout the jar (rather than leaving them all in the saucepan) helps ensure every clove gets maximum flavor exposure.
Step 6: Pour the Pickling Liquid
Pour the warm pickling liquid over the garlic cloves until they are completely submerged. Full submersion is key to even pickling and helps prevent spoilage.
Step 7: Seal and Cool
Seal the jar with a tight-fitting lid and let it cool to room temperature on the counter before refrigerating.
Step 8: Chill and Wait
Refrigerate the jar for at least 24 to 48 hours before serving. This resting period is essential — it’s when the garlic truly absorbs the tangy, herby, slightly spicy flavors of the brine. While you can technically eat it sooner, waiting the full 48 hours results in a noticeably more flavorful, well-rounded product.
How Long Does Pickled Garlic Last?
Stored properly in an airtight jar in the refrigerator, homemade pickled garlic will typically stay fresh for up to 2 to 3 months. Because this recipe is a refrigerator pickle rather than a shelf-stable canned product, it must be kept refrigerated at all times and does not go through a hot water bath canning process.
If you want to make pickled garlic shelf-stable for long-term pantry storage, you’ll need to follow proper water bath canning procedures with sterilized jars and appropriate processing times. Because garlic is a low-acid food, it’s especially important to follow tested, USDA-approved canning guidelines to ensure food safety when canning for shelf storage.
A note on safety: Garlic stored in oil or improperly acidified liquid at room temperature can pose a risk of botulism. Always keep this vinegar-based pickled garlic refrigerated, and never store homemade garlic-in-oil mixtures at room temperature.
Tips for the Best Pickled Garlic
- Use fresh, firm garlic cloves. Avoid cloves that are soft, sprouting, or discolored, as they won’t pickle as well and may affect the final texture and flavor.
- Don’t over-simmer the garlic. A short 2-minute simmer is all you need. Overcooking can lead to soft, mushy cloves instead of the desired crisp-tender texture.
- Sterilize your jars. Starting with clean, sterilized jars helps extend shelf life and reduces the risk of spoilage.
- Fully submerge the garlic. Any cloves exposed to air above the liquid line are more prone to spoilage, so make sure the brine completely covers the garlic.
- Be patient. The flavor genuinely improves the longer the garlic sits in the brine — many people find the flavor peaks around the one-week mark.
- Use fresh herbs when possible. Fresh thyme provides a brighter, more aromatic flavor compared to dried, though dried thyme can be substituted in a pinch.
Flavor Variations to Try
Once you’ve made the classic version, try these variations to change up the flavor profile:
- Rosemary and Lemon: Swap thyme for fresh rosemary and add a few strips of lemon zest for a bright, herby twist.
- Extra Spicy: Add a sliced fresh chili pepper (such as a serrano or jalapeño) along with the red pepper flakes for a bigger heat kick.
- Sweet and Tangy: Increase the sugar slightly for a more pronounced sweet-tangy balance, similar to a bread-and-butter pickle style.
- Mediterranean Style: Add a few peppercorns of pink or green variety, along with a sprig of oregano, for a Mediterranean-inspired flavor profile.
- Smoky Garlic: Add a small pinch of smoked paprika to the brine for a subtle smoky undertone.
- Dill Pickled Garlic: Replace thyme with fresh dill for a flavor reminiscent of classic dill pickles.
Delicious Ways to Use Pickled Garlic
Pickled garlic is far more than just a snack — though it certainly holds its own straight out of the jar. Here are some of the best ways to incorporate it into your cooking:
- Snacking Straight From the Jar – Simple, satisfying, and endlessly addictive for garlic lovers.
- Sandwiches – Add a few sliced or whole cloves to sandwiches for a punch of tangy, savory flavor.
- Salads – Chop pickled garlic and toss it into green salads, grain bowls, or pasta salads for an extra layer of flavor.
- Pasta Dishes – Stir chopped pickled garlic into pasta sauces or toss with olive oil and pasta for a quick, flavorful meal.
- Grilled Meats – Serve alongside grilled chicken, steak, or sausages as a tangy, palate-cleansing bite between bites.
- Charcuterie Boards – Add a small bowl of pickled garlic to your next charcuterie or grazing board for a bold, tangy contrast to cured meats and cheeses.
- Pizza Topping – Scatter halved cloves over pizza before or after baking for a punch of tangy garlic flavor.
- Martinis and Cocktails – Use pickled garlic cloves as a unique, savory garnish in place of olives for a bold cocktail twist.
- Hummus and Dips – Blend a few cloves into hummus or other dips for a tangy, garlicky boost.
- Roasted Vegetables – Toss chopped pickled garlic with roasted vegetables just before serving for a bright, tangy finishing touch.
Frequently Asked Questions
Does pickling reduce the sharpness of raw garlic? Yes. The vinegar, sugar, and brief simmering process significantly mellow garlic’s raw intensity, resulting in a milder, tangier, more approachable flavor compared to fresh raw garlic.
Can I use pre-peeled garlic cloves to save time? Yes, pre-peeled garlic cloves work well in this recipe and can save significant prep time. Just make sure they’re fresh and firm before using.
Why does my pickled garlic turn slightly blue or green? This is a natural, harmless chemical reaction that can occur when garlic reacts with certain compounds in the vinegar, particularly if the garlic is very fresh. It doesn’t indicate spoilage and is safe to eat.
Can I reuse the pickling liquid for another batch? It’s best to make a fresh batch of pickling liquid each time to ensure proper acidity levels and food safety. Reusing liquid can dilute its preservative strength.
How long should I wait before eating the garlic? While technically edible after a few hours, waiting the full 24 to 48 hours allows the garlic to properly absorb the brine’s flavor. For the best results, many people prefer waiting up to a full week.
Is pickled garlic good for you? Garlic is naturally rich in beneficial compounds, and pickling doesn’t diminish its core nutritional value. However, keep in mind that this recipe does include added sugar and salt, so it’s best enjoyed in moderation as a flavorful condiment rather than a health supplement.
Final Thoughts
Pickled Garlic is a simple, rewarding recipe that transforms an everyday pantry ingredient into something truly special. With its perfect balance of tangy vinegar, subtle sweetness, fragrant herbs, and gentle chili warmth, this refrigerator pickle is guaranteed to become a staple in your kitchen. It’s easy enough for a first-time canner to tackle, yet flavorful enough to impress even the most devoted garlic lovers.
Make a batch, let it chill for a day or two, and prepare to fall in love with garlic all over again — whether you’re eating it straight from the jar or using it to elevate everything from sandwiches to pasta to charcuterie boards.
Print
Pickled Garlic
Ingredients
This recipe uses a short, simple ingredient list that yields big, bold flavor. Here’s what goes into a batch of homemade pickled garlic:
- 3 cups fresh garlic cloves, peeled
- 1½ cups white vinegar
- 1½ cups water
- 2 tbsp granulated sugar
- 1 tbsp kosher salt
- 1 tsp black peppercorns
- 1 tsp mustard seeds
- 2–3 sprigs fresh thyme
- 2 bay leaves
- ½ tsp red pepper flakes
Understanding Each Ingredient’s Role
- Fresh garlic cloves are, of course, the star of the show. Using fresh, firm cloves ensures the best texture and flavor once pickled.
- White vinegar provides the sharp, tangy backbone of the pickling liquid and acts as a natural preservative.
- Water dilutes the vinegar slightly, preventing the pickling liquid from being overly acidic while still maintaining enough acidity for proper pickling and preservation.
- Granulated sugar balances the sharpness of the vinegar with a touch of sweetness, softening garlic’s natural bite.
- Kosher salt enhances flavor throughout the brine and helps draw out moisture from the garlic, aiding in the pickling process.
- Black peppercorns add a subtle, warm spice note that complements the garlic without overpowering it.
- Mustard seeds contribute a mild tang and gentle pop of texture, common in classic pickling blends.
- Fresh thyme infuses the brine with an earthy, aromatic herbal note.
- Bay leaves add subtle depth and a slightly savory, herbal complexity to the overall flavor.
- Red pepper flakes bring a gentle chili kick that builds slowly, adding warmth without overwhelming heat.
Instructions
Peel the garlic cloves and trim off any damaged or discolored ends. If you’re working with a large quantity, consider using a quick trick to speed up peeling: place unpeeled cloves in a sealed container and shake vigorously for about 30 seconds — the skins often loosen and slip right off.
In a saucepan, combine the white vinegar, water, granulated sugar, kosher salt, black peppercorns, mustard seeds, fresh thyme sprigs, bay leaves, and red pepper flakes.
Bring the mixture to a gentle boil over medium heat, stirring occasionally until the sugar and salt fully dissolve. This step ensures the pickling liquid is well-seasoned and ready to properly flavor the garlic.
Once the pickling liquid reaches a boil, add the peeled garlic cloves directly into the saucepan. Let them simmer gently for about 2 minutes. This brief cooking time softens the garlic’s raw bite just slightly while keeping the cloves crisp and firm — you’re not trying to fully cook the garlic, just give it a head start on absorbing flavor.
Remove the saucepan from the heat and let the mixture cool slightly before transferring it to a jar. This short cooling period helps prevent thermal shock when the hot liquid meets a room-temperature glass jar.
Carefully transfer the garlic cloves along with the herbs, peppercorns, and mustard seeds into a clean glass jar. Distributing the herbs and spices throughout the jar (rather than leaving them all in the saucepan) helps ensure every clove gets maximum flavor exposure.
Pour the warm pickling liquid over the garlic cloves until they are completely submerged. Full submersion is key to even pickling and helps prevent spoilage.
Seal the jar with a tight-fitting lid and let it cool to room temperature on the counter before refrigerating.
Refrigerate the jar for at least 24 to 48 hours before serving. This resting period is essential — it’s when the garlic truly absorbs the tangy, herby, slightly spicy flavors of the brine. While you can technically eat it sooner, waiting the full 48 hours results in a noticeably more flavorful, well-rounded product.






