Ingredients
For the Garlic
- 2 cups peeled fresh garlic cloves
For the Brine
- 1 cup white distilled vinegar (5% acidity)
- 1 cup water
- 1 tablespoon salt
- 1 tablespoon granulated sugar (optional)
For the Flavor
- 3–4 fresh red chili peppers, sliced
- 3 sprigs fresh dill
- 1 teaspoon mustard seeds
- 1 teaspoon black peppercorns
- ½ teaspoon red pepper flakes (adjust to taste)
- 2 bay leaves
Instructions
Step 1: Prepare the Fresh Garlic
Start by peeling approximately 2 cups of fresh garlic cloves.
Remove any damaged, bruised, soft, or discolored pieces. Try to keep the cloves whole rather than chopping or crushing them.
Whole garlic cloves provide a satisfying texture and look beautiful inside the jar.
If some cloves are significantly larger than others, remember that they may take longer to absorb the flavors of the brine.
Set the prepared garlic aside.
Step 2: Prepare the Glass Jar
Wash a clean glass jar and its lid thoroughly with hot, soapy water.
Rinse away all soap residue and allow the jar to dry completely.
Starting with clean equipment is important when preparing homemade refrigerator pickles.
Make sure the jar is large enough to hold all the garlic cloves, seasonings, and vinegar mixture without overflowing.
Step 3: Make the Vinegar Brine
Place a small saucepan over medium-low heat.
Add:
- 1 cup white distilled vinegar
- 1 cup water
- 1 tablespoon salt
- 1 tablespoon granulated sugar, if using
Stir gently until the salt and sugar dissolve completely.
You do not need to boil the mixture vigorously. Gentle heating is sufficient to dissolve the seasonings.
Once everything is dissolved, remove the saucepan from the heat.
Step 4: Add the Dill and Spices
Place the fresh dill sprigs into the prepared glass jar.
Add the sliced red chili peppers, mustard seeds, black peppercorns, red pepper flakes, and bay leaves.
Distribute the seasonings throughout the jar so their flavors can infuse the brine evenly.
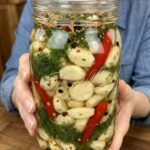
The fresh dill and red chili peppers also create a beautiful appearance, making the finished jar look colorful and appetizing.
Step 5: Fill the Jar With Garlic
Carefully add the peeled garlic cloves to the jar.
Arrange them tightly enough to fit comfortably, but avoid crushing or forcing them into the container.
Leave sufficient room for the vinegar brine.
Try to distribute the garlic evenly around the dill and peppers so the ingredients are well mixed.
Step 6: Pour in the Vinegar Brine
Carefully pour the prepared warm vinegar mixture over the garlic cloves.
Make sure every garlic clove is completely covered by the liquid.
This is an important step because garlic left above the brine may be exposed to air and spoil more easily.
If necessary, gently tap the jar to release trapped air pockets.
Do not add extra water to fill the jar. Maintain the recipe’s specified vinegar-to-water ratio.
Step 7: Cool and Refrigerate
Allow the jar to cool briefly at room temperature.
Once it is no longer hot, close the lid and transfer the jar promptly to the refrigerator.
Do not leave homemade garlic pickles sitting at room temperature for extended periods.
Keep the jar refrigerated at all times.
Step 8: Let the Flavors Develop
Allow the garlic to refrigerate for at least 3–5 days before enjoying it.
During this time, the garlic absorbs the tangy vinegar, fragrant dill, spicy chili, and aromatic spices.
The flavor becomes more developed as the ingredients have time to infuse.
For the best experience, taste a clove after several days and adjust your expectations for future batches based on how strong or spicy you prefer your pickles.
Your homemade Spicy Dill Pickled Garlic is now ready to enjoy!