
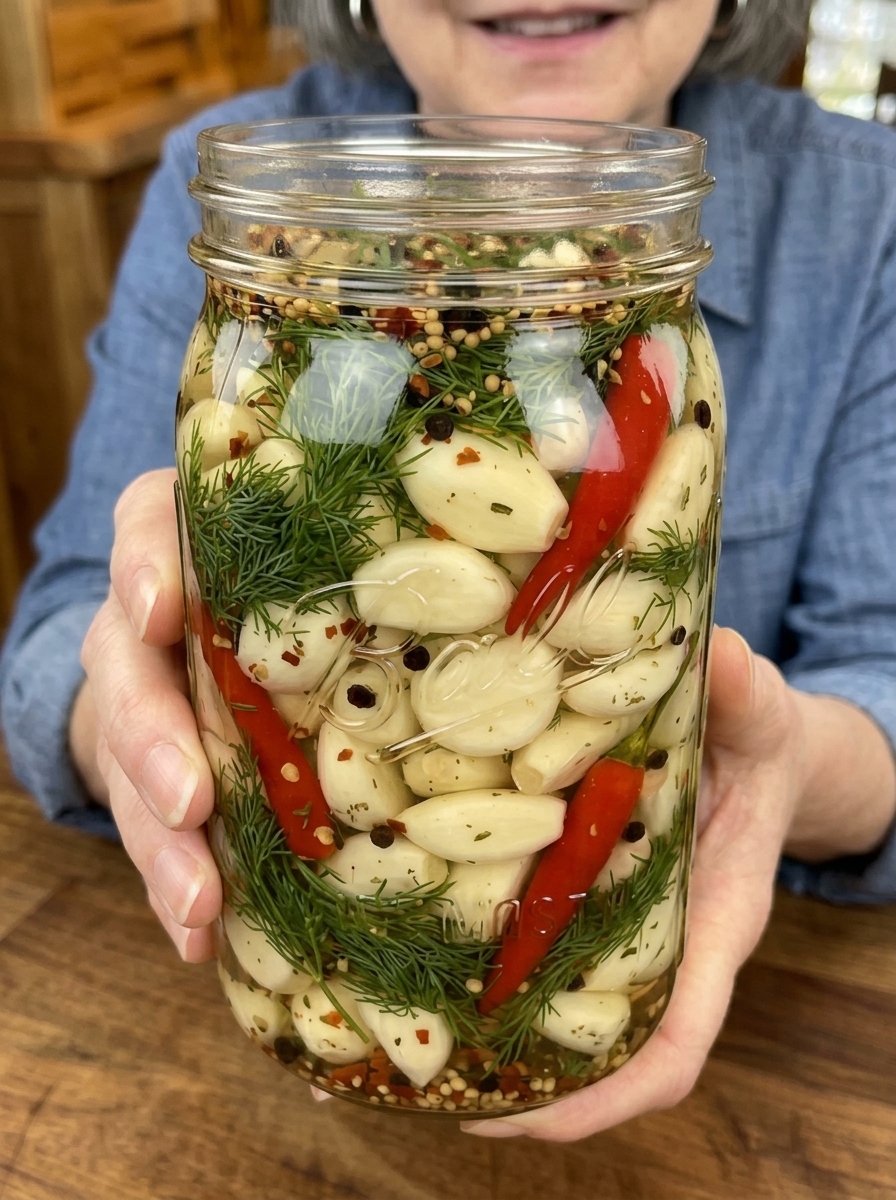
Spicy Dill Pickled Garlic – Crunchy, Tangy, and Packed with Flavor
If you love bold flavors, homemade pickles, and a little spicy kick, this Spicy Dill Pickled Garlic recipe is one you need to try! Made with fresh garlic cloves, tangy white vinegar, fragrant dill, fresh red chili peppers, and a delicious blend of aromatic spices, these homemade pickled garlic cloves deliver an incredible combination of savory, sour, spicy, and slightly sweet flavors in every bite.
This easy Spicy Dill Pickled Garlic is a fantastic way to transform ordinary garlic into a flavorful refrigerator pickle. The vinegar brine gives the cloves a pleasantly tangy taste, while fresh dill adds a refreshing herbal aroma and red chili peppers bring just the right amount of heat. Mustard seeds, black peppercorns, bay leaves, and red pepper flakes complete the flavor with a deliciously savory finish.
One of the best things about this recipe is how simple it is to prepare. You don’t need special canning equipment, complicated techniques, or hours in the kitchen. Simply prepare the garlic, make a quick vinegar brine, add your favorite seasonings, and let everything chill in the refrigerator while the flavors develop.
After a few days, the garlic absorbs the delicious dill, chili, and vinegar flavors, creating a versatile homemade condiment that pairs beautifully with burgers, grilled chicken, roasted meats, sandwiches, salads, and cheese boards.
Whether you’re a garlic lover, a fan of spicy refrigerator pickles, or someone who enjoys making homemade condiments, this Spicy Dill Pickled Garlic recipe is an easy and delicious addition to your kitchen.
What Is Spicy Dill Pickled Garlic?
Spicy Dill Pickled Garlic is a refrigerator pickle made by soaking peeled fresh garlic cloves in a seasoned vinegar brine with dill, chili peppers, and aromatic spices.
Unlike traditional pickled cucumbers, this recipe uses whole garlic cloves as the main ingredient. The garlic absorbs the tangy brine and develops a bold flavor that combines the natural taste of garlic with refreshing dill, spicy chili, and savory seasonings.
The result is a delicious condiment that can be served as a snack, added to sandwiches, or used to enhance everyday meals.
This particular recipe is prepared using a simple vinegar-and-water brine. It is refrigerated rather than processed for shelf storage, making it an accessible option for home cooks who want to experiment with homemade pickles without traditional canning equipment.
The longer the garlic rests in the refrigerator, the more time the flavors have to develop. For the best flavor, allow at least 3–5 days before serving.
Why You’ll Love This Spicy Dill Pickled Garlic Recipe
There are plenty of reasons to add this homemade garlic pickle recipe to your collection.
1. Bold and Delicious Flavor
Fresh garlic already has a distinctive savory flavor, but soaking it in a vinegar brine takes it to another level. The combination of dill, chili peppers, mustard seeds, and black pepper creates a balanced pickle with plenty of personality.
2. Perfect Amount of Spicy Heat
Fresh red chili peppers and red pepper flakes give the garlic a delicious spicy kick. You can adjust the amount of chili according to your personal preference.
If you enjoy mild pickles, use fewer peppers. If you love extra-spicy food, increase the chili flakes slightly while keeping the vinegar and water proportions unchanged.
3. Easy Refrigerator Pickle Preparation
You don’t need a pressure canner, water-bath canner, or complicated preservation equipment. A clean glass jar, a saucepan, and a refrigerator are all you need for this simple refrigerator pickle.
4. Perfect for Meal Pairings
These pickled garlic cloves are incredibly versatile. They work wonderfully with grilled meats, sandwiches, burgers, salads, roasted vegetables, and appetizer platters.
5. Make-Ahead Friendly
You can prepare this recipe several days before you plan to serve it. This makes it a convenient homemade condiment to have ready in the refrigerator.
6. Customizable Ingredients
You can adjust the chili peppers, dill, and spices to create a flavor combination that suits your taste. The basic vinegar-to-water ratio should remain unchanged.
Ingredients for Spicy Dill Pickled Garlic
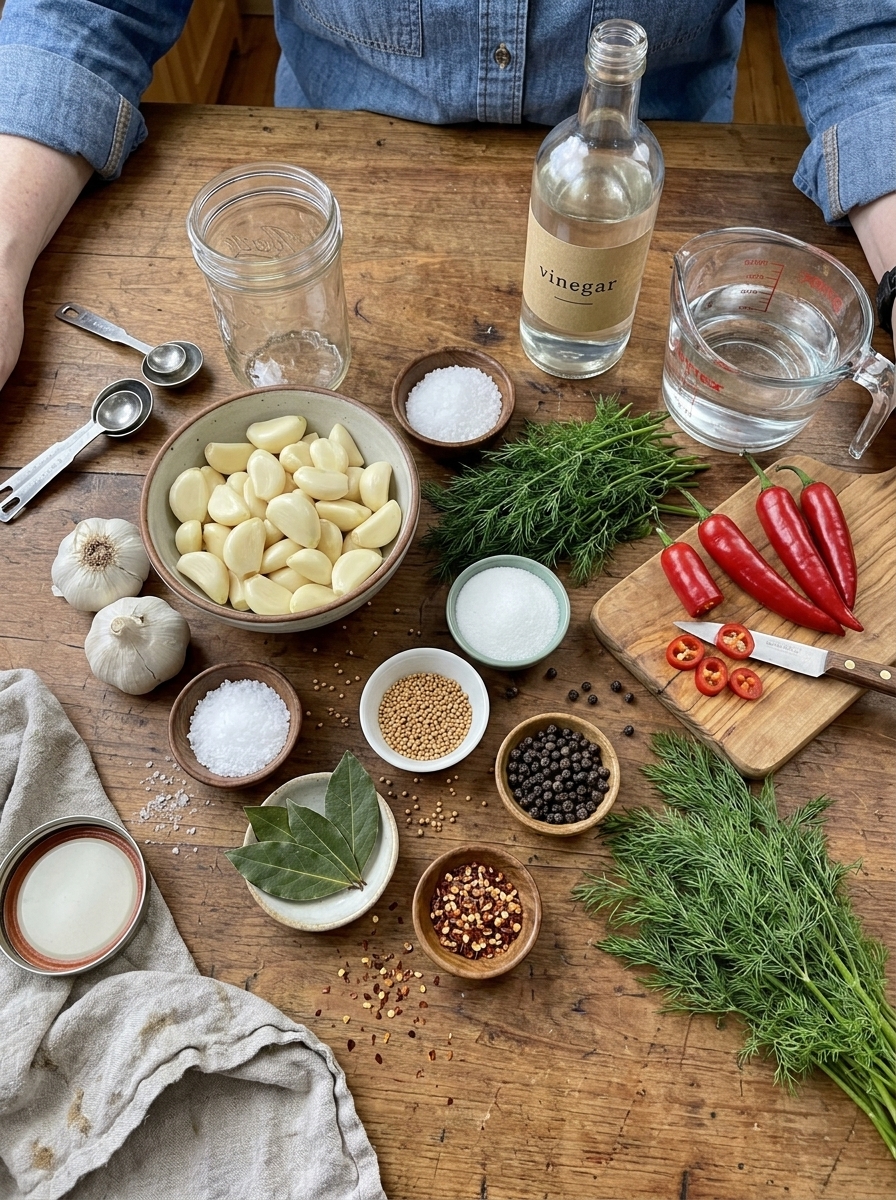
This recipe uses simple ingredients that work together to create a bold, tangy, and spicy refrigerator pickle.
For the Garlic
- 2 cups peeled fresh garlic cloves
Fresh garlic is the star of this recipe. Choose firm, fresh cloves without soft spots, mold, or visible damage. Freshly peeled garlic gives the best flavor and texture.
Try to use cloves that are relatively similar in size so they absorb the brine more evenly.
For the Brine
- 1 cup white distilled vinegar (5% acidity)
- 1 cup water
- 1 tablespoon salt
- 1 tablespoon granulated sugar (optional)
White distilled vinegar provides the signature tangy pickle flavor. Make sure the vinegar is labeled with 5% acidity.
Water balances the sharpness of the vinegar, while salt enhances the overall flavor.
Granulated sugar is optional, but it can help balance the acidity and heat without making the finished garlic noticeably sweet.
For the Flavor
- 3–4 fresh red chili peppers, sliced
- 3 sprigs fresh dill
- 1 teaspoon mustard seeds
- 1 teaspoon black peppercorns
- ½ teaspoon red pepper flakes, adjusted to taste
- 2 bay leaves
Fresh dill adds a refreshing herbal flavor that pairs beautifully with garlic.
Red chili peppers provide heat and a vibrant appearance, while red pepper flakes create an additional layer of spiciness.
Mustard seeds add a subtle earthy flavor, black peppercorns contribute gentle warmth, and bay leaves bring a pleasant aromatic note to the brine.
Together, these ingredients create the classic spicy dill pickle flavor.
Kitchen Equipment You’ll Need
You don’t need many tools to make homemade spicy pickled garlic.
Here is what you should prepare:
- One clean glass jar with a tight-fitting lid
- A small saucepan
- A measuring cup
- Measuring spoons
- A sharp knife
- A cutting board
- A spoon for stirring
- A clean utensil for handling the garlic
Choose a glass jar large enough to comfortably hold the garlic and brine. The garlic must remain completely submerged in the liquid.
Avoid using reactive metal containers for storing acidic pickles. A suitable glass jar is a convenient choice.
How to Make Spicy Dill Pickled Garlic
Making Spicy Dill Pickled Garlic is surprisingly easy. Follow these detailed steps to prepare a flavorful homemade refrigerator pickle.
Step 1: Prepare the Fresh Garlic
Start by peeling approximately 2 cups of fresh garlic cloves.
Remove any damaged, bruised, soft, or discolored pieces. Try to keep the cloves whole rather than chopping or crushing them.
Whole garlic cloves provide a satisfying texture and look beautiful inside the jar.
If some cloves are significantly larger than others, remember that they may take longer to absorb the flavors of the brine.
Set the prepared garlic aside.
Step 2: Prepare the Glass Jar
Wash a clean glass jar and its lid thoroughly with hot, soapy water.
Rinse away all soap residue and allow the jar to dry completely.
Starting with clean equipment is important when preparing homemade refrigerator pickles.
Make sure the jar is large enough to hold all the garlic cloves, seasonings, and vinegar mixture without overflowing.
Step 3: Make the Vinegar Brine
Place a small saucepan over medium-low heat.
Add:
- 1 cup white distilled vinegar
- 1 cup water
- 1 tablespoon salt
- 1 tablespoon granulated sugar, if using
Stir gently until the salt and sugar dissolve completely.
You do not need to boil the mixture vigorously. Gentle heating is sufficient to dissolve the seasonings.
Once everything is dissolved, remove the saucepan from the heat.
Step 4: Add the Dill and Spices
Place the fresh dill sprigs into the prepared glass jar.
Add the sliced red chili peppers, mustard seeds, black peppercorns, red pepper flakes, and bay leaves.
Distribute the seasonings throughout the jar so their flavors can infuse the brine evenly.
The fresh dill and red chili peppers also create a beautiful appearance, making the finished jar look colorful and appetizing.
Step 5: Fill the Jar With Garlic
Carefully add the peeled garlic cloves to the jar.
Arrange them tightly enough to fit comfortably, but avoid crushing or forcing them into the container.
Leave sufficient room for the vinegar brine.
Try to distribute the garlic evenly around the dill and peppers so the ingredients are well mixed.
Step 6: Pour in the Vinegar Brine
Carefully pour the prepared warm vinegar mixture over the garlic cloves.
Make sure every garlic clove is completely covered by the liquid.
This is an important step because garlic left above the brine may be exposed to air and spoil more easily.
If necessary, gently tap the jar to release trapped air pockets.
Do not add extra water to fill the jar. Maintain the recipe’s specified vinegar-to-water ratio.
Step 7: Cool and Refrigerate
Allow the jar to cool briefly at room temperature.
Once it is no longer hot, close the lid and transfer the jar promptly to the refrigerator.
Do not leave homemade garlic pickles sitting at room temperature for extended periods.
Keep the jar refrigerated at all times.
Step 8: Let the Flavors Develop
Allow the garlic to refrigerate for at least 3–5 days before enjoying it.
During this time, the garlic absorbs the tangy vinegar, fragrant dill, spicy chili, and aromatic spices.
The flavor becomes more developed as the ingredients have time to infuse.
For the best experience, taste a clove after several days and adjust your expectations for future batches based on how strong or spicy you prefer your pickles.
Your homemade Spicy Dill Pickled Garlic is now ready to enjoy!
Tips for Making the Best Spicy Dill Pickled Garlic
A few simple tips can help you achieve a flavorful and consistent batch.
Choose Fresh, Firm Garlic
Fresh garlic is essential for good flavor and texture.
Avoid cloves that are soft, shriveled, damaged, or moldy. Firm cloves are the best choice for refrigerator pickles.
Use Vinegar With 5% Acidity
Always use white distilled vinegar labeled with 5% acidity.
The acidity is an important part of the recipe. Do not substitute a weaker vinegar or reduce the amount of vinegar without using a tested recipe.
Keep Every Clove Submerged
All garlic cloves should remain completely covered by the brine.
Use a jar that is appropriately sized for the quantity of ingredients.
Adjust the Spice Level
The amount of chili can be adjusted to suit your taste.
For a milder flavor, use fewer fresh chili peppers and reduce the red pepper flakes.
For a stronger spicy flavor, use all four chili peppers and the full amount of red pepper flakes.
Do not change the vinegar-to-water ratio when adjusting the heat.
Allow Enough Refrigeration Time
Although the garlic may be tasted earlier, waiting 3–5 days gives the dill, chili, and spices more time to develop their flavors.
Use Clean Utensils
Always use a clean fork or spoon when removing garlic from the jar.
Avoid introducing food particles or dirty utensils into the remaining brine.
How Spicy Is This Pickled Garlic?
The heat level depends mainly on the type and quantity of red chili peppers used.
With 3–4 fresh red chili peppers and ½ teaspoon of red pepper flakes, this recipe produces a noticeable spicy kick.
However, different chili varieties have different levels of heat.
If you prefer a milder pickle, start with two fresh chili peppers and less red pepper flakes.
If you enjoy bold, spicy flavors, use the full quantity.
Remember that the heat can become more noticeable as the chili peppers infuse the brine.
Delicious Variations to Try
One of the best things about homemade pickled garlic is how easily you can experiment with the flavors.
Here are a few ideas for future batches.
Extra-Spicy Dill Pickled Garlic
For people who love intense heat, increase the quantity of fresh red chili peppers within your preferred spice tolerance.
You can also add a little more red pepper flakes.
Keep the original vinegar and water proportions unchanged.
Lemon Dill Pickled Garlic
For a brighter citrus-inspired flavor, experiment with a small amount of lemon zest.
The lemon adds a fresh aroma that complements the dill and garlic.
Do not use lemon juice as a replacement for the vinegar.
Garlic and Jalapeño Pickles
Replace some of the red chili peppers with sliced jalapeños.
Jalapeños provide a different type of heat and a delicious flavor that works particularly well with burgers, tacos, and grilled meats.
Extra-Herby Garlic Pickles
If you enjoy fresh herbs, experiment with additional dill within the same basic refrigerator pickle recipe.
The result is a fragrant, herb-forward garlic pickle with a refreshing taste.
Peppercorn and Mustard Garlic Pickles
For a more pronounced savory flavor, experiment with the proportions of mustard seeds and whole black peppercorns.
These spices create a delicious aromatic background that complements the garlic.
What to Serve With Spicy Dill Pickled Garlic
Spicy Dill Pickled Garlic is more than just a snack. It is a versatile condiment that can add bold flavor to many meals.
1. Burgers and Sandwiches
Add a few pickled garlic cloves alongside juicy burgers, grilled cheese sandwiches, deli sandwiches, or toasted subs.
You can also finely chop the garlic and mix it into sandwich spreads for an extra burst of flavor.
2. Grilled Chicken
Serve these pickled cloves with grilled chicken breasts, chicken thighs, or roasted chicken.
Their tangy flavor provides a delicious contrast to savory grilled meats.
3. Charcuterie and Cheese Boards
Add a small bowl of spicy pickled garlic to a cheese board with cheddar, Monterey Jack, crackers, olives, and cured meats.
The bold garlic flavor pairs particularly well with rich and creamy cheeses.
4. Potato Salad
Finely chop a few pickled garlic cloves and mix them into potato salad.
They add a tangy, savory flavor that complements mayonnaise-based and vinegar-based dressings.
5. Pasta Salad
Add chopped pickled garlic to cold pasta salads with tomatoes, cucumbers, olives, and fresh herbs.
It gives the dish a delicious pickle-inspired flavor.
6. Roasted Vegetables
Serve the garlic alongside roasted potatoes, carrots, zucchini, or cauliflower.
You can also finely chop the cloves and add them to a prepared vegetable salad.
7. Tacos and Mexican-Inspired Meals
Serve a few cloves alongside tacos, grilled meats, quesadillas, or rice bowls.
Their spicy and tangy flavor can complement many savory dishes.
8. Enjoy Them Straight From the Jar
If you are a garlic lover, you can simply enjoy a few refrigerated pickled cloves as a bold, tangy snack.
Always use a clean utensil to remove them from the jar.
How to Store Spicy Dill Pickled Garlic
Proper refrigeration and careful handling are essential for homemade garlic pickles.
Keep the garlic in a clean, airtight glass jar in the refrigerator at all times.
Make sure every clove remains submerged in the vinegar brine.
For best quality, this refrigerator pickle is intended to be enjoyed within 2–3 weeks. This is a conservative quality guideline, not a guarantee of safety or a validated preservation period.
Always use clean utensils when serving.
Discard the entire batch if you notice mold, unusual odors, unexpected bubbling, or other signs of spoilage. Do not taste questionable food to determine whether it is safe.
Can You Store Pickled Garlic at Room Temperature?
No.
This recipe is designed specifically as a refrigerator pickle.
It has not been tested or processed as a shelf-stable canned product. Never store it in a pantry, cupboard, or at room temperature.
Refrigeration is essential.
Can You Freeze Spicy Dill Pickled Garlic?
Freezing is not recommended for this recipe because it can negatively affect the texture of the garlic.
For the best quality, prepare a manageable quantity and keep it refrigerated.
Important Food Safety Information
Homemade garlic pickles require careful handling.
Garlic is a low-acid food, so it must not be stored in an improperly prepared environment.
Use vinegar labeled 5% acidity, follow the specified vinegar-to-water ratio, and refrigerate the finished product promptly.
Do not reduce the vinegar or replace it with water.
Do not store homemade garlic in oil at room temperature. Garlic in oil can create conditions that allow dangerous botulism toxin to develop.
This recipe is not a tested canning recipe and should never be treated as shelf-stable. Refrigeration does not make an improperly prepared preservation recipe safe.
Common Mistakes to Avoid
Even though this recipe is easy, there are a few mistakes worth avoiding.
Using Old or Damaged Garlic
Old garlic may have an unpleasant flavor or poor texture.
Always start with fresh, firm garlic cloves.
Changing the Vinegar Ratio
Reducing the vinegar or increasing the water changes the acidity of the brine.
Follow the recipe’s measurements carefully.
Skipping Refrigeration
This is not a pantry pickle.
The jar must be refrigerated promptly after preparation and kept refrigerated throughout storage.
Opening the Jar With Dirty Hands or Utensils
Introducing contaminants into the jar can compromise the quality of the remaining pickles.
Always use clean utensils.
Expecting Immediate Flavor
The garlic needs time to absorb the seasonings.
Allow at least 3–5 days for the flavor to develop.
Frequently Asked Questions
1. How Long Does Spicy Dill Pickled Garlic Take to Make?
The active preparation time is approximately 15–20 minutes, depending on how quickly you peel the garlic.
However, the garlic needs at least 3–5 days in the refrigerator for the flavors to develop.
2. Can I Use Pre-Peeled Garlic?
Fresh, commercially peeled garlic can be convenient, provided it is fresh, properly handled, and free from damage or spoilage.
Choose firm cloves for the best texture.
3. Can I Use Apple Cider Vinegar Instead of White Vinegar?
This particular recipe is designed for white distilled vinegar with 5% acidity.
Do not substitute a different vinegar unless you are following a tested recipe that specifically supports that substitution.
4. Why Is My Pickled Garlic Turning Blue or Green?
Garlic can sometimes develop blue or green coloration when its natural sulfur compounds react with acidic conditions or trace minerals.
This color change does not automatically mean the garlic has spoiled.
However, discard the batch if you notice mold, unusual odors, unexpected bubbling, or other signs of spoilage. Do not rely on color alone to determine food safety.
5. Does Pickled Garlic Taste Like Fresh Garlic?
Pickled garlic has a different flavor from raw garlic.
The vinegar creates a tangy taste, while dill, chili peppers, and spices add complexity.
It still has a recognizable garlic flavor, but the overall result is more balanced and pickle-like.
6. Can I Make This Recipe Without Sugar?
Yes.
The sugar is optional. You can leave it out if you prefer a sharper, more acidic flavor.
The vinegar and water quantities should remain unchanged.
7. Can I Make It Less Spicy?
Absolutely!
Use fewer fresh red chili peppers and reduce the red pepper flakes.
You can adjust the heat without changing the other brine ingredients.
8. Can I Use Dried Dill Instead of Fresh Dill?
Fresh dill is recommended because it provides a fresh herbal aroma and attractive appearance.
If you want to experiment with dried dill, use a small amount and remember that the final flavor will be different.
9. How Do I Know When the Garlic Is Ready?
The garlic can be tasted after 3–5 days of refrigeration.
At this point, the vinegar, dill, and chili flavors should be more noticeable.
The cloves may continue to develop flavor while refrigerated.
10. Can I Use the Leftover Pickling Brine?
For the safest approach, do not reuse the leftover brine to prepare another batch of garlic or other vegetables.
Once it has been used, its acidity and cleanliness can no longer be assumed to be suitable for another preservation process.
11. Do I Need Special Canning Equipment?
No special canning equipment is required because this recipe is prepared as a refrigerator pickle.
You simply need a clean glass jar, a saucepan, and refrigerator space.
Remember that this does not make the recipe shelf-stable.
12. What Is the Best Way to Eat Pickled Garlic?
You can enjoy it straight from the jar, serve it with grilled meats, add it to burgers, chop it into salads, or include it on a cheese board.
Its bold flavor makes it an excellent addition to savory meals.
Nutrition Information
The nutritional content of homemade Spicy Dill Pickled Garlic depends on the size of the garlic cloves, the amount of brine consumed, and the quantity of sugar used.
Garlic contains naturally occurring carbohydrates and small amounts of several nutrients.
The vinegar, salt, and seasonings contribute additional flavor, but the amount of sodium can vary depending on the salt used and how much brine is consumed.
For accurate nutrition information, calculate the values using the exact brands and ingredient quantities in your batch.
Final Thoughts on Spicy Dill Pickled Garlic
This Spicy Dill Pickled Garlic recipe is a delicious way to turn simple fresh garlic into a bold homemade refrigerator pickle.
With tangy white vinegar, fragrant fresh dill, spicy red chili peppers, mustard seeds, black peppercorns, and bay leaves, every clove develops a wonderful combination of savory, spicy, and tangy flavors.
The preparation is simple, the ingredients are easy to find, and the finished garlic is incredibly versatile.
Serve it with burgers, grilled chicken, sandwiches, salads, roasted vegetables, or your favorite appetizer board. You can also enjoy a few cloves straight from the refrigerator whenever you crave something bold and flavorful.
If you love homemade pickles and garlic-packed condiments, this recipe deserves a place in your collection.
Make a jar, let the flavors develop for 3–5 days, and enjoy the delicious taste of homemade Spicy Dill Pickled Garlic!
Print
Spicy Dill Pickled Garlic – Crunchy, Tangy & Packed with Flavor
Ingredients
For the Garlic
- 2 cups peeled fresh garlic cloves
For the Brine
- 1 cup white distilled vinegar (5% acidity)
- 1 cup water
- 1 tablespoon salt
- 1 tablespoon granulated sugar (optional)
For the Flavor
- 3–4 fresh red chili peppers, sliced
- 3 sprigs fresh dill
- 1 teaspoon mustard seeds
- 1 teaspoon black peppercorns
- ½ teaspoon red pepper flakes (adjust to taste)
- 2 bay leaves
Instructions
Step 1: Prepare the Fresh Garlic
Start by peeling approximately 2 cups of fresh garlic cloves.
Remove any damaged, bruised, soft, or discolored pieces. Try to keep the cloves whole rather than chopping or crushing them.
Whole garlic cloves provide a satisfying texture and look beautiful inside the jar.
If some cloves are significantly larger than others, remember that they may take longer to absorb the flavors of the brine.
Set the prepared garlic aside.
Step 2: Prepare the Glass Jar
Wash a clean glass jar and its lid thoroughly with hot, soapy water.
Rinse away all soap residue and allow the jar to dry completely.
Starting with clean equipment is important when preparing homemade refrigerator pickles.
Make sure the jar is large enough to hold all the garlic cloves, seasonings, and vinegar mixture without overflowing.
Step 3: Make the Vinegar Brine
Place a small saucepan over medium-low heat.
Add:
- 1 cup white distilled vinegar
- 1 cup water
- 1 tablespoon salt
- 1 tablespoon granulated sugar, if using
Stir gently until the salt and sugar dissolve completely.
You do not need to boil the mixture vigorously. Gentle heating is sufficient to dissolve the seasonings.
Once everything is dissolved, remove the saucepan from the heat.
Step 4: Add the Dill and Spices
Place the fresh dill sprigs into the prepared glass jar.
Add the sliced red chili peppers, mustard seeds, black peppercorns, red pepper flakes, and bay leaves.
Distribute the seasonings throughout the jar so their flavors can infuse the brine evenly.
The fresh dill and red chili peppers also create a beautiful appearance, making the finished jar look colorful and appetizing.
Step 5: Fill the Jar With Garlic
Carefully add the peeled garlic cloves to the jar.
Arrange them tightly enough to fit comfortably, but avoid crushing or forcing them into the container.
Leave sufficient room for the vinegar brine.
Try to distribute the garlic evenly around the dill and peppers so the ingredients are well mixed.
Step 6: Pour in the Vinegar Brine
Carefully pour the prepared warm vinegar mixture over the garlic cloves.
Make sure every garlic clove is completely covered by the liquid.
This is an important step because garlic left above the brine may be exposed to air and spoil more easily.
If necessary, gently tap the jar to release trapped air pockets.
Do not add extra water to fill the jar. Maintain the recipe’s specified vinegar-to-water ratio.
Step 7: Cool and Refrigerate
Allow the jar to cool briefly at room temperature.
Once it is no longer hot, close the lid and transfer the jar promptly to the refrigerator.
Do not leave homemade garlic pickles sitting at room temperature for extended periods.
Keep the jar refrigerated at all times.
Step 8: Let the Flavors Develop
Allow the garlic to refrigerate for at least 3–5 days before enjoying it.
During this time, the garlic absorbs the tangy vinegar, fragrant dill, spicy chili, and aromatic spices.
The flavor becomes more developed as the ingredients have time to infuse.
For the best experience, taste a clove after several days and adjust your expectations for future batches based on how strong or spicy you prefer your pickles.
Your homemade Spicy Dill Pickled Garlic is now ready to enjoy!