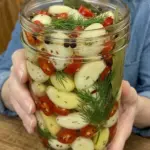
Ingredients
For the Pickled Garlic
- 2 cups peeled whole garlic cloves — The star of the recipe. Choose fresh, firm cloves without soft or damaged spots.
- 2–3 fresh red chili peppers, sliced — Add fresh chile flavor, color, and heat. Adjust the quantity according to your preference.
- 2–3 sprigs fresh dill — Bring a fresh, aromatic herbal flavor that pairs beautifully with garlic and vinegar.
- 2 bay leaves — Add subtle herbal depth to the pickling brine.
- 1 teaspoon black peppercorns — Provide warm, peppery flavor.
- 1 teaspoon mustard seeds — Add a classic pickling-spice note and subtle texture.
- ½ teaspoon red pepper flakes — Reinforce the heat from the fresh chilies.
- ½ teaspoon dried oregano — Adds earthy herbal flavor.
For the Pickling Brine
- 1 cup white vinegar — Provides the bright acidity that forms the foundation of the brine.
- 1 cup water — Balances the strength of the vinegar.
- 1 tablespoon kosher or pickling salt — Seasons the garlic and brine.
- 1 tablespoon granulated sugar — Softens the sharp edges of the vinegar and heat without making the garlic overly sweet.
Instructions
The preparation is simple, but giving the garlic enough time to rest in the refrigerator is important for developing its flavor.
Peel enough fresh garlic cloves to measure approximately 2 cups.
Inspect each clove and discard any that are soft, bruised, moldy, or otherwise damaged.
Leave the cloves whole for the best texture and presentation.
Wash and thinly slice the fresh red chili peppers.
For a milder version, remove the seeds and membranes before slicing.
If you enjoy more heat, leave the seeds intact and use the full amount of red pepper flakes.
Combine the white vinegar, water, salt, and sugar in a small saucepan.
Bring the mixture to a gentle simmer, stirring until the salt and sugar have completely dissolved.
Remove the brine from the heat.
Place some of the garlic cloves into a clean glass jar.
Layer the sliced red chilies, fresh dill, bay leaves, black peppercorns, mustard seeds, red pepper flakes, and oregano throughout the garlic.
Continue layering until the jar is comfortably packed.
Avoid crushing the garlic cloves.
Carefully pour the prepared vinegar brine over the garlic, peppers, herbs, and spices.
The garlic should remain covered by the brine.
Gently tap the jar against the counter to help release trapped air bubbles. You can also carefully move a clean utensil around the inside edge of the jar to release additional bubbles.
Allow the jar to cool before sealing it tightly.
Once cooled, transfer the jar to the refrigerator.
This recipe is intended as a refrigerator pickle, not as a shelf-stable canned product.
Although it can begin taking on flavor fairly quickly, allow the garlic to pickle for at least 3–5 days before serving for better flavor.
As it rests, the harshness of the raw garlic begins to mellow while the cloves absorb the spicy, tangy, herbal brine.
Use a clean utensil to remove garlic cloves from the jar.
Enjoy them whole or slice, chop, or mince them before adding them to your favorite dishes.
Don’t forget the pickled chili slices—they’re delicious too.