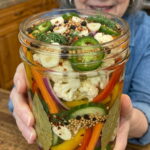
Ingredients
For the Vegetables
- 2 cups cauliflower florets
- 1½ cups carrots, sliced into sticks
- 1½ cups cucumber, cut into thick slices
- 1 red bell pepper, sliced into strips
- 1 yellow bell pepper, sliced into strips
- ½ red onion, thinly sliced
- 2 fresh jalapeños, thinly sliced
- 4 cloves garlic, thinly sliced
- ¼ cup fresh dill sprigs
For the Brine
- 2 cups white vinegar
- 1 cup water
- ¼ cup granulated sugar
- 1½ tablespoons honey
- 1½ tablespoons kosher salt
- 1 teaspoon whole black peppercorns
- 1 teaspoon mustard seeds
- ½ teaspoon coriander seeds
- ½ teaspoon crushed red pepper flakes
- 2 bay leaves
A quick note on ingredient choices: white vinegar is used here because its clean, sharp acidity lets the sweet and spicy notes shine without competing flavors, but you can experiment with apple cider vinegar for a slightly fruitier, mellower tang. Kosher salt is preferred over table salt because it dissolves cleanly and doesn’t carry the anti-caking additives that can cloud a brine. And using both sugar and honey rather than just one sweetener gives the brine more complexity — the honey adds a subtle floral note that plain sugar can’t replicate.
Instructions
Start by washing all of your vegetables thoroughly. Cut the cauliflower into bite-sized florets, slice the carrots into sticks, cut the cucumber into thick rounds or spears, and slice the bell peppers, red onion, jalapeños, and garlic thinly and evenly. Uniform cutting matters more than people expect — vegetables that are cut to similar sizes will pickle at the same rate, so you won’t end up with some pieces that are perfectly tangy and others that are still bland in the middle.
Bring a large pot of water to a gentle boil. Add the cauliflower and carrots and blanch for 2 to 3 minutes, just until they are slightly tender while still maintaining a good amount of crispness. This step is optional for some quick pickle recipes, but it makes a real difference here: raw cauliflower and carrots can taste chalky or overly firm even after several days in the brine, while a quick blanch softens them just enough to absorb flavor while keeping that essential crunch.
As soon as the cauliflower and carrots are done blanching, drain them immediately and rinse them under cold water (or plunge them into an ice bath) to stop the cooking process. This “shocking” step is crucial — it halts the residual heat from continuing to cook the vegetables, which is what preserves their crisp-tender texture instead of letting them turn mushy.
Pack the cauliflower, carrots, cucumber, bell peppers, red onion, jalapeños, garlic, and fresh dill sprigs into clean glass jars. Layer the vegetables evenly so that every jar gets a good mix of colors, textures, and flavors — this also helps the brine circulate more evenly through the jar rather than pooling around just one type of vegetable.
In a medium saucepan, combine the white vinegar, water, granulated sugar, honey, kosher salt, black peppercorns, mustard seeds, coriander seeds, crushed red pepper flakes, and bay leaves. Bring the mixture to a gentle simmer over medium heat, stirring occasionally, until the sugar, honey, and salt have completely dissolved. You’ll know it’s ready when the liquid looks clear (aside from the visible spices) and no longer feels gritty when you dip a spoon in.
Remove the saucepan from the heat and let the brine cool slightly for a few minutes. You want it warm, not scalding — pouring a rapidly boiling brine directly over delicate vegetables like cucumber can cause them to soften too quickly and lose their crunch.
Carefully pour the warm brine over the packed vegetables until they are completely submerged. Make sure the liquid reaches all the way to the top of the jar, covering every piece of vegetable — anything left above the brine line is at risk of spoiling faster or turning an unappetizing color.
Gently press the vegetables down with a clean spoon or a chopstick to release any trapped air bubbles and help the brine work its way through every layer of the jar. This small step ensures more even pickling and helps prevent air pockets that can lead to uneven flavor or premature spoilage.
Allow the jars to cool to room temperature on the counter before sealing them tightly with their lids. Sealing while the jars are still hot can create pressure buildup or trap excess condensation inside, which isn’t ideal for a refrigerator pickle.
Refrigerate the jars for at least 24 hours before serving — this is the minimum amount of time needed for the vegetables to absorb real flavor from the brine. For the best sweet-and-spicy flavor, though, patience pays off: let the vegetables pickle for 3 to 5 days. During this window, the flavors deepen, the sweetness and heat mellow into each other, and the vegetables take on that irresistible tangy crunch that makes this recipe so addictive.