

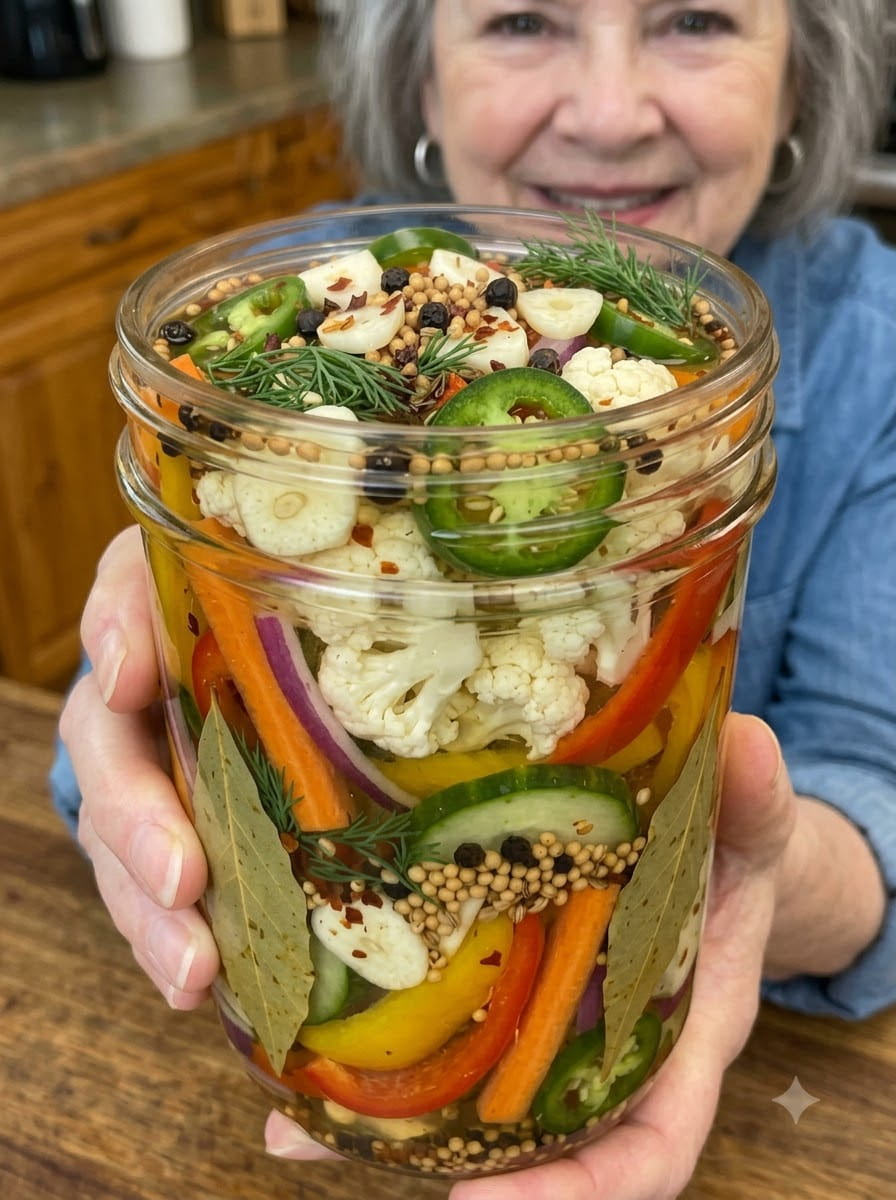
Sweet & Spicy Pickled Vegetables: The Crunchy, Tangy Condiment You’ll Want on Everything
If you have never made your own pickled vegetables at home, this recipe is about to change the way you think about condiments forever. These Sweet & Spicy Pickled Vegetables are crisp, colorful, tangy, and perfectly balanced with a touch of sweetness, fresh garlic, and a fiery chili kick. They are the kind of homemade staple that quietly transforms an ordinary meal into something memorable — one bite and you will find yourself piling them onto sandwiches, burgers, tacos, salads, grilled meats, barbecue plates, and charcuterie boards all year long.
Unlike store-bought pickled vegetables that often taste flat, overly acidic, or artificially sweet, this homemade version lets you control every element of the flavor. You decide how spicy it gets, how sweet the brine is, and exactly how crunchy the vegetables stay. The result is a vibrant jar of rainbow-colored vegetables — snowy white cauliflower, bright orange carrots, deep red and sunny yellow peppers, translucent cucumber, and thin ribbons of garlic — all suspended in a glossy, herb-flecked brine that smells like a farmer’s market in a jar.
In this guide, we will walk through everything you need to know to make perfect sweet and spicy pickled vegetables at home: the ingredients, the step-by-step method, expert tips for keeping that essential crunch, flavor variations, serving ideas, storage guidance, and answers to the most common questions people ask about quick pickling. Whether you are a seasoned home cook or a total pickling beginner, by the end of this article you will have everything you need to make a batch that disappears faster than you can refill the jar.
Why You’ll Love This Sweet & Spicy Pickled Vegetables Recipe
There are countless pickle recipes out there, but this one earns a permanent spot in your refrigerator door for a few very good reasons.
It’s a flavor bomb in every bite. The brine strikes a careful balance between tangy white vinegar, warm honey, granulated sugar, and a small arsenal of whole spices — black peppercorns, mustard seeds, coriander seeds, and crushed red pepper flakes. That means every piece of vegetable you pull from the jar carries sweetness, acidity, and heat all at once, rather than one flat pickled flavor.
It’s endlessly versatile. This is not a one-note condiment. These pickled vegetables work as a topping, a side dish, a snack, or even a gift. They belong on a burger just as much as they belong next to a bowl of hummus and warm pita.
It’s naturally colorful and beautiful. Between the cauliflower, carrots, cucumbers, red and yellow bell peppers, red onion, and jalapeños, this recipe practically pickles itself into a showpiece. It is the kind of jar that looks as good on a charcuterie board as it tastes.
It’s a quick pickle, not a canning project. This is a refrigerator pickle recipe, which means there’s no pressure canner, no water bath processing, and no fear of botulism-related canning mistakes. You simply pack the jars, pour the hot brine, refrigerate, and wait. It is one of the most beginner-friendly ways to get into home pickling.
It’s low in calories and big on flavor. At roughly 55 calories per serving, these pickled vegetables give you a satisfying, flavor-packed crunch without derailing any health goals. They are a smart way to add texture and zing to a meal without added fat or excessive calories.
The Secret to Great Pickled Vegetables: Balance
Great pickled vegetables come down to one word: balance. You need acidity from the vinegar, sweetness to round out the sharp edges, salt to season and help preserve, heat for excitement, and aromatics like garlic and dill to tie it all together. This recipe nails that balance by combining two forms of sweetness (granulated sugar and honey), a generous amount of vinegar, kosher salt, and a well-rounded spice blend that includes mustard seeds and coriander seeds for warmth, black peppercorns for a subtle bite, and crushed red pepper flakes plus fresh jalapeños for real heat.
The result is a brine that is tangy but never harsh, sweet but never cloying, and spicy but never overwhelming. It’s the kind of pickle that appeals to people who “don’t really like spicy food” just as much as those who put hot sauce on everything.
Ingredients You’ll Need
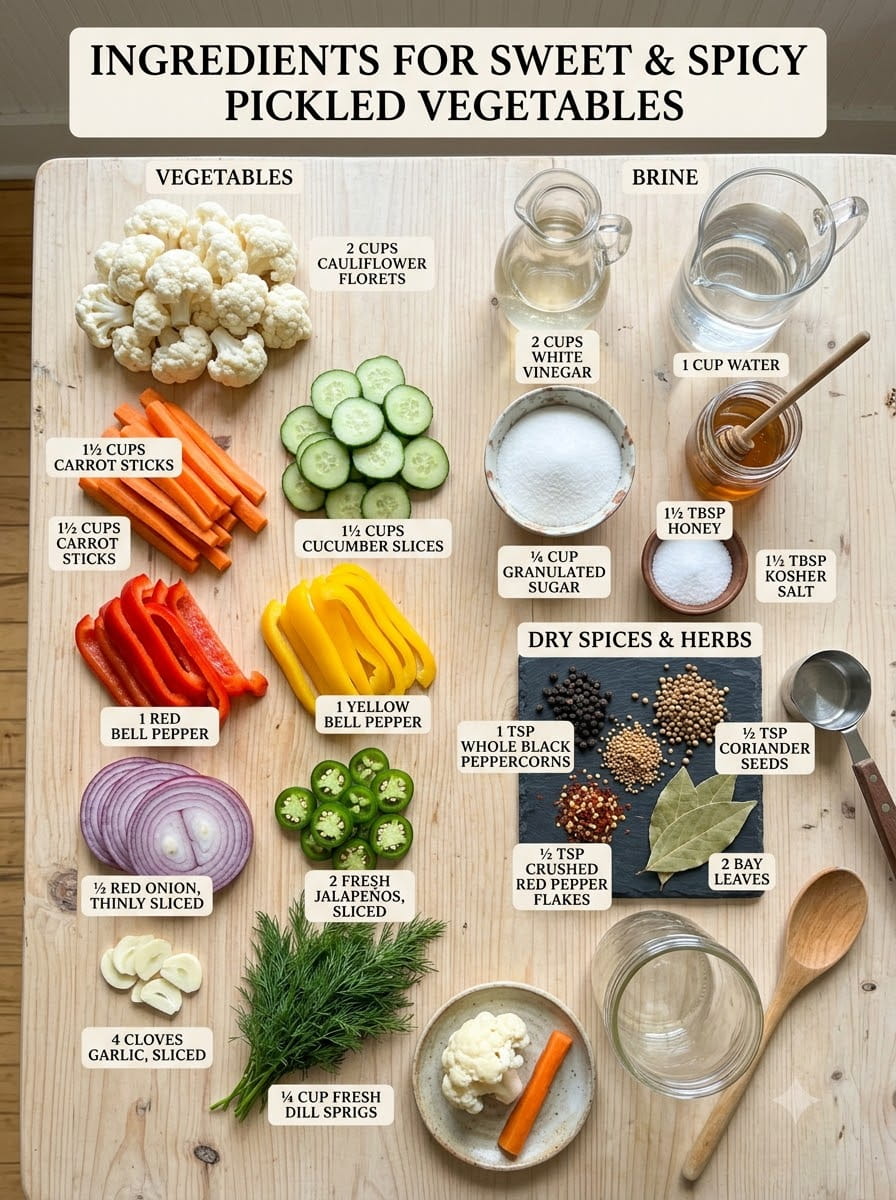
For the Vegetables
- 2 cups cauliflower florets
- 1½ cups carrots, sliced into sticks
- 1½ cups cucumber, cut into thick slices
- 1 red bell pepper, sliced into strips
- 1 yellow bell pepper, sliced into strips
- ½ red onion, thinly sliced
- 2 fresh jalapeños, thinly sliced
- 4 cloves garlic, thinly sliced
- ¼ cup fresh dill sprigs
For the Brine
- 2 cups white vinegar
- 1 cup water
- ¼ cup granulated sugar
- 1½ tablespoons honey
- 1½ tablespoons kosher salt
- 1 teaspoon whole black peppercorns
- 1 teaspoon mustard seeds
- ½ teaspoon coriander seeds
- ½ teaspoon crushed red pepper flakes
- 2 bay leaves
A quick note on ingredient choices: white vinegar is used here because its clean, sharp acidity lets the sweet and spicy notes shine without competing flavors, but you can experiment with apple cider vinegar for a slightly fruitier, mellower tang. Kosher salt is preferred over table salt because it dissolves cleanly and doesn’t carry the anti-caking additives that can cloud a brine. And using both sugar and honey rather than just one sweetener gives the brine more complexity — the honey adds a subtle floral note that plain sugar can’t replicate.
Step-by-Step Directions
Step 1: Prep the Vegetables
Start by washing all of your vegetables thoroughly. Cut the cauliflower into bite-sized florets, slice the carrots into sticks, cut the cucumber into thick rounds or spears, and slice the bell peppers, red onion, jalapeños, and garlic thinly and evenly. Uniform cutting matters more than people expect — vegetables that are cut to similar sizes will pickle at the same rate, so you won’t end up with some pieces that are perfectly tangy and others that are still bland in the middle.
Step 2: Blanch the Cauliflower and Carrots
Bring a large pot of water to a gentle boil. Add the cauliflower and carrots and blanch for 2 to 3 minutes, just until they are slightly tender while still maintaining a good amount of crispness. This step is optional for some quick pickle recipes, but it makes a real difference here: raw cauliflower and carrots can taste chalky or overly firm even after several days in the brine, while a quick blanch softens them just enough to absorb flavor while keeping that essential crunch.
Step 3: Shock in Cold Water
As soon as the cauliflower and carrots are done blanching, drain them immediately and rinse them under cold water (or plunge them into an ice bath) to stop the cooking process. This “shocking” step is crucial — it halts the residual heat from continuing to cook the vegetables, which is what preserves their crisp-tender texture instead of letting them turn mushy.
Step 4: Pack the Jars
Pack the cauliflower, carrots, cucumber, bell peppers, red onion, jalapeños, garlic, and fresh dill sprigs into clean glass jars. Layer the vegetables evenly so that every jar gets a good mix of colors, textures, and flavors — this also helps the brine circulate more evenly through the jar rather than pooling around just one type of vegetable.
Step 5: Make the Brine
In a medium saucepan, combine the white vinegar, water, granulated sugar, honey, kosher salt, black peppercorns, mustard seeds, coriander seeds, crushed red pepper flakes, and bay leaves. Bring the mixture to a gentle simmer over medium heat, stirring occasionally, until the sugar, honey, and salt have completely dissolved. You’ll know it’s ready when the liquid looks clear (aside from the visible spices) and no longer feels gritty when you dip a spoon in.
Step 6: Cool Slightly
Remove the saucepan from the heat and let the brine cool slightly for a few minutes. You want it warm, not scalding — pouring a rapidly boiling brine directly over delicate vegetables like cucumber can cause them to soften too quickly and lose their crunch.
Step 7: Pour the Brine
Carefully pour the warm brine over the packed vegetables until they are completely submerged. Make sure the liquid reaches all the way to the top of the jar, covering every piece of vegetable — anything left above the brine line is at risk of spoiling faster or turning an unappetizing color.
Step 8: Release Air Bubbles
Gently press the vegetables down with a clean spoon or a chopstick to release any trapped air bubbles and help the brine work its way through every layer of the jar. This small step ensures more even pickling and helps prevent air pockets that can lead to uneven flavor or premature spoilage.
Step 9: Cool and Seal
Allow the jars to cool to room temperature on the counter before sealing them tightly with their lids. Sealing while the jars are still hot can create pressure buildup or trap excess condensation inside, which isn’t ideal for a refrigerator pickle.
Step 10: Refrigerate and Wait
Refrigerate the jars for at least 24 hours before serving — this is the minimum amount of time needed for the vegetables to absorb real flavor from the brine. For the best sweet-and-spicy flavor, though, patience pays off: let the vegetables pickle for 3 to 5 days. During this window, the flavors deepen, the sweetness and heat mellow into each other, and the vegetables take on that irresistible tangy crunch that makes this recipe so addictive.
Tips for Perfectly Crisp Pickled Vegetables
Don’t skip the ice bath. Shocking the blanched vegetables in cold water is the single easiest way to guarantee crunch. Skipping this step is the most common reason quick-pickled vegetables turn out soft.
Use fresh, firm produce. Pickling can’t rescue vegetables that are already past their prime. Start with crisp, firm cauliflower, carrots, cucumbers, and peppers for the best texture in the final product.
Choose the right cucumber. If possible, use a pickling cucumber (like Kirby or Persian cucumbers) rather than a standard slicing cucumber. Pickling cucumbers have fewer watery seeds and firmer flesh, which holds up much better in brine.
Keep everything submerged. Any vegetable poking above the brine line is exposed to air and more likely to spoil or discolor. Use a small clean weight, a cabbage leaf, or simply pack the jar tightly to keep everything under the liquid.
Use clean jars and utensils. Always start with jars that have been washed in hot, soapy water (or run through a dishwasher) and use a clean utensil every time you reach into the jar. This single habit dramatically extends how long your pickled vegetables stay fresh.
Adjust the heat to your taste. If you prefer a milder pickle, remove the seeds and ribs from the jalapeños before slicing, or reduce the crushed red pepper flakes. For a spicier version, leave the jalapeño seeds in, or add a sliced serrano or a few dried chile de árbol pods to the brine.
Let the flavor develop. It’s tempting to try these the moment they hit the fridge, but the real magic happens after a few days. The 3-to-5-day mark is when the sweet, tangy, and spicy notes truly come together.
Flavor Variations to Try
One of the best things about this recipe is how easy it is to customize. Here are a few ideas to make it your own:
- Extra garlicky: Double the garlic and add a few whole peeled cloves directly into the jar for a bolder, more pungent bite.
- Herb swap: Trade the fresh dill for tarragon, thyme, or fresh cilantro for a completely different aromatic profile.
- Smoky heat: Add a sliced chipotle pepper in adobo sauce or a pinch of smoked paprika to the brine for a smoky, deeper spice.
- Extra crunchy: Add sliced radishes or green beans for even more textural variety.
- Curry-spiced: Stir a teaspoon of curry powder or turmeric into the brine for a golden color and warm, earthy flavor.
- Low sugar: Reduce the granulated sugar and honey by half for a tangier, less sweet pickle that leans more savory.
How to Serve Sweet & Spicy Pickled Vegetables
These pickled vegetables are one of the most versatile condiments you can keep in your refrigerator. Here are just a few of the countless ways to enjoy them:
- Piled on top of burgers or hot dogs for a tangy, crunchy contrast
- Layered into sandwiches and wraps in place of standard pickles or lettuce
- Added to tacos and burrito bowls for brightness and heat
- Tossed into green salads or grain bowls for extra texture
- Served alongside grilled meats, chicken, or fish as a palate-cleansing side
- Included on a barbecue plate next to ribs, brisket, or pulled pork
- Arranged on a charcuterie or cheese board with crackers and cured meats
- Paired with hummus, warm pita, and other grilled vegetables for a Mediterranean-inspired spread
- Chopped and stirred into potato salad, pasta salad, or egg salad for a punch of flavor
- Served straight out of the jar as a low-calorie, crunchy snack
Because the flavor is so well-rounded — sweet, tangy, garlicky, and spicy all at once — these pickled vegetables complement almost any cuisine, from classic American barbecue to Mexican-inspired tacos to Mediterranean mezze spreads.
Storage Information
Proper storage is key to keeping your pickled vegetables tasting fresh and staying safe to eat. Store the sweet and spicy pickled vegetables in airtight glass jars in the refrigerator for up to 3 to 4 weeks. Always keep the vegetables fully submerged in the brine, and use a clean utensil every time you serve them to avoid introducing bacteria that could cause the pickles to spoil early.
Because this is a refrigerator pickle rather than a shelf-stable canned pickle, it should never be stored at room temperature for extended periods. Keep the jars chilled at all times, and give them a quick visual and smell check before eating — if you notice an off smell, unusual cloudiness beyond the natural spices, or any sign of mold, it’s best to discard that batch.
Recipe Quick Facts
- Prep Time: 20 minutes
- Cook Time: 5 minutes
- Total Time: 25 minutes, plus chilling time
- Servings: 12
- Calories: Approximately 55 per serving
Frequently Asked Questions
Do I need to can these vegetables to make them shelf-stable? No. This recipe is designed as a refrigerator (quick) pickle, not a shelf-stable canned pickle. There is no water bath processing involved, which means the jars must stay refrigerated at all times and be consumed within 3 to 4 weeks.
Can I skip the blanching step? You can, but it’s not recommended for the cauliflower and carrots. Blanching softens these denser vegetables just enough so they absorb the brine properly while retaining a pleasant crunch. Skipping this step often results in vegetables that stay too firm and underseasoned even after several days of pickling.
How spicy is this recipe? As written, this recipe has a moderate, well-rounded heat from the fresh jalapeños and crushed red pepper flakes — noticeable but not overwhelming. You can easily adjust the spice level up or down by changing the amount of jalapeño seeds and red pepper flakes used.
Can I reuse the brine after the vegetables are gone? While it’s tempting to reuse leftover brine, it’s generally best to make a fresh batch for each new batch of vegetables. The brine loses some of its salt, sugar, and acidity balance after the vegetables have soaked in it, and reused brine is more likely to lead to spoilage.
What’s the best jar to use for pickling? Wide-mouth glass mason jars are ideal because they make it easy to pack vegetables tightly and pour in the brine without spills. Make sure jars are thoroughly cleaned and completely dry before packing.
Can I make this recipe without sugar or honey? You can reduce the sweeteners for a tangier, more savory pickle, but keep in mind that sugar and honey aren’t just for sweetness — they also help balance the sharp acidity of the vinegar and contribute to the overall flavor complexity. Cutting them out entirely will significantly change the taste.
Why did my pickled vegetables turn soft? Soft, mushy pickled vegetables are usually the result of skipping the ice bath after blanching, using a boiling-hot brine instead of a slightly cooled one, or starting with produce that wasn’t fresh and firm to begin with.
Final Thoughts
Sweet & Spicy Pickled Vegetables are proof that a handful of pantry staples, some fresh produce, and a little patience can create something truly special. This recipe delivers everything a great condiment should: bold flavor, satisfying crunch, beautiful color, and enough versatility to earn a spot in nearly every meal you make. Once you have a jar of these tangy, garlicky, spicy-sweet vegetables in your refrigerator, you will find yourself reaching for them constantly — on burgers, in tacos, alongside grilled meats, or straight from the jar as a quick, low-calorie snack.
Give this recipe a try, adjust the spice level to your liking, and don’t be surprised if you find yourself making a double batch next time. Once you taste homemade pickled vegetables done right, it’s hard to go back to store-bought.
Print
Sweet & Spicy Pickled Vegetables
Ingredients
For the Vegetables
- 2 cups cauliflower florets
- 1½ cups carrots, sliced into sticks
- 1½ cups cucumber, cut into thick slices
- 1 red bell pepper, sliced into strips
- 1 yellow bell pepper, sliced into strips
- ½ red onion, thinly sliced
- 2 fresh jalapeños, thinly sliced
- 4 cloves garlic, thinly sliced
- ¼ cup fresh dill sprigs
For the Brine
- 2 cups white vinegar
- 1 cup water
- ¼ cup granulated sugar
- 1½ tablespoons honey
- 1½ tablespoons kosher salt
- 1 teaspoon whole black peppercorns
- 1 teaspoon mustard seeds
- ½ teaspoon coriander seeds
- ½ teaspoon crushed red pepper flakes
- 2 bay leaves
A quick note on ingredient choices: white vinegar is used here because its clean, sharp acidity lets the sweet and spicy notes shine without competing flavors, but you can experiment with apple cider vinegar for a slightly fruitier, mellower tang. Kosher salt is preferred over table salt because it dissolves cleanly and doesn’t carry the anti-caking additives that can cloud a brine. And using both sugar and honey rather than just one sweetener gives the brine more complexity — the honey adds a subtle floral note that plain sugar can’t replicate.
Instructions
Start by washing all of your vegetables thoroughly. Cut the cauliflower into bite-sized florets, slice the carrots into sticks, cut the cucumber into thick rounds or spears, and slice the bell peppers, red onion, jalapeños, and garlic thinly and evenly. Uniform cutting matters more than people expect — vegetables that are cut to similar sizes will pickle at the same rate, so you won’t end up with some pieces that are perfectly tangy and others that are still bland in the middle.
Bring a large pot of water to a gentle boil. Add the cauliflower and carrots and blanch for 2 to 3 minutes, just until they are slightly tender while still maintaining a good amount of crispness. This step is optional for some quick pickle recipes, but it makes a real difference here: raw cauliflower and carrots can taste chalky or overly firm even after several days in the brine, while a quick blanch softens them just enough to absorb flavor while keeping that essential crunch.
As soon as the cauliflower and carrots are done blanching, drain them immediately and rinse them under cold water (or plunge them into an ice bath) to stop the cooking process. This “shocking” step is crucial — it halts the residual heat from continuing to cook the vegetables, which is what preserves their crisp-tender texture instead of letting them turn mushy.
Pack the cauliflower, carrots, cucumber, bell peppers, red onion, jalapeños, garlic, and fresh dill sprigs into clean glass jars. Layer the vegetables evenly so that every jar gets a good mix of colors, textures, and flavors — this also helps the brine circulate more evenly through the jar rather than pooling around just one type of vegetable.
In a medium saucepan, combine the white vinegar, water, granulated sugar, honey, kosher salt, black peppercorns, mustard seeds, coriander seeds, crushed red pepper flakes, and bay leaves. Bring the mixture to a gentle simmer over medium heat, stirring occasionally, until the sugar, honey, and salt have completely dissolved. You’ll know it’s ready when the liquid looks clear (aside from the visible spices) and no longer feels gritty when you dip a spoon in.
Remove the saucepan from the heat and let the brine cool slightly for a few minutes. You want it warm, not scalding — pouring a rapidly boiling brine directly over delicate vegetables like cucumber can cause them to soften too quickly and lose their crunch.
Carefully pour the warm brine over the packed vegetables until they are completely submerged. Make sure the liquid reaches all the way to the top of the jar, covering every piece of vegetable — anything left above the brine line is at risk of spoiling faster or turning an unappetizing color.
Gently press the vegetables down with a clean spoon or a chopstick to release any trapped air bubbles and help the brine work its way through every layer of the jar. This small step ensures more even pickling and helps prevent air pockets that can lead to uneven flavor or premature spoilage.
Allow the jars to cool to room temperature on the counter before sealing them tightly with their lids. Sealing while the jars are still hot can create pressure buildup or trap excess condensation inside, which isn’t ideal for a refrigerator pickle.
Refrigerate the jars for at least 24 hours before serving — this is the minimum amount of time needed for the vegetables to absorb real flavor from the brine. For the best sweet-and-spicy flavor, though, patience pays off: let the vegetables pickle for 3 to 5 days. During this window, the flavors deepen, the sweetness and heat mellow into each other, and the vegetables take on that irresistible tangy crunch that makes this recipe so addictive.






