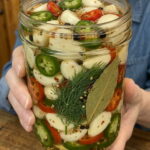
Ingredients
This recipe is broken into two simple components: the garlic and aromatics, and the tangy, spiced brine.
For the Garlic
2 cups peeled whole garlic cloves — Using pre-peeled garlic cloves from the store can save significant prep time, though freshly peeled cloves work wonderfully too. Look for firm, fresh cloves without any soft spots or sprouting.
1 fresh jalapeño, thinly sliced — Fresh jalapeño brings real, building heat and a fresh, slightly grassy spice that layers beautifully with the red pepper flakes.
3 sprigs fresh dill — Fresh dill adds a bright, aromatic, herby note that pairs perfectly with the garlic and spicy elements, echoing the flavor of a classic dill pickle.
1 teaspoon mustard seeds — Mustard seeds are a pickling staple, contributing subtle tang and a bit of texture to the jar.
1/2 teaspoon black peppercorns — Whole peppercorns add warm, slightly floral heat to the brine.
1/2 teaspoon red pepper flakes — Red pepper flakes reinforce the heat from the fresh jalapeño, adding a steady, lingering spice throughout the jar.
1/2 teaspoon dried oregano — Oregano adds a warm, earthy herbal note that rounds out the overall flavor.
1 bay leaf — A bay leaf contributes a subtle herbal aroma that infuses into the brine as the garlic pickles.
For the Brine
1 cup white vinegar — White vinegar provides the sharp, clean acidity that’s essential to a great pickle.
1/2 cup water — Water dilutes the vinegar slightly, softening the acidity so the other flavors can shine through.
2 tablespoons granulated sugar — A touch of sugar balances out the sharp vinegar, rounding out the overall flavor of the brine.
1 1/2 teaspoons kosher salt — Salt is essential for both flavor and the pickling process, helping season the garlic all the way through.
Instructions
This recipe is refreshingly simple and comes together with very little hands-on time, since the garlic goes into the jar completely raw. Here’s exactly how to make it from start to finish.
Pack the peeled whole garlic cloves into a clean glass jar, tucking in the sliced jalapeño, fresh dill sprigs, mustard seeds, black peppercorns, red pepper flakes, oregano, and bay leaf as you go. Distributing the aromatics evenly throughout the jar ensures every clove gets plenty of flavor contact.
In a small saucepan, combine the white vinegar, water, sugar, and kosher salt. This straightforward combination of acid, sugar, and salt forms the base of a well-balanced pickling brine.
Place the saucepan over medium heat and warm the mixture, stirring until the sugar and salt have completely dissolved. It’s important not to bring this brine to a hard boil; a gentle warm-through is all that’s needed to dissolve the sugar and salt without altering the brine’s flavor.
Carefully pour the warm brine over the garlic cloves in the jar, making sure every single clove is completely submerged in liquid. Any cloves poking above the brine line are more likely to discolor or spoil, so top off with a little extra brine if needed.
Let the jar cool uncovered on the counter until it reaches room temperature. Allowing the jar to cool fully before sealing helps prevent excess condensation from building up inside once closed.
Once cooled, cover the jar tightly with a lid and transfer it to the refrigerator. Let the garlic pickle for at least 24 hours, which allows the brine to begin flavoring the cloves throughout.
For the best flavor, allow the garlic to pickle for 2 to 3 days before serving. The longer it sits in the refrigerator, the more the tangy, spicy, garlicky flavor develops and mellows into something truly addictive.
Once ready, keep the jar refrigerated and enjoy the crunchy, spicy pickled garlic on sandwiches, burgers, tacos, salads, charcuterie boards, or straight from the jar.