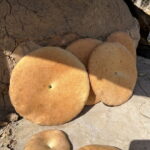
Ingredients
- 3 cups (375 g) all-purpose flour
- 1 cup (160 g) fine semolina
- 1½ cups (360 ml) warm water, approximately
- 2 teaspoons instant yeast (7 g)
- 1 teaspoon sugar
- 1½ teaspoons salt
- 2 tablespoons olive oil
Instructions
In a large bowl, combine the warm water, yeast and sugar. Stir gently and let it sit for 5 to 10 minutes, until slightly foamy. This proves that the yeast is alive and ready. If you see no bubbles or foam after 10 minutes, the yeast may be old or the water the wrong temperature, and it is best to start again.
Add the flour, semolina, salt and olive oil to the bowl with the yeast mixture.
Mix until a soft, slightly sticky dough forms. Add water gradually if needed, a tablespoon at a time, especially if the semolina soaks up the liquid. The dough should feel soft and pliable. It should not be so dry that it cracks or so wet that it cannot hold its shape.
Knead for 8 to 10 minutes by hand on a lightly floured surface or in a stand mixer with a dough hook for about 6 to 8 minutes, until smooth and elastic. The dough will become less sticky as you knead. You can check by stretching a small piece of dough thin. If it forms a translucent membrane without tearing right away, the gluten is well developed.
Place the dough in a lightly oiled bowl and turn it once to coat. Cover and let it rise in a warm place for about 1 hour, or until doubled in size. A warm spot could be a turned-off oven with the light on or a sunny corner of the kitchen. In cooler weather, the rise may take longer.
Gently deflate the dough and divide it into 2 or 3 portions. Shape each into a thick, round flatbread, about 2 to 3 cm (¾ to 1 inch) thick. Press the dough gently with your fingers or palms, working from the center outward, until you have an even disc. Tuck any rough edges underneath and smooth the surface.
Two larger loaves will give you a more rustic, hearty bread, while three smaller ones are easier to handle and bake a little faster.
Place the shaped breads on a lightly floured surface, cover and rest for 15 to 20 minutes. This short rest relaxes the dough and gives it a little more lightness before baking. Many bakers like to dust the surface with a little semolina, which also adds a pleasant texture to the base of the bread.
Preheat a baking stone or heavy baking tray in the oven at 475°F (245°C) for at least 30 minutes. The hot surface is what mimics the heat of a clay oven and helps the bread rise and brown properly.
Carefully transfer the breads onto the hot surface. You can use a floured peel, a flat baking sheet or parchment paper for easier handling. Bake for 10 to 15 minutes, turning if necessary for even browning, until golden with lightly crisp edges. The breads should sound hollow when tapped on the bottom. Baking time varies with the thickness and size of your breads and the strength of your oven.
Always use thick oven mitts, as the stone and tray are extremely hot.
Remove the breads from the oven, cover with a clean kitchen towel for a few minutes, and serve warm. Covering the bread traps steam and keeps the crust from becoming too hard, giving you a soft, tender bite.