
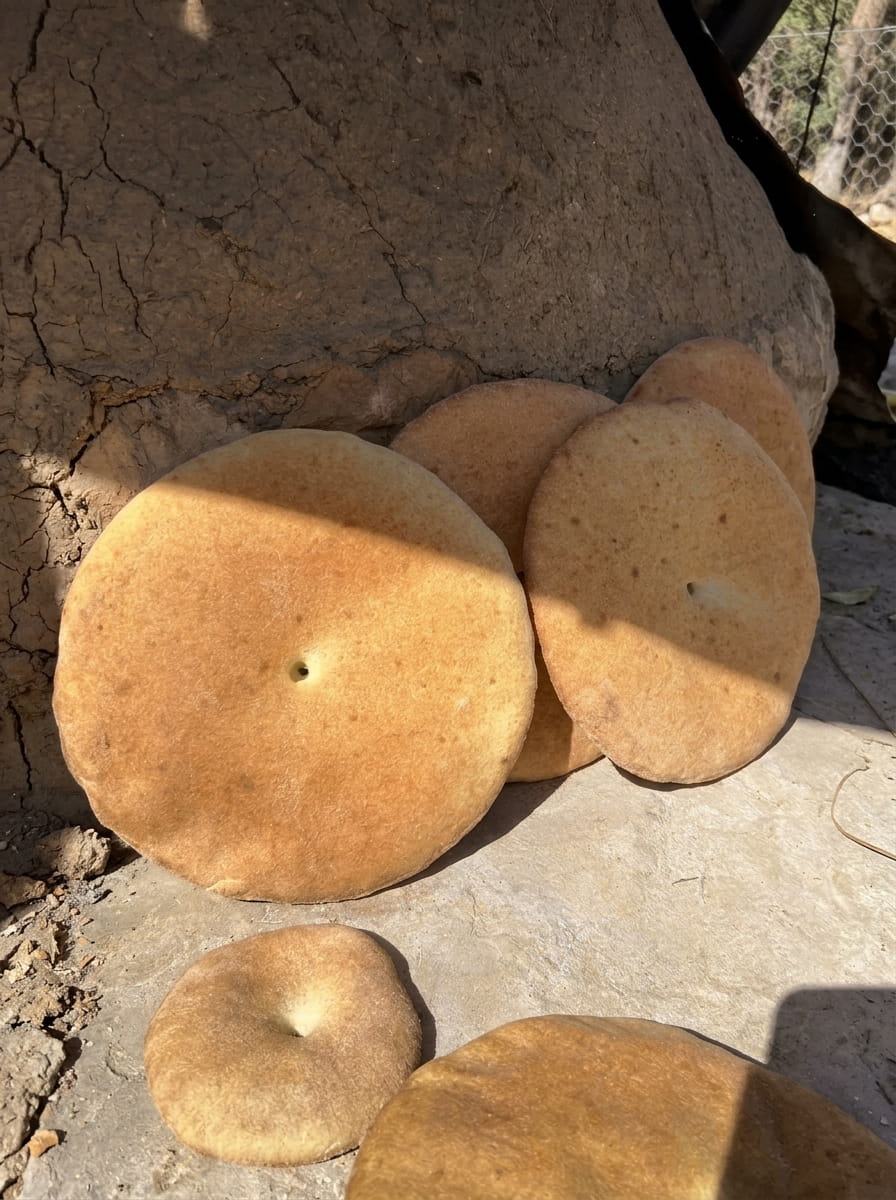
Traditional Moroccan Tafarnout Bread: Rustic, Golden & Chewy
Traditional Moroccan tafarnout bread is rustic, golden and deliciously chewy, with a lightly crisp exterior and a soft, tender center. This Amazigh-style flatbread is traditionally baked in a hot clay oven and made with simple ingredients: flour, semolina, yeast, salt, a touch of sugar and olive oil. At home, you can get beautiful results using a baking stone or a heavy baking tray in a very hot oven.
Serve it warm with olive oil, honey, butter, amlou or alongside your favorite Moroccan tagine. It is the kind of bread that makes a meal feel complete, perfect for scooping up sauces, sharing around the table and enjoying with a glass of mint tea.
In this guide you will find the full recipe, ingredient notes, step-by-step instructions, tips for the best texture, variations, storage advice, serving ideas and answers to frequently asked questions.
What Is Tafarnout Bread?
Tafarnout is a traditional Moroccan bread associated with Amazigh (Berber) communities, particularly in rural and mountain regions. The name is closely tied to the traditional clay oven in which the bread is baked, and in many households the same word is used for both the oven and the bread baked in it. As far as I know, regional names and spellings vary across Morocco, so you may see it written in different ways or described with slightly different shapes and textures depending on the family and the area.
Traditionally, the dough is shaped into thick, round loaves and baked against the hot walls or on the hot floor of a wood-fired clay oven. The intense heat gives the bread a golden, lightly crisp crust and a soft, airy crumb, along with a subtle smoky aroma. Many households prepare dough at home and take it to a communal oven, which makes bread baking a social part of daily life.
This recipe adapts that tradition for a home kitchen. The use of fine semolina alongside all-purpose flour gives the bread its characteristic slightly sandy, golden color and pleasant chew, similar to other classic Moroccan breads.
Why You’ll Love This Recipe
It uses simple pantry ingredients. Flour, semolina, water, yeast, sugar, salt and olive oil are all you need.
It has a wonderful texture. The crust is lightly crisp, while the inside stays soft, tender and chewy.
It is rustic and satisfying. The thick, round shape is hearty, generous and made for sharing.
Semolina adds character. It gives the bread a warm golden color, a subtle sweetness and a pleasantly sturdy crumb.
It works in a home oven. A preheated baking stone or heavy tray gives you much of the effect of a clay oven.
It is incredibly versatile. Serve it with sweet or savory toppings, tagines, soups, dips or breakfast spreads.
It makes a meal feel special. Warm homemade bread brings comfort and a sense of tradition to the table.
Ingredients You’ll Need
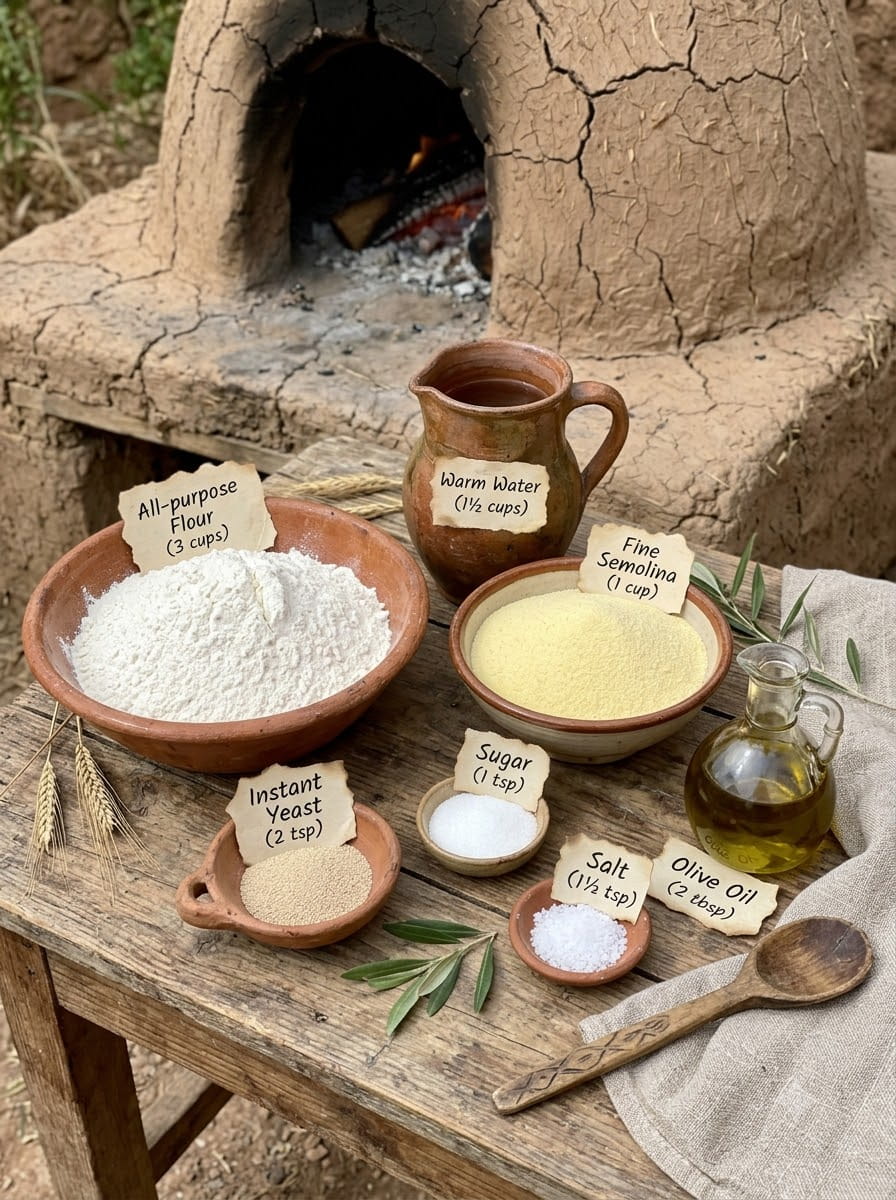
- 3 cups (375 g) all-purpose flour
- 1 cup (160 g) fine semolina
- 1½ cups (360 ml) warm water, approximately
- 2 teaspoons instant yeast (7 g)
- 1 teaspoon sugar
- 1½ teaspoons salt
- 2 tablespoons olive oil
Ingredient Notes
All-purpose flour. This provides the main structure of the bread and keeps the crumb soft. For a chewier, slightly taller loaf, you can use bread flour instead. If you measure by cups, spoon the flour into the cup and level it off rather than scooping directly from the bag. Weighing is more accurate.
Fine semolina. Semolina is made from durum wheat. Fine semolina, sometimes called semolina flour, gives the bread its golden color, slight sweetness and chew. Avoid coarse semolina for this recipe, as it can make the texture gritty and absorb water differently. Many Moroccan households use fine or medium semolina in their breads, so use what you can find, but fine is best here.
Warm water. The water should feel pleasantly warm, not hot, about 38°C to 43°C (100°F to 110°F). Water that is too hot will kill the yeast, and water that is too cold will slow it down. The amount of water you need may vary depending on the flour, the semolina and the humidity, so add it gradually.
Instant yeast. Instant yeast is mixed directly with warm water and sugar in this recipe so you can see it foam. If you only have active dry yeast, use the same amount and allow it to bloom for 10 minutes.
Sugar. One teaspoon feeds the yeast and encourages browning. It does not make the bread sweet.
Salt. Salt brings out the flavor and strengthens the dough. The amount here, 1½ teaspoons, gives a well-seasoned bread. Adjust slightly to taste.
Olive oil. Two tablespoons add flavor, softness and a slightly richer crumb. Choose a good-quality extra virgin olive oil. Moroccan olive oil would be especially fitting.
How to Make Moroccan Tafarnout Bread
Step 1: Activate the Yeast
In a large bowl, combine the warm water, yeast and sugar. Stir gently and let it sit for 5 to 10 minutes, until slightly foamy. This proves that the yeast is alive and ready. If you see no bubbles or foam after 10 minutes, the yeast may be old or the water the wrong temperature, and it is best to start again.
Step 2: Add the Dry Ingredients
Add the flour, semolina, salt and olive oil to the bowl with the yeast mixture.
Step 3: Mix the Dough
Mix until a soft, slightly sticky dough forms. Add water gradually if needed, a tablespoon at a time, especially if the semolina soaks up the liquid. The dough should feel soft and pliable. It should not be so dry that it cracks or so wet that it cannot hold its shape.
Step 4: Knead
Knead for 8 to 10 minutes by hand on a lightly floured surface or in a stand mixer with a dough hook for about 6 to 8 minutes, until smooth and elastic. The dough will become less sticky as you knead. You can check by stretching a small piece of dough thin. If it forms a translucent membrane without tearing right away, the gluten is well developed.
Step 5: First Rise
Place the dough in a lightly oiled bowl and turn it once to coat. Cover and let it rise in a warm place for about 1 hour, or until doubled in size. A warm spot could be a turned-off oven with the light on or a sunny corner of the kitchen. In cooler weather, the rise may take longer.
Step 6: Divide and Shape
Gently deflate the dough and divide it into 2 or 3 portions. Shape each into a thick, round flatbread, about 2 to 3 cm (¾ to 1 inch) thick. Press the dough gently with your fingers or palms, working from the center outward, until you have an even disc. Tuck any rough edges underneath and smooth the surface.
Two larger loaves will give you a more rustic, hearty bread, while three smaller ones are easier to handle and bake a little faster.
Step 7: Rest
Place the shaped breads on a lightly floured surface, cover and rest for 15 to 20 minutes. This short rest relaxes the dough and gives it a little more lightness before baking. Many bakers like to dust the surface with a little semolina, which also adds a pleasant texture to the base of the bread.
Step 8: Preheat the Oven and Baking Surface
Preheat a baking stone or heavy baking tray in the oven at 475°F (245°C) for at least 30 minutes. The hot surface is what mimics the heat of a clay oven and helps the bread rise and brown properly.
Step 9: Bake
Carefully transfer the breads onto the hot surface. You can use a floured peel, a flat baking sheet or parchment paper for easier handling. Bake for 10 to 15 minutes, turning if necessary for even browning, until golden with lightly crisp edges. The breads should sound hollow when tapped on the bottom. Baking time varies with the thickness and size of your breads and the strength of your oven.
Always use thick oven mitts, as the stone and tray are extremely hot.
Step 10: Steam and Serve
Remove the breads from the oven, cover with a clean kitchen towel for a few minutes, and serve warm. Covering the bread traps steam and keeps the crust from becoming too hard, giving you a soft, tender bite.
Tips for the Best Tafarnout Bread
Do not skip the hot baking surface. A preheated stone or tray gives the bread a strong initial heat, which improves the rise and the crust.
Knead well. The dough needs time to become smooth and elastic, as this is what gives the bread its chewy texture.
Add water gradually. Different flours and semolina absorb liquid differently. A soft, slightly sticky dough produces a more tender bread.
Keep the dough warm for the rise. A warm environment helps the yeast do its job.
Shape thick, even rounds. Even thickness ensures even baking.
Use a pinch of semolina for dusting. It prevents sticking and adds a lovely rustic finish.
Prick or dimple the dough if desired. Some bakers gently prick the surface with a fork to control puffing and keep it flatter.
Cover after baking. The towel keeps the crust soft and the bread moist.
Serve warm. The bread is at its best fresh from the oven.
Common Mistakes to Avoid
Dense, heavy bread. This usually means the dough was under-kneaded, under-risen or the yeast was weak. Check the yeast and let the dough rise until doubled.
Dough too dry. Semolina absorbs a lot of water. If the dough feels stiff, add a little more water.
Dough too sticky to handle. Do not add too much flour at once. Use lightly oiled hands and a bench scraper, and add flour a spoonful at a time.
Crust too hard. The bread may have been baked too long, or the oven was too hot for the thickness. Cover with a towel after baking, and check it at the earlier end of the time range.
Pale bread. The oven may not have been hot enough, or the baking surface was not preheated long enough. Make sure the oven reaches temperature.
Bread did not rise. The yeast may not have been active, or the room may be cold. Test the yeast and find a warmer place.
Uneven baking. Turn the breads and rotate the tray if your oven has hot spots.
Delicious Variations
Whole wheat tafarnout. Replace up to half of the all-purpose flour with whole wheat flour. You may need a little more water.
Anise and sesame bread. Add a teaspoon of anise seeds and a sprinkle of sesame seeds, both common in Moroccan bread, to the dough or the top.
Herbed tafarnout. Mix in chopped fresh herbs such as parsley, cilantro or thyme.
Garlic olive oil brush. Brush the warm bread with garlic-infused olive oil right after baking.
Spiced version. Add a teaspoon of cumin or a pinch of paprika for a savory twist.
Stuffed tafarnout. Fill with a mix of onion, herbs and spices, or with cheese, before shaping and baking, for a more substantial meal.
Mini loaves. Divide the dough into smaller portions for individual rounds, ideal for sandwiches or serving with dips.
Skillet version. If you do not want to heat the oven, cook the rested flatbreads on a heavy skillet or griddle over medium heat, turning until cooked through. The result will be different from oven-baked bread, but still delicious.
Serving Ideas
With sweet toppings:
- Warm bread drizzled with honey
- Spread with butter and honey, a classic Moroccan breakfast combination
- Served with amlou, the Moroccan dip made from almonds, argan oil and honey
- Paired with jam or soft cheese
With savory dishes:
- As the main scooping bread for tagines, such as chicken with preserved lemon and olives, lamb with prunes, or vegetable tagine
- With harira, the traditional Moroccan soup
- Alongside salads such as zaalouk, taktouka or carrot salad
- With grilled meats, kefta or kebabs
For breakfast and snacks:
- With olive oil and a sprinkle of salt
- With eggs, olives and fresh cheese
- Alongside mint tea or coffee
For sandwiches:
- Cut in half and fill with grilled meat, salad and sauce
- Fill with cheese and herbs for a simple warm sandwich
How to Store Tafarnout Bread
At room temperature: Once cooled, store the bread in a clean kitchen towel, bread box or paper bag for 1 to 2 days. Homemade bread has no preservatives and is best fresh.
In an airtight container or bag: This keeps the bread softer for longer, though the crust will lose its crispness.
In the freezer: Wrap cooled loaves tightly or slice them and place them in a freezer-safe bag. Freeze for up to 3 months. Thaw at room temperature.
Reheating: Warm the bread in a 175°C (350°F) oven for 5 to 10 minutes, or in a dry skillet or toaster, to restore its texture. A light sprinkle of water on the crust before reheating helps it stay soft inside.
Using leftovers: Day-old bread makes excellent croutons, breadcrumbs, or pieces for dipping into soups and stews.
Nutrition Notes
Tafarnout bread is made from wheat flour and semolina, so it provides carbohydrates for energy and some protein, along with healthy fats from the olive oil. Semolina is made from durum wheat, which has a high protein content. Exact nutritional values depend on your ingredients and portion size. The bread contains gluten and is not suitable for people with celiac disease or gluten intolerance. If you have dietary restrictions or a health condition, check with your doctor or a registered dietitian.
Frequently Asked Questions
What is tafarnout?
Tafarnout is a traditional Moroccan, Amazigh-style bread, baked in a hot clay oven. The name is often connected to the oven itself, and the bread has a rustic, chewy texture and golden crust.
Do I need a clay oven?
No. A home oven with a preheated baking stone or heavy baking tray produces excellent results.
What is the difference between semolina and flour?
Semolina is made from durum wheat and has a more granular texture and golden color. Flour is more finely milled and gives a softer crumb. The combination in this bread gives both tenderness and chew.
Can I use all-purpose flour only?
Yes, but the bread will lack some of the color, flavor and texture that semolina provides.
Can I use coarse semolina?
Fine semolina works best for this recipe. Coarse semolina can make the bread gritty unless it is soaked first.
Why is my dough sticky?
This dough is meant to be soft and slightly sticky. Kneading will make it smoother. Add flour gradually if needed, but avoid adding too much, as it can make the bread dry.
Can I make the dough ahead?
Yes. After kneading, you can refrigerate the dough for several hours or overnight in a covered, oiled bowl. Let it come to room temperature and finish rising before shaping.
Can I use active dry yeast?
Yes. Use the same amount and let it foam in the warm water and sugar for about 10 minutes.
Why did my bread turn out hard?
It may have been overbaked, the dough may have been too dry, or the bread may not have been covered after baking. Cover warm bread with a towel to soften the crust.
What is amlou?
Amlou is a Moroccan spread made from ground almonds, argan oil and honey. It is traditionally eaten with bread, especially at breakfast.
Can I make it without sugar?
Yes. The amount of sugar is tiny and mainly feeds the yeast. You can leave it out, though browning might be slightly less pronounced.
How thick should the bread be?
About 2 to 3 cm (¾ to 1 inch) is a good range. Thinner bread will bake faster and be crisper, while thicker bread will be softer and more tender.
Final Thoughts
Traditional Moroccan tafarnout bread brings the warmth of an Amazigh oven into your own kitchen. With a golden, lightly crisp crust, a soft, chewy center and the gentle flavor of semolina and olive oil, it is a simple loaf with a lot of character.
Serve it warm with honey, butter, amlou or olive oil for breakfast, or use it to scoop up a fragrant tagine at dinner. Once you have baked it and torn into that first warm piece, it is easy to see why this style of bread has been a staple of Moroccan tables for generations.
Try the recipe, share it with family and friends, and enjoy a taste of Moroccan tradition at home.
Print
Traditional Moroccan Tafarnout Bread
Ingredients
- 3 cups (375 g) all-purpose flour
- 1 cup (160 g) fine semolina
- 1½ cups (360 ml) warm water, approximately
- 2 teaspoons instant yeast (7 g)
- 1 teaspoon sugar
- 1½ teaspoons salt
- 2 tablespoons olive oil
Instructions
In a large bowl, combine the warm water, yeast and sugar. Stir gently and let it sit for 5 to 10 minutes, until slightly foamy. This proves that the yeast is alive and ready. If you see no bubbles or foam after 10 minutes, the yeast may be old or the water the wrong temperature, and it is best to start again.
Add the flour, semolina, salt and olive oil to the bowl with the yeast mixture.
Mix until a soft, slightly sticky dough forms. Add water gradually if needed, a tablespoon at a time, especially if the semolina soaks up the liquid. The dough should feel soft and pliable. It should not be so dry that it cracks or so wet that it cannot hold its shape.
Knead for 8 to 10 minutes by hand on a lightly floured surface or in a stand mixer with a dough hook for about 6 to 8 minutes, until smooth and elastic. The dough will become less sticky as you knead. You can check by stretching a small piece of dough thin. If it forms a translucent membrane without tearing right away, the gluten is well developed.
Place the dough in a lightly oiled bowl and turn it once to coat. Cover and let it rise in a warm place for about 1 hour, or until doubled in size. A warm spot could be a turned-off oven with the light on or a sunny corner of the kitchen. In cooler weather, the rise may take longer.
Gently deflate the dough and divide it into 2 or 3 portions. Shape each into a thick, round flatbread, about 2 to 3 cm (¾ to 1 inch) thick. Press the dough gently with your fingers or palms, working from the center outward, until you have an even disc. Tuck any rough edges underneath and smooth the surface.
Two larger loaves will give you a more rustic, hearty bread, while three smaller ones are easier to handle and bake a little faster.
Place the shaped breads on a lightly floured surface, cover and rest for 15 to 20 minutes. This short rest relaxes the dough and gives it a little more lightness before baking. Many bakers like to dust the surface with a little semolina, which also adds a pleasant texture to the base of the bread.
Preheat a baking stone or heavy baking tray in the oven at 475°F (245°C) for at least 30 minutes. The hot surface is what mimics the heat of a clay oven and helps the bread rise and brown properly.
Carefully transfer the breads onto the hot surface. You can use a floured peel, a flat baking sheet or parchment paper for easier handling. Bake for 10 to 15 minutes, turning if necessary for even browning, until golden with lightly crisp edges. The breads should sound hollow when tapped on the bottom. Baking time varies with the thickness and size of your breads and the strength of your oven.
Always use thick oven mitts, as the stone and tray are extremely hot.
Remove the breads from the oven, cover with a clean kitchen towel for a few minutes, and serve warm. Covering the bread traps steam and keeps the crust from becoming too hard, giving you a soft, tender bite.