Pickled Red Onions: The Easy, Tangy Condiment That Upgrades Everything
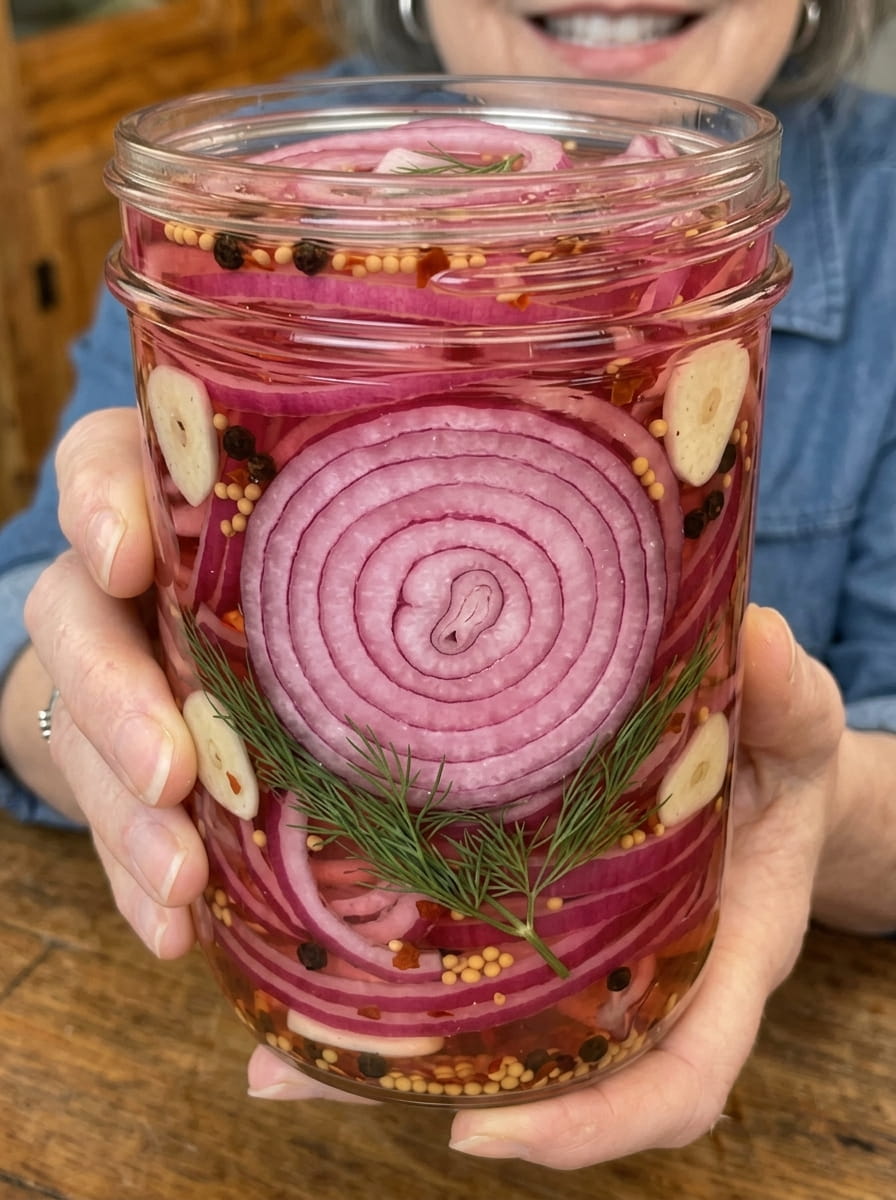
If there’s one condiment that deserves a permanent spot in your refrigerator, it’s Pickled Red Onions. Bright pink, tangy, slightly sweet, and endlessly versatile, these quick-pickled onions take just minutes to prepare and instantly elevate everything from tacos to burgers to grain bowls. With a simple brine of apple cider vinegar, sugar, and salt, plus garlic, mustard seeds, and a touch of heat from red pepper flakes, this recipe transforms sharp raw onions into a crisp, tangy, addictive topping you’ll want to put on absolutely everything.
Unlike traditional canning, this is a quick pickle, meaning there’s no special equipment, no water bath, and no complicated process. You simply slice, pack, pour, and chill. Within an hour you’ll have a batch of vibrant pickled onions ready to go, though letting them sit longer only deepens the flavor. Once you start keeping a jar of these in your fridge, you’ll wonder how you ever lived without them.
Below, you’ll find a complete guide to making the best pickled red onions, including ingredient details, step-by-step instructions, expert tips, flavor variations, serving ideas, and answers to the most common questions about quick pickling.
Why You’ll Love This Recipe
They’re incredibly quick and easy. With just a handful of ingredients and about 10 minutes of active prep time, this recipe delivers big, bold flavor without any fuss. There’s no canning equipment or special skills required.
They mellow out raw onion’s sharp bite. Pickling softens the harsh, pungent edge of raw red onion, transforming it into something tangy, slightly sweet, and much more pleasant to eat raw.
The color is stunning. As the onions sit in the vinegar brine, they turn a vibrant, almost neon pink color that makes any dish look instantly more appetizing.
They’re endlessly versatile. From tacos and burgers to salads, sandwiches, grain bowls, and grilled meats, pickled red onions add a pop of acidity and crunch to almost any savory dish.
They keep for weeks. Stored properly in the refrigerator, a jar of pickled onions will last for several weeks, making this a fantastic make-ahead condiment to always have on hand.
They’re naturally gluten-free and vegan. This recipe fits seamlessly into a wide variety of dietary preferences without any modifications needed.
Ingredients You’ll Need
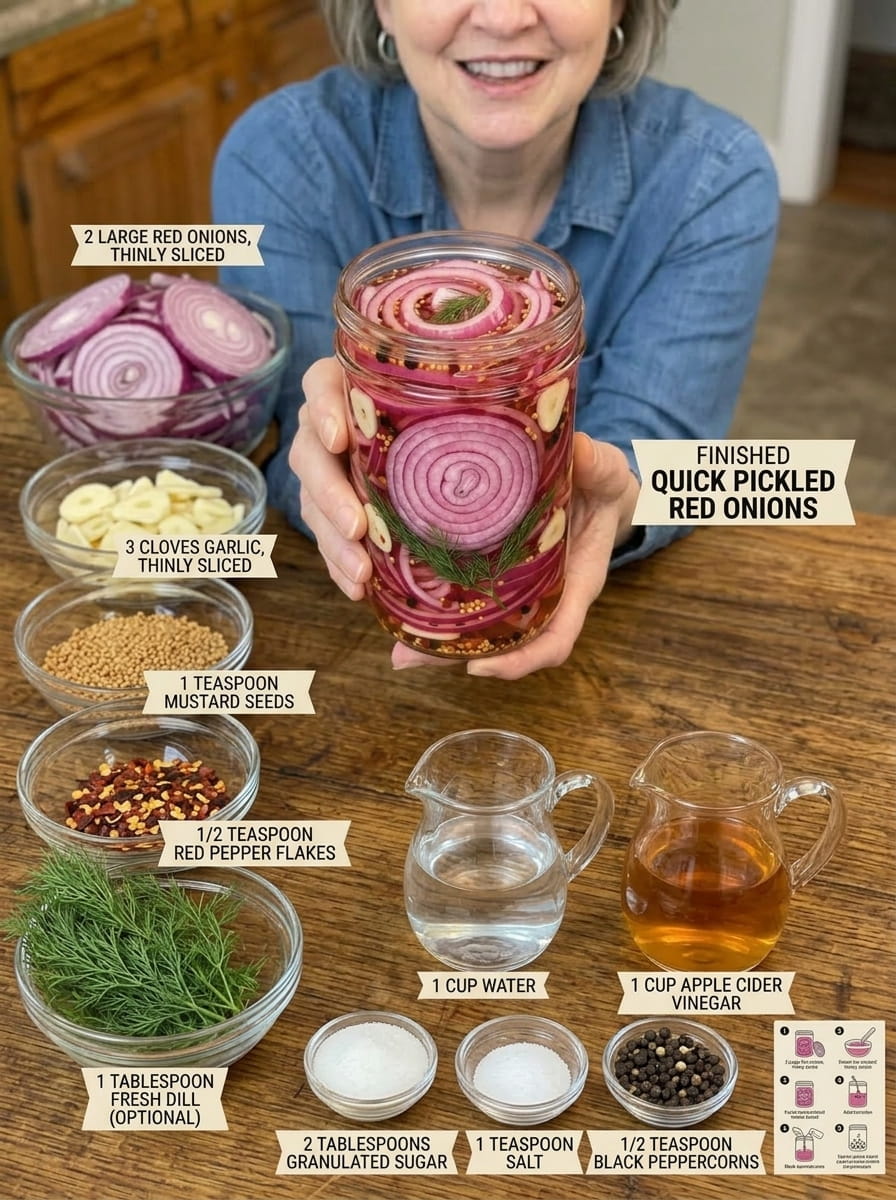
Here’s a closer look at what goes into this recipe and why each ingredient matters.
For the Onions
Red onions — The star of the dish. Red onions are ideal for pickling because of their vibrant color, which turns an even more brilliant pink once pickled, and their slightly sweeter, milder flavor compared to yellow or white onions.
Garlic — Thinly sliced garlic infuses the brine with a warm, savory depth and becomes deliciously tangy and mellow itself after pickling.
Mustard seeds — These add a subtle tangy, slightly peppery pop of flavor and are a classic addition to pickling brines.
Red pepper flakes — A touch of heat that balances the sweetness of the brine. This can easily be adjusted up or down based on your spice preference.
Fresh dill (optional) — Adds an herbaceous, slightly citrusy note that pairs beautifully with the tanginess of the vinegar. This is a great addition if you’re planning to use the onions on sandwiches or alongside seafood.
For the Pickling Brine
Apple cider vinegar — The backbone of the brine, providing tang and acidity while also contributing a subtle, slightly fruity flavor that pairs beautifully with red onion.
Water — Balances out the acidity of the vinegar so the brine isn’t overly harsh.
Granulated sugar — Adds a touch of sweetness that balances the tartness of the vinegar, creating that signature sweet-and-tangy pickle flavor.
Salt — Essential for flavor balance and also plays a role in the pickling process itself.
Black peppercorns — Infuses the brine with a warm, subtly spicy background note as it simmers.
Step-by-Step Instructions
1. Slice and Pack the Onions
Thinly slice the red onions — a mandoline works wonderfully here for consistent, thin slices, though a sharp knife works just fine too. Pack the sliced onions into a clean glass jar, pressing down gently so you can fit as much as possible without overly crushing them.
2. Add the Aromatics
Add the sliced garlic, mustard seeds, red pepper flakes, and fresh dill, if using, directly into the jar with the onions. These aromatics will infuse the brine as it’s poured over the top and continue to flavor the onions as they pickle.
3. Make the Brine
In a small saucepan, combine the apple cider vinegar, water, sugar, salt, and black peppercorns. Bring the mixture to a gentle simmer over medium heat, stirring occasionally, until the sugar and salt are completely dissolved.
4. Pour the Hot Brine Over the Onions
Carefully pour the hot brine over the packed onions in the jar, making sure the onions are completely submerged. If needed, use the back of a spoon to press the onions down so they’re fully covered by the liquid.
5. Cool, Seal, and Refrigerate
Let the jar cool to room temperature on the counter, uncovered, to avoid trapping excess steam and condensation inside. Once cooled, seal the jar with a tight-fitting lid and transfer it to the refrigerator.
6. Let Them Pickle
Allow the onions to pickle for at least 1 hour for a quick, mild pickle. For a deeper, more developed tangy flavor, let them sit for several hours or overnight before using.
7. Store and Enjoy
Keep the jar refrigerated at all times. Use the pickled onions on tacos, burgers, sandwiches, salads, rice bowls, grilled meats, and any other dish that could use a punch of bright, tangy flavor.
Tips for the Best Pickled Red Onions
Slice the onions thinly and evenly. Thin, uniform slices pickle more quickly and evenly than thick or unevenly cut pieces. A mandoline slicer is a great tool for consistent results.
Use a glass jar. Glass won’t absorb odors or react with the acidic vinegar brine the way some plastic containers might, and it also lets you see the beautiful color transformation as the onions pickle.
Make sure the onions are fully submerged. Any onion pieces poking out above the brine won’t pickle properly and may dry out or discolor. Press them down with a spoon or use a smaller jar to ensure full coverage.
Don’t skip the cooling step. Allowing the jar to cool to room temperature before sealing helps prevent condensation buildup inside the jar, which can affect texture and shelf life.
Adjust the sweetness and heat to taste. If you prefer a more tangy, less sweet pickle, reduce the sugar slightly. If you like more heat, increase the red pepper flakes.
Let time do the work. While these onions are ready to eat after just an hour, the flavor continues to deepen and mellow over the following days, so don’t be afraid to make a batch in advance.
Delicious Variations to Try
Pickled red onions are a fantastic base recipe that can be easily customized. Here are some ideas:
Citrus Pickled Onions — Add a few strips of orange or lime zest to the jar for a bright, citrusy twist that’s especially delicious on fish tacos.
Jalapeño Pickled Onions — Add a few slices of fresh jalapeño to the jar along with the onions for extra heat and a fresh, grassy flavor.
Herb-Infused Onions — Swap the dill for fresh thyme, rosemary, or oregano for a different aromatic profile that pairs well with roasted meats.
Sweet and Spicy Onions — Increase both the sugar and red pepper flakes slightly for a bolder, sweet-and-spicy version that’s fantastic on burgers.
White or Sweet Onion Version — While red onions are traditional for their color, this same brine works well with white or sweet onions if that’s what you have on hand.
Beet Pickled Onions — Add a few thin slices of raw beet to the jar for an even deeper pink color and a subtle earthy sweetness.
What to Serve With Pickled Red Onions
These tangy onions are one of the most versatile condiments you can keep on hand. Here are just a few ways to use them:
- Tacos: Add a spoonful to fish tacos, carnitas, or barbacoa for a bright, acidic contrast to rich, savory fillings.
- Burgers and Sandwiches: Layer them onto burgers, pulled pork sandwiches, or a classic deli sandwich for a punch of tang.
- Salads: Toss them into green salads, grain bowls, or pasta salads for an extra layer of flavor and color.
- Rice Bowls: Top rice bowls, burrito bowls, or poke bowls with a handful of pickled onions for brightness.
- Grilled Meats and BBQ: Serve alongside grilled chicken, steak, or barbecue dishes to cut through smoky, rich flavors.
- Charcuterie and Cheese Boards: Add a small bowl to a charcuterie spread for a tangy contrast to rich cheeses and cured meats.
- Avocado Toast: Top your morning avocado toast with a few pickled onions for a quick flavor boost.
Make-Ahead and Storage Tips
To make ahead: This recipe is essentially designed to be made ahead. In fact, the flavor improves the longer the onions sit in the brine, so preparing a jar a day or two before you plan to use it is ideal.
Storing: Keep the jar tightly sealed and stored in the refrigerator at all times. Properly stored, pickled red onions will typically stay fresh and flavorful for up to 2 to 3 weeks.
Checking freshness: Over time, the onions will continue to soften and the color may fade slightly. If you notice any off smells, mold, or an unusual texture, it’s best to discard the batch.
Freezing: Freezing is not recommended for this recipe, as the pickled onions will lose their signature crisp texture and become mushy once thawed.
Frequently Asked Questions
How long do pickled red onions last in the fridge? When stored in a sealed jar in the refrigerator, pickled red onions typically stay fresh for about 2 to 3 weeks.
Can I reuse the brine for a second batch of onions? While it’s best to make a fresh brine for the most flavorful results, you can reuse the leftover brine once for a milder second batch, keeping in mind the flavor won’t be quite as strong.
Do I have to use apple cider vinegar? No, though it’s a popular choice for its subtle fruity flavor. White vinegar, rice vinegar, or red wine vinegar can all be used as substitutes, each lending a slightly different flavor profile.
Why did my pickled onions turn bright pink? This is completely normal. Red onions contain natural pigments that react with the acidic vinegar, turning the onions a vibrant pink color as they pickle.
Can I make this recipe without sugar? Yes, though the sugar helps balance the acidity of the vinegar. If you prefer to omit it or use a sugar substitute, the pickled onions will have a sharper, more tart flavor.
Is it necessary to heat the brine? Heating the brine helps dissolve the sugar and salt completely and allows the flavors to meld together more quickly. However, a cold brine method can also be used if you prefer a more raw, crunchy texture, though it may take longer to develop flavor.
Final Thoughts
Pickled Red Onions are proof that the simplest recipes are often the most useful. With just a handful of pantry staples and a few minutes of prep, you can create a vibrant, tangy condiment that instantly makes tacos, burgers, salads, and grain bowls taste more exciting. Once you have a jar of these tucked away in your refrigerator, you’ll find yourself reaching for them constantly, whether you’re dressing up a quick weeknight dinner or adding a finishing touch to a special occasion spread.
Make a batch today, and get ready for a new pantry staple that never goes to waste.
Recipe Card: Pickled Red Onions
Prep Time: 10 minutes | Pickling Time: 1 hour minimum (best after several hours) | Total Time: about 1 hour 10 minutes | Yield: about 1 pint jar
Ingredients
For the Onions
- 2 large red onions, thinly sliced
- 3 cloves garlic, thinly sliced
- 1 teaspoon mustard seeds
- ½ teaspoon red pepper flakes
- 1 tablespoon fresh dill, optional
For the Pickling Brine
- 1 cup apple cider vinegar
- 1 cup water
- 2 tablespoons granulated sugar
- 1 teaspoon salt
- ½ teaspoon black peppercorns
Instructions
- Thinly slice the red onions and pack them into a clean glass jar.
- Add the sliced garlic, mustard seeds, red pepper flakes, and fresh dill.
- In a small saucepan, combine the vinegar, water, sugar, salt, and black peppercorns. Bring to a gentle simmer and stir until the sugar and salt dissolve.
- Carefully pour the hot brine over the onions until completely covered.
- Let the jar cool to room temperature, then seal and refrigerate.
- Allow the onions to pickle for at least 1 hour for a quick pickle, though the flavor becomes even better after several hours.
- Keep refrigerated and use on tacos, burgers, sandwiches, salads, rice bowls, grilled meats, and BBQ dishes.
-
Print
Pickled Red Onions
Ingredients
Here’s a closer look at what goes into this recipe and why each ingredient matters.
For the Onions
Red onions — The star of the dish. Red onions are ideal for pickling because of their vibrant color, which turns an even more brilliant pink once pickled, and their slightly sweeter, milder flavor compared to yellow or white onions.
Garlic — Thinly sliced garlic infuses the brine with a warm, savory depth and becomes deliciously tangy and mellow itself after pickling.
Mustard seeds — These add a subtle tangy, slightly peppery pop of flavor and are a classic addition to pickling brines.
Red pepper flakes — A touch of heat that balances the sweetness of the brine. This can easily be adjusted up or down based on your spice preference.
Fresh dill (optional) — Adds an herbaceous, slightly citrusy note that pairs beautifully with the tanginess of the vinegar. This is a great addition if you’re planning to use the onions on sandwiches or alongside seafood.
For the Pickling Brine
Apple cider vinegar — The backbone of the brine, providing tang and acidity while also contributing a subtle, slightly fruity flavor that pairs beautifully with red onion.
Water — Balances out the acidity of the vinegar so the brine isn’t overly harsh.
Granulated sugar — Adds a touch of sweetness that balances the tartness of the vinegar, creating that signature sweet-and-tangy pickle flavor.
Salt — Essential for flavor balance and also plays a role in the pickling process itself.
Black peppercorns — Infuses the brine with a warm, subtly spicy background note as it simmers.
Instructions
1. Slice and Pack the Onions Thinly slice the red onions — a mandoline works wonderfully here for consistent, thin slices, though a sharp knife works just fine too. Pack the sliced onions into a clean glass jar, pressing down gently so you can fit as much as possible without overly crushing them.
2. Add the Aromatics Add the sliced garlic, mustard seeds, red pepper flakes, and fresh dill, if using, directly into the jar with the onions. These aromatics will infuse the brine as it’s poured over the top and continue to flavor the onions as they pickle.
3. Make the Brine In a small saucepan, combine the apple cider vinegar, water, sugar, salt, and black peppercorns. Bring the mixture to a gentle simmer over medium heat, stirring occasionally, until the sugar and salt are completely dissolved.
4. Pour the Hot Brine Over the Onions Carefully pour the hot brine over the packed onions in the jar, making sure the onions are completely submerged. If needed, use the back of a spoon to press the onions down so they’re fully covered by the liquid.
5. Cool, Seal, and Refrigerate Let the jar cool to room temperature on the counter, uncovered, to avoid trapping excess steam and condensation inside. Once cooled, seal the jar with a tight-fitting lid and transfer it to the refrigerator.
6. Let Them Pickle Allow the onions to pickle for at least 1 hour for a quick, mild pickle. For a deeper, more developed tangy flavor, let them sit for several hours or overnight before using.
7. Store and Enjoy Keep the jar refrigerated at all times. Use the pickled onions on tacos, burgers, sandwiches, salads, rice bowls, grilled meats, and any other dish that could use a punch of bright, tangy flavor.