Cowboy Candy Pickled Eggs: The Sweet, Spicy, Tangy Snack You Didn’t Know You Needed
If you’ve never tried Cowboy Candy Pickled Eggs, get ready for a serious flavor wake-up call. These aren’t your grandma’s plain pickled eggs sitting in a jar of vinegar at the back of the fridge. Cowboy Candy Pickled Eggs are bold, punchy, sweet, tangy, and spicy all at once — a Southern-inspired snack that takes the classic pickled egg and turns it into something downright addictive.
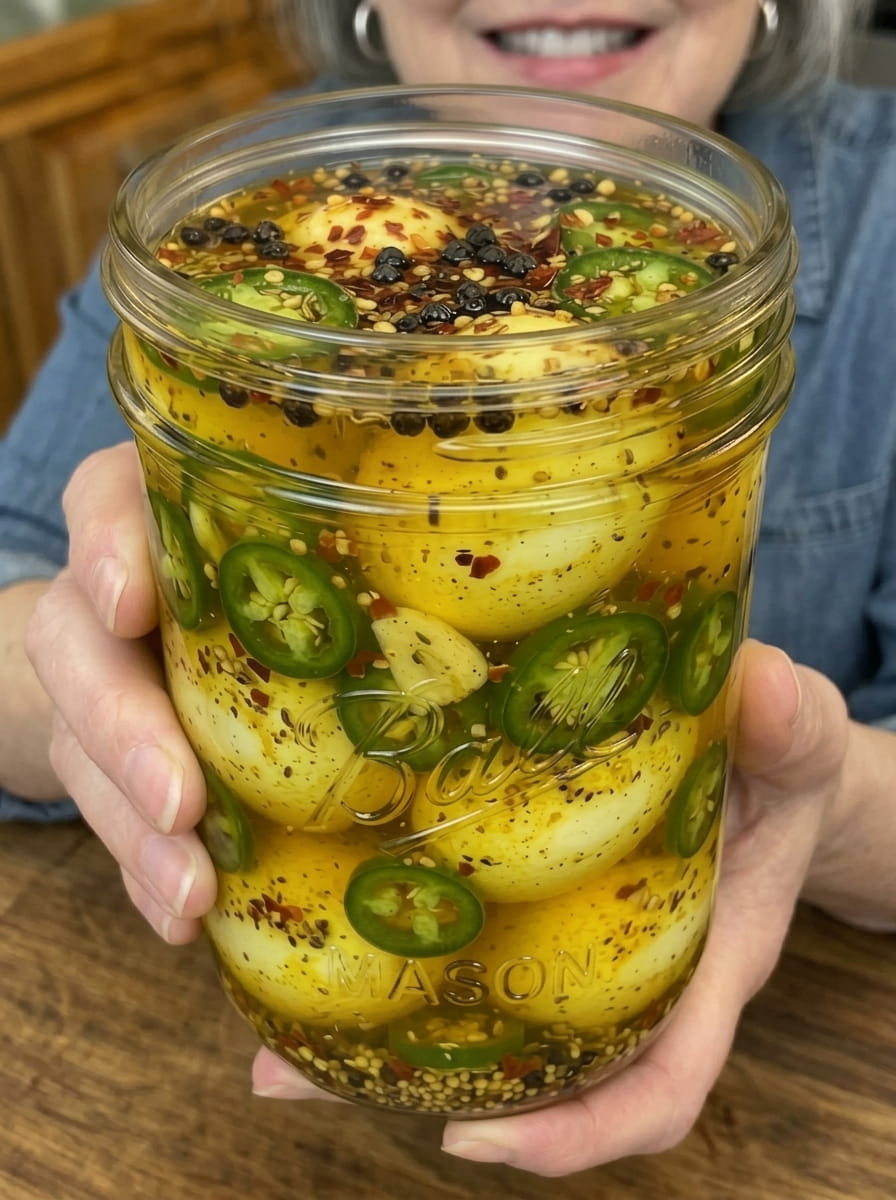
Inspired by the beloved “cowboy candy” trend (candied pickled jalapeños), this recipe combines protein-packed hard-boiled eggs with a sweet-heat brine loaded with apple cider vinegar, sugar, turmeric, garlic, and fresh jalapeños. The result is a jar of glowing, golden-hued eggs that pack a flavor punch far beyond what their humble ingredients suggest.
Whether you’re building a snack board, prepping sides for your next backyard barbecue, looking for game-day bites that aren’t the usual chips and dip, or just want a protein-rich snack to keep in your fridge for whenever hunger strikes, Cowboy Candy Pickled Eggs check every box. In this article, we’ll walk through everything you need to know: the full recipe, why this flavor combination works so well, tips for getting the best texture and taste, storage guidance, serving ideas, and answers to the most common questions people have about making pickled eggs at home.
What Are Cowboy Candy Pickled Eggs?
“Cowboy candy” traditionally refers to candied jalapeños — thin slices of jalapeño peppers simmered in a sweet, spicy syrupy brine until they turn glossy and slightly chewy, with a flavor that’s equal parts sugar and fire. It’s a beloved condiment across the South and Southwest, often spooned onto burgers, nachos, cream cheese and crackers, or eaten straight from the jar.
Cowboy Candy Pickled Eggs borrow that same sweet-heat flavor profile and apply it to hard-boiled eggs. Instead of (or in addition to) pickling jalapeños alone, whole peeled eggs are submerged in a brine built from apple cider vinegar, sugar, pickling salt, turmeric, and a blend of warm, earthy spices like mustard seed, celery seed, and crushed red pepper flakes. Fresh jalapeño slices and crushed garlic cloves are layered right into the jar with the eggs, so every bite of egg picks up little pockets of heat and pungency alongside the sweet tang of the brine.
The turmeric does double duty here — it lends a warm, earthy note while also giving the eggs that gorgeous golden-yellow color that makes them so eye-catching on a snack board or charcuterie spread.
Why You’ll Love This Recipe
There’s a reason pickled eggs have such a devoted following, and Cowboy Candy Pickled Eggs take everything people already love about the format and dial it up.
They’re bursting with flavor. Between the tang of apple cider vinegar, the sweetness of sugar, the earthiness of turmeric, and the heat from jalapeños and red pepper flakes, every bite delivers a complex, layered flavor experience that’s genuinely hard to stop eating.
They’re make-ahead friendly. This is a recipe you prepare in advance, which makes it perfect for meal prep, entertaining, or just having something delicious and ready to go in your fridge at all times. In fact, the flavor gets better the longer the eggs sit in the brine, so planning ahead actually pays off.
They’re protein-packed. Each egg delivers roughly six grams of protein along with vitamins and minerals, making this a snack that actually keeps you full — unlike most spicy snacks that leave you reaching for more within the hour.
They’re endlessly versatile. Serve them whole as a snack, slice them in half for a snack board, chop them into potato or egg salad for a spicy twist, or serve them alongside barbecue as a tangy counterpoint to smoky, rich meats.
They’re budget-friendly. Eggs, vinegar, sugar, and spices are inexpensive pantry staples, which means this show-stopping snack costs just a few dollars to make a full jar.
Cowboy Candy Pickled Eggs Recipe
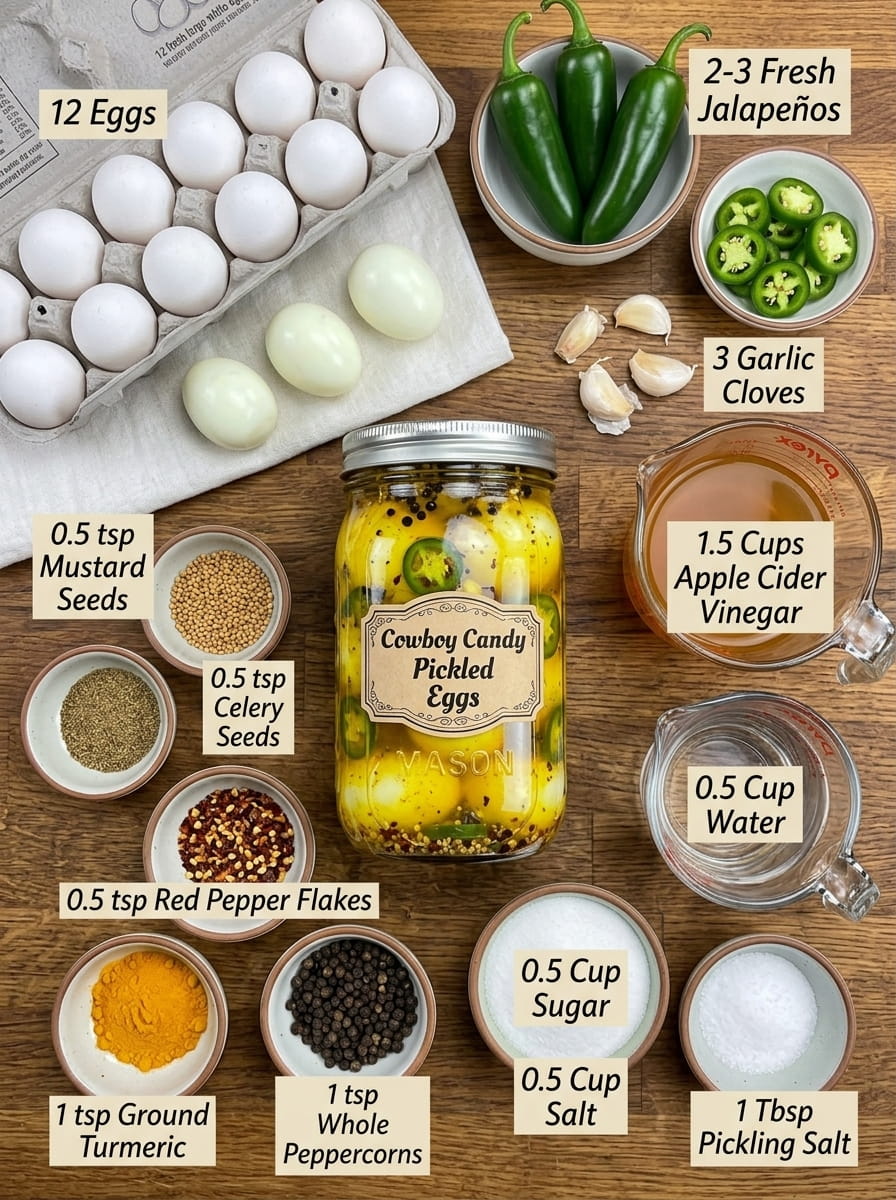
Below is the full recipe, broken down step by step so you can recreate these sweet, tangy, spicy pickled eggs at home.
Ingredients
For the Eggs
- 12 large eggs
- 2–3 fresh jalapeños, thinly sliced
- 3 garlic cloves, lightly crushed
For the Sweet-Heat Brine
- 1½ cups apple cider vinegar
- ½ cup water
- ½ cup granulated sugar
- 1 tablespoon pickling salt
- 1 teaspoon ground turmeric
- 1 teaspoon whole black peppercorns
- ½ teaspoon crushed red pepper flakes
- ½ teaspoon mustard seeds
- ½ teaspoon celery seeds
Instructions
1. Cook the eggs. Place the eggs in a saucepan in a single layer and cover with cold water by about an inch. Bring the water to a full boil over medium-high heat. Once boiling, cover the pan, remove it from the heat, and let the eggs stand, covered, for 10–12 minutes. This gentle residual-heat method produces perfectly cooked hard-boiled eggs with tender whites and fully set (but not chalky or greenish) yolks.
2. Cool and peel. Use a slotted spoon to transfer the eggs immediately to a bowl of ice water. Let them cool completely — this stops the cooking process and makes peeling much easier. Once cooled, peel the eggs carefully, starting at the wider end where there’s typically an air pocket, and rinse each egg under cool water to remove any stray bits of shell.
3. Prepare the brine. In a medium saucepan, combine the apple cider vinegar, water, granulated sugar, pickling salt, ground turmeric, black peppercorns, crushed red pepper flakes, mustard seeds, and celery seeds.
4. Heat the brine. Set the saucepan over medium heat and bring the mixture to a gentle simmer, stirring occasionally until the sugar and salt fully dissolve. Once dissolved, remove the pan from the heat and let the brine cool slightly — you want it warm, not scalding, when it meets the eggs.
5. Pack the jar. Choose a clean glass jar large enough to hold all 12 eggs (a wide-mouth quart or half-gallon jar works well, or split the batch between two jars). Layer the peeled eggs into the jar along with the sliced jalapeños and crushed garlic cloves, distributing them evenly so every egg ends up near some heat and aromatics.
6. Add the brine. Carefully pour the warm brine over the eggs, making sure they’re completely submerged. If needed, press the eggs down gently or add a bit more liquid (equal parts vinegar and water) to fully cover them. Let the jar cool to room temperature on the counter before sealing.
7. Refrigerate. Seal the jar tightly and place it in the refrigerator. Let the eggs pickle for at least 24 hours before tasting — but for the best, most developed flavor, resist the urge to dig in early and let them sit for a full 5 to 7 days.
8. Serve. Once pickled to your liking, enjoy the eggs chilled straight from the jar as a snack, alongside barbecue, as a game-day appetizer, or arranged on a colorful snack board.
Tips for the Best Cowboy Candy Pickled Eggs
Use eggs that aren’t too fresh. Slightly older eggs (about a week or so past their pack date) peel far more easily than very fresh eggs, since the air pocket between the shell and the membrane expands as the egg ages, making the shell release more cleanly.
Don’t skip the ice bath. Shocking the eggs in ice water isn’t just about speeding up cooling — it also helps separate the shell membrane from the egg white, which makes peeling significantly less frustrating.
Adjust the heat to your taste. Two to three sliced jalapeños gives these eggs a noticeable but manageable kick. If you love serious heat, leave some of the seeds and membranes in the jalapeño slices, or add a sliced serrano pepper for an extra punch. Prefer things milder? Remove all the seeds and ribs, or reduce the jalapeño quantity.
Let the color develop. Don’t worry if the eggs look pale yellow on day one — turmeric and the vinegar brine need time to fully penetrate the egg white. By day 3 or 4, you’ll notice the eggs have taken on a much deeper golden-orange hue, which is a great visual cue that the flavor has developed too.
Make sure the eggs stay fully submerged. Any part of the egg poking above the brine line won’t pickle evenly and could spoil faster. If you’re short on liquid, top off the jar with a bit more apple cider vinegar mixed with water in equal parts.
Use a non-reactive container. Glass jars are ideal for pickling. Avoid using metal containers, which can react with the acidic vinegar brine and affect both flavor and safety.
Reuse the brine thoughtfully. Once you’ve eaten all the eggs, the leftover brine (with its garlic and jalapeño flavor) can be used to pickle a fresh batch of hard-boiled eggs, sliced onions, or even vegetables like cauliflower or green beans — though for food safety, it’s best to bring the brine back to a boil before reusing it and to treat it as a shorter second-round pickle rather than a long-term brine.
How Long Do Pickled Eggs Take to Develop Flavor?
Patience really is the secret ingredient in this recipe. While the eggs are technically safe to eat after the minimum 24-hour refrigeration period, the flavor at that point will still taste fairly mild and eggy, with the brine mostly coating the outside.
By day 3, the vinegar and spices will have started penetrating deeper into the egg white, giving you a noticeably tangier, spicier bite. By day 5 to 7, the eggs will be fully infused with that signature sweet-heat flavor from edge to center — this is the sweet spot most recipe testers and pickling enthusiasts recommend for the best possible flavor. Some fans of pickled eggs even prefer waiting a full two weeks for maximum flavor saturation, though the eggs’ texture will continue to firm up slightly the longer they sit, so there’s a bit of a trade-off between deep flavor and tender texture.
Storage and Food Safety
Cowboy Candy Pickled Eggs are what’s known as “refrigerator pickles,” meaning they rely on cold storage — not shelf-stable canning methods — to stay safe and fresh. This is an important distinction, because true shelf-stable pickled eggs require a much higher vinegar-to-water ratio and proper canning/processing techniques to prevent the growth of harmful bacteria, including botulism.
Because this recipe uses a milder, more balanced brine designed for flavor rather than long-term shelf stability, it’s essential to:
- Keep the jar refrigerated at all times, both before and after opening.
- Make sure the eggs remain fully submerged in the brine throughout storage.
- Use clean utensils when removing eggs from the jar to avoid introducing bacteria.
- Consume the eggs within about 3 to 4 weeks for the best quality and safety, discarding any that develop an off smell, unusual sliminess, or visible mold.
- Never leave the jar at room temperature for extended periods, especially after the initial cooling step.
If you’re looking to make a larger batch for gifting or extended storage, that would require a true canning approach with a validated, tested recipe and proper processing — this quick-pickle method is intended for fridge storage and relatively short-term enjoyment (which, let’s be honest, won’t be hard, because these eggs tend to disappear fast).
Serving Ideas for Cowboy Candy Pickled Eggs
One of the best things about this recipe is just how versatile it is. Here are some of the tastiest ways to put your jar of pickled eggs to use:
- Snack boards and charcuterie spreads: Halve the eggs and arrange them alongside cured meats, sharp cheeses, crackers, and pickled vegetables for a colorful, flavor-packed board.
- BBQ sides: The tangy, spicy brine cuts through rich, smoky barbecue meats beautifully, making these eggs a natural pairing for pulled pork, brisket, or ribs.
- Game-day appetizers: Set out a bowl of pickled eggs alongside other finger foods for an easy, no-fuss snack that stands out from the usual chip-and-dip lineup.
- Deviled eggs with a twist: Use the pickled eggs in place of regular hard-boiled eggs for a deviled egg recipe with a built-in sweet-and-spicy kick.
- Chopped into salads: Dice the pickled eggs and fold them into potato salad, egg salad, or a hearty grain salad for a punch of tangy flavor throughout.
- Burger and sandwich topper: Slice the eggs and layer them onto burgers or sandwiches for an unexpected, flavor-forward addition.
- Straight from the jar: Sometimes the simplest way is the best way — grab one straight from the fridge as a quick, protein-packed snack whenever cravings hit.
Frequently Asked Questions
Can I make these eggs less spicy? Yes. Simply remove the seeds and membranes from the jalapeños before slicing, use fewer jalapeño slices, or swap in a milder pepper. You can also reduce the crushed red pepper flakes in the brine.
Why did my eggs turn out rubbery? Overcooking is the most common culprit. Stick closely to the 10–12 minute standing time in the covered pot, and be sure to transfer the eggs to an ice bath immediately after cooking to stop the residual heat from continuing to firm up the whites.
Can I use a different type of vinegar? Apple cider vinegar gives this recipe its signature tangy, slightly fruity flavor, but white distilled vinegar can be substituted if that’s what you have on hand. Keep in mind the flavor will be sharper and less complex.
Do I need to boil the jar before use? Since these are refrigerator pickles rather than shelf-stable canned pickles, you don’t need to sterilize the jar through boiling water processing. However, it’s still a good idea to wash the jar thoroughly with hot, soapy water (or run it through the dishwasher) before filling it.
How spicy are these eggs, really? With 2–3 sliced jalapeños and a modest amount of red pepper flakes, the heat level lands in the medium range — noticeable and warming, but not overwhelming for most palates. Heat lovers can easily amp things up, while those sensitive to spice can scale it back.
Can I double the recipe? Absolutely. Just scale up both the egg quantity and the brine ingredients proportionally, and use a larger jar (or multiple jars) to ensure everything stays fully submerged.
Final Thoughts
Cowboy Candy Pickled Eggs are proof that a handful of pantry staples — eggs, vinegar, sugar, and a few well-chosen spices — can transform into something truly craveable. The combination of sweet, tangy, and spicy flavors makes these eggs stand out from typical pickled egg recipes, while the vibrant turmeric-tinted color makes them a showstopper on any snack board or party spread.
Best of all, this is a low-effort, high-reward recipe. A little active prep time upfront, a patient wait in the fridge, and you’re rewarded with a jar of bold, snackable eggs that only get better with time. Whether you’re planning a backyard cookout, looking for a fun game-day appetizer, or simply want a protein-packed snack with a spicy kick waiting in your fridge, Cowboy Candy Pickled Eggs are well worth adding to your recipe rotation.
Give this recipe a try, adjust the heat to your liking, and don’t be surprised if this jar disappears faster than you expected.
Print
Cowboy Candy Pickled Eggs
Ingredients
Below is the full recipe, broken down step by step so you can recreate these sweet, tangy, spicy pickled eggs at home.
Ingredients
For the Eggs
- 12 large eggs
- 2–3 fresh jalapeños, thinly sliced
- 3 garlic cloves, lightly crushed
For the Sweet-Heat Brine
- 1½ cups apple cider vinegar
- ½ cup water
- ½ cup granulated sugar
- 1 tablespoon pickling salt
- 1 teaspoon ground turmeric
- 1 teaspoon whole black peppercorns
- ½ teaspoon crushed red pepper flakes
- ½ teaspoon mustard seeds
- ½ teaspoon celery seeds
Instructions
1. Cook the eggs. Place the eggs in a saucepan in a single layer and cover with cold water by about an inch. Bring the water to a full boil over medium-high heat. Once boiling, cover the pan, remove it from the heat, and let the eggs stand, covered, for 10–12 minutes. This gentle residual-heat method produces perfectly cooked hard-boiled eggs with tender whites and fully set (but not chalky or greenish) yolks.
2. Cool and peel. Use a slotted spoon to transfer the eggs immediately to a bowl of ice water. Let them cool completely — this stops the cooking process and makes peeling much easier. Once cooled, peel the eggs carefully, starting at the wider end where there’s typically an air pocket, and rinse each egg under cool water to remove any stray bits of shell.
3. Prepare the brine. In a medium saucepan, combine the apple cider vinegar, water, granulated sugar, pickling salt, ground turmeric, black peppercorns, crushed red pepper flakes, mustard seeds, and celery seeds.
4. Heat the brine. Set the saucepan over medium heat and bring the mixture to a gentle simmer, stirring occasionally until the sugar and salt fully dissolve. Once dissolved, remove the pan from the heat and let the brine cool slightly — you want it warm, not scalding, when it meets the eggs.
5. Pack the jar. Choose a clean glass jar large enough to hold all 12 eggs (a wide-mouth quart or half-gallon jar works well, or split the batch between two jars). Layer the peeled eggs into the jar along with the sliced jalapeños and crushed garlic cloves, distributing them evenly so every egg ends up near some heat and aromatics.
6. Add the brine. Carefully pour the warm brine over the eggs, making sure they’re completely submerged. If needed, press the eggs down gently or add a bit more liquid (equal parts vinegar and water) to fully cover them. Let the jar cool to room temperature on the counter before sealing.
7. Refrigerate. Seal the jar tightly and place it in the refrigerator. Let the eggs pickle for at least 24 hours before tasting — but for the best, most developed flavor, resist the urge to dig in early and let them sit for a full 5 to 7 days.
8. Serve. Once pickled to your liking, enjoy the eggs chilled straight from the jar as a snack, alongside barbecue, as a game-day appetizer, or arranged on a colorful snack board.