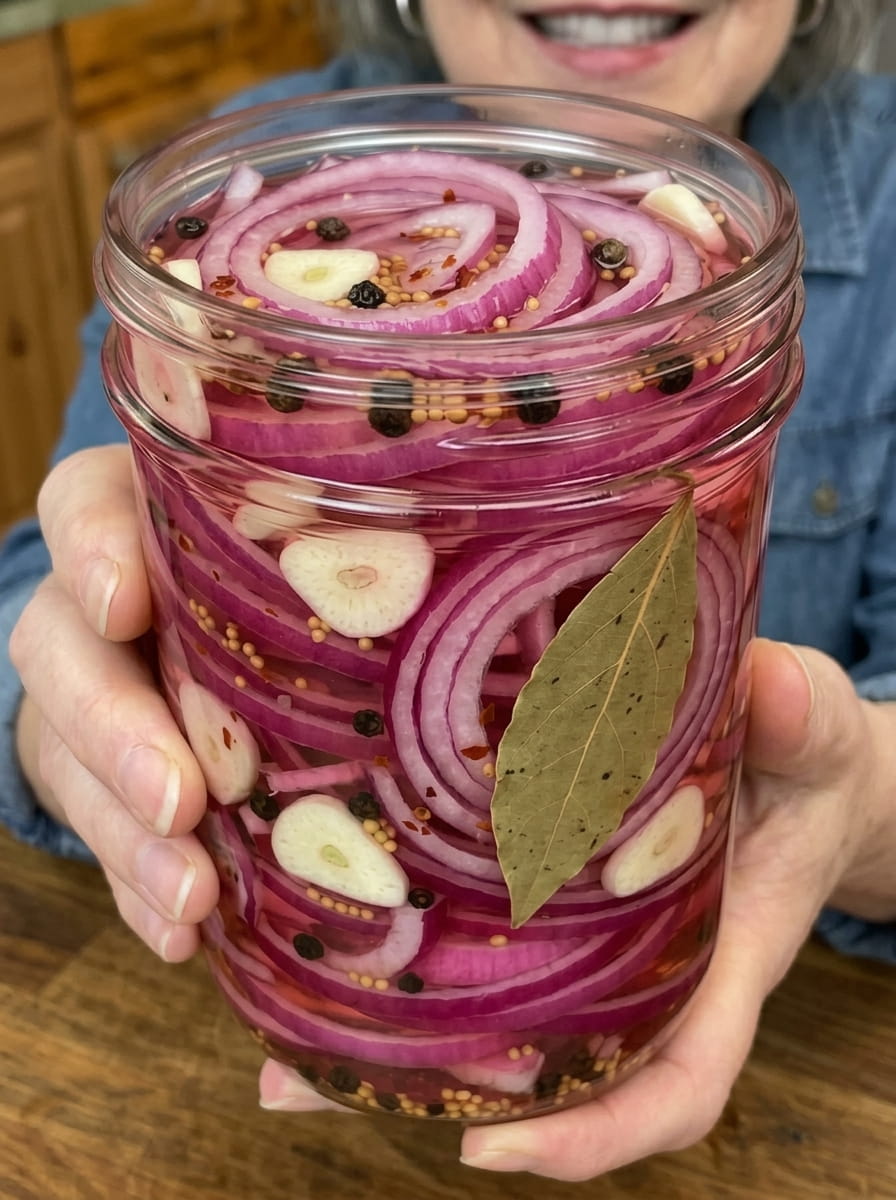
Quick Pickled Red Onions: The Easiest, Most Versatile Condiment You’ll Ever Make
Meta Description: Learn how to make Quick Pickled Red Onions with this easy recipe. Crisp, tangy, slightly sweet onions ready in minutes — the perfect topping for tacos, burgers, and more.
If there’s one homemade condiment every home cook should have in their fridge at all times, it’s Quick Pickled Red Onions. This recipe transforms sharp, raw red onion into something completely different: crisp, tangy, slightly sweet onions with a beautiful vibrant pink color and just a hint of spice. Best of all, it comes together in minutes with pantry staples, requiring no special equipment or canning experience.
Quick pickled onions have become a staple in modern home cooking for good reason. They add a bright, acidic crunch to just about any dish, cutting through richness and balancing flavors in a way that few other condiments can. Once you start keeping a jar in your fridge, you’ll find yourself reaching for it constantly — on tacos, burgers, sandwiches, salads, grain bowls, and so much more.
Below, you’ll find the complete recipe along with ingredient breakdowns, step-by-step instructions, storage tips, flavor variations, and plenty of ideas for how to use these onions throughout the week.
Why Quick Pickled Onions Are a Kitchen Essential
Unlike traditional canning, which requires sterilized jars, processing times, and specialized equipment, “quick pickling” refers to a fast, refrigerator-based method that delivers big flavor in a short amount of time. The onions aren’t shelf-stable and must be kept refrigerated, but the payoff is huge: within just an hour, you have a bright, tangy condiment ready to use, and the flavor only gets better as the onions continue to marinate over the following days.
Red onions are the classic choice for this method because their color turns a stunning, vibrant pink once pickled, and their naturally sharp bite mellows beautifully in the vinegar brine. The result is a condiment that’s as visually striking as it is delicious — perfect for brightening up everything from weeknight tacos to elegant charcuterie boards.
Why You’ll Love This Recipe
- Incredibly quick and easy. With just a few minutes of prep and a short simmer, this recipe comes together fast.
- No canning equipment required. This is a simple refrigerator pickle — no water bath canning, sterilizing, or special tools needed.
- Perfectly balanced flavor. Tangy vinegar, a touch of sweetness, and warm spices create a well-rounded, crave-worthy flavor.
- Beautiful vibrant color. Red onions turn a gorgeous pink once pickled, adding visual appeal to any dish.
- Incredibly versatile. Use them on tacos, burgers, sandwiches, salads, grain bowls, and so much more.
- Great way to use up onions. A perfect way to use extra red onions before they go bad, extending their usefulness in a totally new form.
Ingredients You’ll Need
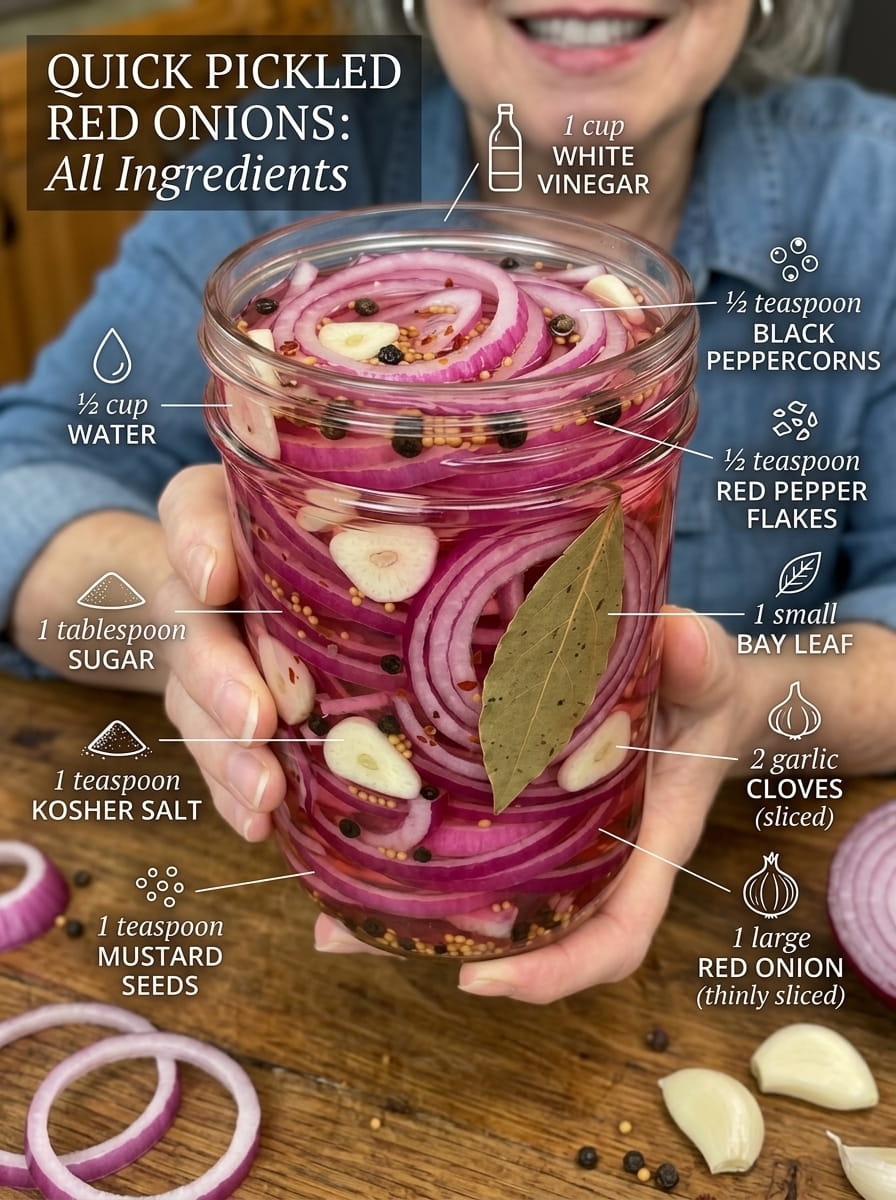
This recipe uses a short list of pantry staples to create a bold, tangy brine. Here’s what you’ll need:
- 1 large red onion, thinly sliced
- 1 cup white vinegar
- ½ cup water
- 1 tablespoon sugar
- 1 teaspoon kosher salt
- 2 garlic cloves, thinly sliced
- 1 teaspoon mustard seeds
- ½ teaspoon black peppercorns
- ½ teaspoon red pepper flakes
- 1 small bay leaf
Understanding Each Ingredient’s Role
- Red onion is the star of the recipe, prized for both its sharp flavor, which mellows beautifully during pickling, and its vibrant color once soaked in the acidic brine.
- White vinegar provides the tangy, acidic base of the brine and acts as a natural preservative.
- Water balances the vinegar’s sharpness, keeping the brine from being overly acidic while still maintaining enough acidity for proper pickling.
- Sugar softens the vinegar’s intensity with a touch of sweetness, helping to balance the onion’s natural sharpness.
- Kosher salt enhances flavor throughout the brine and supports the pickling process.
- Garlic cloves infuse the onions with a subtle, aromatic depth.
- Mustard seeds add a gentle tang and pleasant texture, classic in pickling blends.
- Black peppercorns contribute warm, subtle spice that rounds out the brine.
- Red pepper flakes add a mild, background heat that builds gradually with each bite.
- Bay leaf adds subtle herbal depth to the overall flavor of the brine.
Step-by-Step Instructions
This recipe comes together in just a few simple steps, with minimal hands-on time required.
Step 1: Prep the Jar
Place the thinly sliced red onion and garlic into a clean glass jar. Slicing the onion thinly and evenly helps ensure it pickles quickly and evenly throughout.
Step 2: Add the Spices
Add the mustard seeds, black peppercorns, red pepper flakes, and bay leaf directly into the jar with the onion and garlic.
Step 3: Make the Brine
In a small saucepan, combine the white vinegar, water, sugar, and salt. Bring the mixture to a gentle simmer, stirring until the sugar and salt fully dissolve.
Step 4: Pour the Brine
Carefully pour the warm brine over the onions in the jar, making sure they are completely covered. Full submersion is important for even pickling and helps ensure the onions soften and take on flavor uniformly.
Step 5: Cool
Let the jar cool to room temperature on the counter. This helps prevent thermal shock and allows for safe, gradual cooling before refrigeration.
Step 6: Seal and Refrigerate
Seal the jar tightly and refrigerate for at least 1 hour. At this point, the onions will already have a noticeably tangy, pickled flavor and can technically be enjoyed.
Step 7: Let the Flavor Develop
For the best flavor, let the onions pickle for a full 24 hours before serving. This extended resting period allows the onions to fully absorb the brine’s tangy, slightly sweet, spiced flavor, resulting in a more well-rounded, flavorful condiment.
How Long Do Quick Pickled Red Onions Last?
Keep the jar refrigerated at all times, and use the onions within about 2 weeks for the best quality. Because this is a quick refrigerator pickle rather than a shelf-stable canned product, it has not gone through a hot water bath canning process and must always be stored in the fridge.
As the onions sit, they’ll continue to soften slightly and the flavor will continue to mellow and develop, though they’re at their crispest and brightest in the first week or so after making them.
Tips for the Best Quick Pickled Red Onions
- Slice the onions thinly and evenly. A mandoline slicer can help achieve consistently thin slices, which pickle more quickly and evenly than thicker cuts.
- Use warm, not boiling, brine. Pouring warm (rather than aggressively boiling) brine over the onions helps them stay slightly crisp rather than becoming overly soft.
- Don’t skip the resting time. While the onions are technically ready after an hour, the flavor is significantly better after the full 24-hour rest.
- Adjust the sweetness to taste. If you prefer a more pronounced sweet-tangy balance, feel free to increase the sugar slightly.
- Use a properly sized jar. Make sure your jar is large enough to hold the onions with enough brine to fully submerge them, but not so large that there’s excessive empty headspace.
- Give the jar a gentle shake or stir. After the initial cooling period, a gentle shake helps redistribute the spices and ensures even flavor throughout.
Flavor Variations to Try
Once you’ve made the classic version, try these variations to switch things up:
- Citrus Pickled Onions: Add a few strips of orange or lime zest to the brine for a bright, citrusy twist.
- Extra Spicy Version: Add a sliced fresh jalapeño or increase the red pepper flakes for a bigger heat kick.
- Herb-Infused Onions: Add a few sprigs of fresh thyme or oregano to the jar for an earthy, aromatic variation.
- Beet Pickled Onions: Add a few slices of raw beet to the jar for an even deeper pink color and a subtle earthy sweetness.
- Apple Cider Vinegar Version: Swap the white vinegar for apple cider vinegar for a slightly fruitier, less sharp flavor.
- Sweet Pickled Onions: Increase the sugar for a more pronounced sweet-and-sour flavor, similar to a bread-and-butter pickle style.
Delicious Ways to Use Quick Pickled Red Onions
These bright, tangy onions are one of the most versatile condiments you can keep in your fridge. Here are some of the best ways to use them:
- Tacos – A classic pairing, adding tangy crunch to carnitas, barbacoa, or fish tacos.
- Burgers – Top a burger with pickled onions for a bright, acidic contrast to rich, juicy beef.
- Sandwiches – Layer into sandwiches or paninis for an extra pop of flavor and texture.
- Salads – Toss into green salads, grain bowls, or pasta salads for a burst of tangy flavor.
- Grilled Meats – Serve alongside grilled chicken, steak, or sausages as a bright, acidic accompaniment.
- Grain and Rice Bowls – Add to rice, quinoa, or farro bowls for a pop of color and tang.
- Charcuterie Boards – Add a small bowl to any charcuterie or grazing board for color, crunch, and acidity.
- Avocado Toast – Top avocado toast with a few pickled onion slices for extra flavor and visual appeal.
- Nachos – Scatter over loaded nachos for a bright, tangy contrast to melted cheese and rich toppings.
- Eggs and Breakfast Dishes – Add to omelets, breakfast tacos, or avocado toast for a tangy morning upgrade.
Are Pickled Onions Healthy?
Quick pickled red onions are a light, low-calorie way to add big flavor to your meals. Red onions themselves contain beneficial plant compounds, and the pickling process doesn’t diminish that. The brine does contain some added sugar and salt, but because pickled onions are typically used as a topping or garnish rather than eaten in large quantities, they’re a flavorful way to brighten a dish without adding much in the way of calories or fat.
If you’re looking to reduce the sugar content, you can decrease the amount slightly, though keep in mind that sugar plays a role in balancing the vinegar’s sharpness. A small reduction generally won’t affect the pickling process itself, just the overall flavor balance.
Quick Pickled Onions vs. Traditional Canned Pickled Onions
It’s worth understanding the difference between quick pickled onions and traditional shelf-stable canned pickled onions, since the terms are sometimes used interchangeably but refer to two different processes.
Quick pickled onions, like this recipe, are made by pouring a hot vinegar brine over raw or lightly prepared onions and refrigerating them. They’re ready to eat in as little as an hour, develop fuller flavor over a day or two, and must always be kept refrigerated. They typically last a couple of weeks in the fridge.
Traditional canned pickled onions, on the other hand, go through a full water bath canning process with sterilized jars and specific processing times, resulting in a shelf-stable product that can be stored in the pantry for months or even years unopened. This method requires more equipment, more time, and strict adherence to tested canning guidelines to ensure food safety.
For most home cooks looking for a quick, flavorful condiment to use within a couple of weeks, the quick pickling method used in this recipe is by far the easier and more practical option.
Frequently Asked Questions
Can I use yellow or white onions instead of red onions? Yes, though red onions are traditional for this recipe due to their milder flavor once pickled and their striking color transformation. Yellow or white onions will work but tend to have a sharper flavor and won’t develop the same vibrant pink hue.
Why did my onions turn bright pink? This is a natural reaction between the red onion’s pigments and the acidic vinegar brine, and it’s completely normal and expected. It’s one of the signature visual traits of pickled red onions.
Can I eat the onions after just an hour, or do I really need to wait 24 hours? The onions are technically safe and flavorful after just an hour of chilling, but the flavor becomes noticeably more balanced and developed after a full 24 hours, so it’s worth the wait if you have the time.
Can I reuse the brine for a second batch of onions? It’s best to make a fresh batch of brine each time to ensure proper acidity and the best flavor. Reusing brine can dilute its preservative properties and result in a less flavorful final product.
Why are my pickled onions soft instead of crisp? This can happen if the brine is poured on while still at a rolling boil, which can cook the onions slightly. Let the brine come down to a gentle simmer before pouring for a crisper result.
Can I double or triple this recipe? Yes, this recipe scales up easily. Simply increase the onions and brine ingredients proportionally, and divide the mixture among multiple jars as needed.
Final Thoughts
Quick Pickled Red Onions are proof that some of the best homemade condiments are also the simplest. With just a handful of pantry staples and about an hour of chill time, you can transform sharp raw onion into a bright, tangy, beautifully colored topping that instantly elevates tacos, burgers, salads, and so much more.
Once you make a batch, you’ll likely find yourself keeping a jar in the fridge at all times — it’s that easy, that versatile, and that delicious. Give this recipe a try, and get ready for pickled onions to become a permanent fixture in your kitchen.
Print
Quick Pickled Red Onions
Ingredients
This recipe uses a short list of pantry staples to create a bold, tangy brine. Here’s what you’ll need:
- 1 large red onion, thinly sliced
- 1 cup white vinegar
- ½ cup water
- 1 tablespoon sugar
- 1 teaspoon kosher salt
- 2 garlic cloves, thinly sliced
- 1 teaspoon mustard seeds
- ½ teaspoon black peppercorns
- ½ teaspoon red pepper flakes
- 1 small bay leaf
Instructions
This recipe comes together in just a few simple steps, with minimal hands-on time required.
Place the thinly sliced red onion and garlic into a clean glass jar. Slicing the onion thinly and evenly helps ensure it pickles quickly and evenly throughout.
Add the mustard seeds, black peppercorns, red pepper flakes, and bay leaf directly into the jar with the onion and garlic.
In a small saucepan, combine the white vinegar, water, sugar, and salt. Bring the mixture to a gentle simmer, stirring until the sugar and salt fully dissolve.
Carefully pour the warm brine over the onions in the jar, making sure they are completely covered. Full submersion is important for even pickling and helps ensure the onions soften and take on flavor uniformly.
Let the jar cool to room temperature on the counter. This helps prevent thermal shock and allows for safe, gradual cooling before refrigeration.
Seal the jar tightly and refrigerate for at least 1 hour. At this point, the onions will already have a noticeably tangy, pickled flavor and can technically be enjoyed.
For the best flavor, let the onions pickle for a full 24 hours before serving. This extended resting period allows the onions to fully absorb the brine’s tangy, slightly sweet, spiced flavor, resulting in a more well-rounded, flavorful condiment.