
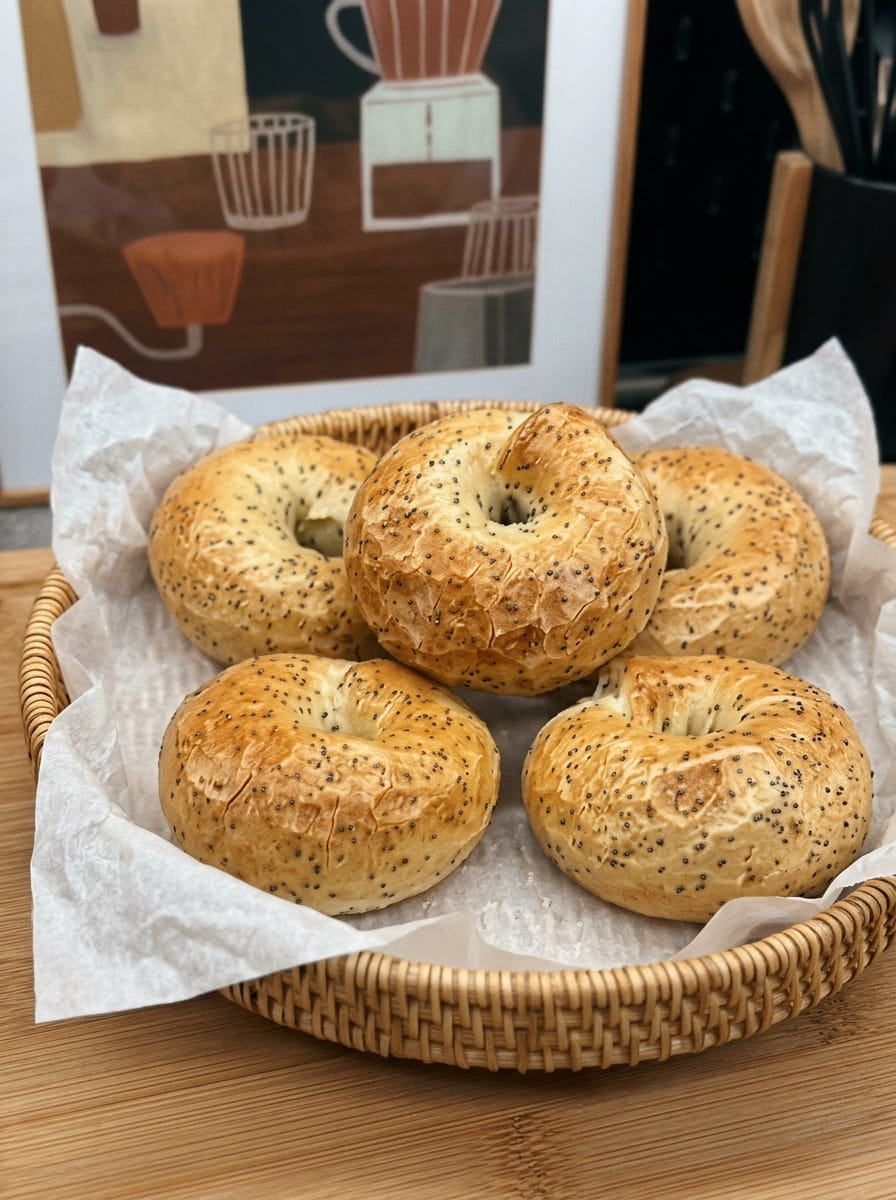
Fluffy Salty Bagels Recipe: Soft, Golden Homemade Bagels with Chia Seeds
There is something deeply satisfying about pulling a tray of fluffy salty bagels out of your own oven. The crust is golden and slightly glossy, the crumb is soft and pillowy, and every bite carries a gentle crunch of coarse salt and chia seeds. Better still, this homemade bagel recipe uses just a handful of pantry staples and no special equipment, so you can enjoy bakery-quality bagels any morning of the week.
In this guide you will find the complete recipe, the science behind why each step matters, troubleshooting tips for common bagel problems, creative variations, and advice on storing and freezing your bagels so they stay fresh. Whether you are a first-time bread baker or a seasoned home cook, this easy bagel recipe will quickly become a favorite.
Table of Contents
- Why You’ll Love This Fluffy Salty Bagels Recipe
- Ingredients and Why They Matter
- Equipment You’ll Need
- Step-by-Step Instructions
- Pro Tips for the Fluffiest Bagels
- Troubleshooting Common Bagel Problems
- Delicious Variations
- How to Serve Your Bagels
- Storing, Freezing, and Reheating
- Frequently Asked Questions
- Final Thoughts
Why You’ll Love This Fluffy Salty Bagels Recipe
Not all bagel recipes are created equal. Here is what makes this one stand out:
- Soft and fluffy inside, golden outside. The combination of high-protein bread flour and a proper boil gives you that classic contrast: a lightly chewy crust and a tender, airy interior.
- Only five core ingredients. Flour, salt, yeast, water, and chia seeds. No eggs, no milk, no butter, and no sugar are needed in the dough.
- Naturally dairy-free and egg-free dough. The dough is plant-based, which makes these bagels friendly for many dietary preferences (just choose your toppings accordingly).
- Chia seeds add texture and nutrition. Chia seeds are a source of fiber and omega-3 fatty acids, and they add a subtle nutty flavor and a pleasant bite.
- Perfect for meal prep. The recipe makes eight bagels, and they freeze beautifully, so one baking session can cover breakfast for weeks.
- Beginner friendly. Every step is straightforward, and the dough is forgiving.
Ingredients and Why They Matter
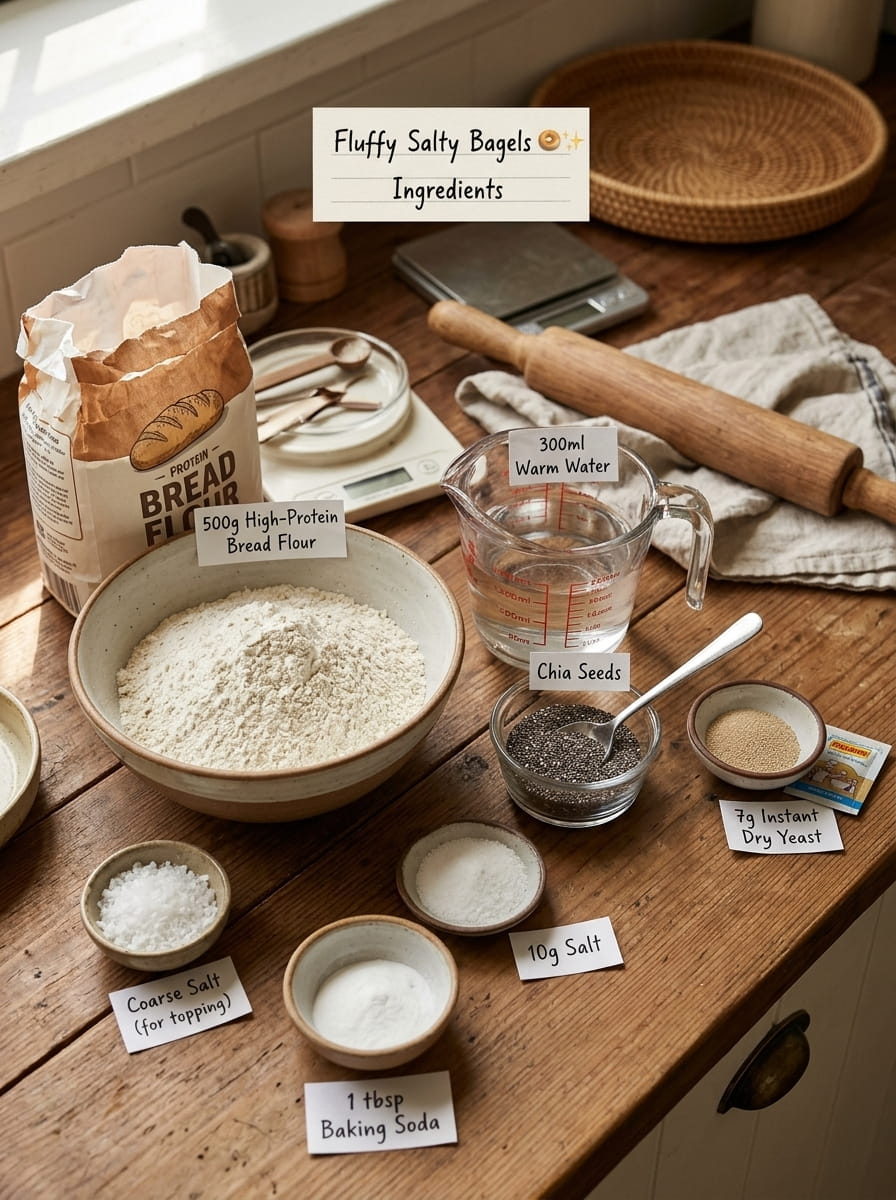
Great bagels come from simple ingredients used well. Here is the full list, followed by a closer look at what each one does.
For the Dough
- 500 g high-protein bread flour
- 10 g salt
- 7 g instant dry yeast
- 300 ml warm water
- 1 tablespoon chia seeds
For Boiling
- Water, as needed
- 1 tablespoon baking soda
For Topping
- Coarse salt, to taste
- Extra chia seeds, optional
High-Protein Bread Flour
Flour is the backbone of any bagel, and the type you choose makes a real difference. Bread flour contains more protein than all-purpose flour, typically around 12 to 14 percent. When that protein is mixed with water and kneaded, it forms gluten, the stretchy network that traps gas from the yeast and gives bagels their signature chew.
Bagel dough is also stiffer and lower in hydration than most bread dough, which means it needs strong gluten to hold its shape through shaping and boiling. If you only have all-purpose flour, you can still make bagels, but the texture will be a little less chewy and the bagels may spread more. For the best results, look for a flour labeled “bread flour” or “high-protein flour.”
Salt
Salt does two jobs. First, it seasons the dough so the bagels taste balanced rather than flat. Second, it regulates yeast activity and strengthens gluten, helping the dough rise steadily. Because these are salty bagels, the 10 g in the dough is complemented by coarse salt sprinkled on top for a flavor contrast in every bite.
Instant Dry Yeast
Instant yeast can be mixed directly into the flour without proofing first, which keeps the process simple. Seven grams is a standard packet and is enough to raise 500 g of flour in about an hour to ninety minutes in a warm spot. If you only have active dry yeast, dissolve it in the warm water for five to ten minutes before mixing.
Warm Water
The water should be comfortably warm, not hot. A temperature around 95 to 105°F (35 to 40°C) wakes up the yeast without harming it. Water that is too hot can kill the yeast, and water that is too cold will slow the rise significantly. If you can comfortably keep your finger in the water for several seconds, it is about right.
Chia Seeds
Chia seeds are the special touch in this recipe. Stirred into the dough, they absorb a little moisture and add tiny pops of texture throughout the crumb. They also bring a mild, nutty flavor and extra fiber. Sprinkled on top, they toast in the oven and look beautiful against the golden crust.
Baking Soda in the Boiling Water
This is the step that separates a true bagel from a round bread roll. Adding baking soda makes the boiling water alkaline. That alkalinity helps the surface of the dough gelatinize and promotes browning in the oven, which gives bagels their shiny, deep golden crust and a distinctive flavor. Do not skip it.
Equipment You’ll Need
You do not need anything fancy for this recipe:
- A large mixing bowl
- A wooden spoon or dough scraper
- A kitchen scale (highly recommended, since bagel dough is sensitive to flour and water ratios)
- A large, wide pot for boiling
- A slotted spoon or spider strainer
- A baking tray lined with parchment paper
- A clean kitchen towel or plastic wrap for covering the dough
- An oven preheated to 425°F (220°C)
If you own a stand mixer with a dough hook, you can use it for kneading, but kneading by hand works perfectly well, and it is a great way to learn how the dough should feel.
Step-by-Step Instructions
Step 1: Mix the Dough
Add the bread flour, salt, instant yeast, and chia seeds to a large bowl and stir to combine. Keep the salt and yeast on opposite sides of the bowl at first if you like, although with instant yeast this is not strictly necessary. Gradually pour in the warm water while mixing with a spoon or your hand until the ingredients come together into a shaggy, fairly stiff dough.
The dough will feel firmer than typical bread dough. That is exactly what you want. A stiff dough produces a dense, chewy bagel that holds its shape rather than a flat, puffy one.
Step 2: Knead
Turn the dough out onto a lightly floured surface and knead for 8 to 10 minutes. Push the dough away from you with the heel of your hand, fold it back over itself, rotate a quarter turn, and repeat. At first it may feel dry and rough, but it will gradually become smooth, elastic, and slightly tacky.
To check whether you have kneaded enough, try the windowpane test: pinch off a small piece of dough and stretch it gently between your fingers. If it stretches into a thin, translucent sheet without tearing, the gluten is well developed. If it tears quickly, knead for another couple of minutes.
Step 3: First Rise
Shape the dough into a ball and place it in a lightly oiled bowl. Cover with a damp towel or plastic wrap and let it rise in a warm place for 60 to 90 minutes, or until doubled in size. A turned-off oven with the light on, or a spot near a warm (not hot) appliance, works well.
Rising time varies with the temperature of your kitchen. In a cool room, it may take closer to two hours. Judge by the dough, not the clock: it should look puffy and airy and spring back slowly when poked.
Step 4: Shape the Bagels
Gently deflate the dough and divide it into 8 equal portions. Weighing each piece (roughly 100 g each) ensures the bagels bake evenly. Roll each portion into a smooth, tight ball.
There are two popular ways to form the hole:
- The poke method: Press your thumb through the center of the ball and gently stretch the hole wider by rotating the dough around your fingers until the hole is about one-third of the bagel’s diameter.
- The rope method: Roll the dough into a rope about 8 inches long, wrap it around your hand, and press the ends together firmly at the palm.
The poke method is quicker and easier for beginners. Whichever method you choose, make the hole larger than you think you need, because it will shrink as the bagels rise and bake.
Step 5: Rest
Arrange the shaped bagels on a parchment-lined baking tray, leaving a little space between each. Cover them loosely and let them rest for 15 to 20 minutes. This short rest relaxes the gluten and lets the bagels puff up slightly, which helps them boil and bake evenly.
Step 6: Boil
Preheat your oven to 425°F (220°C). While it heats, fill a large pot with water and bring it to a gentle boil. Add 1 tablespoon of baking soda; the water may foam briefly, which is normal.
Lower the bagels into the water a few at a time, without crowding the pot. Boil each bagel for 30 to 45 seconds per side, flipping gently with a slotted spoon. A shorter boil gives a softer, more tender crust, while a longer boil produces a chewier, thicker crust. Lift each bagel out, let the excess water drain, and return it to the tray.
Step 7: Add Toppings
While the bagels are still wet and tacky from the boil, sprinkle them generously with coarse salt and extra chia seeds if you like. The moisture on the surface acts like glue and helps the toppings stick. Do this right away, because once the surface dries, toppings tend to fall off.
Step 8: Bake
Transfer the tray to the preheated oven and bake for 18 to 22 minutes, until the bagels are a deep, beautiful golden brown. Rotate the tray halfway through if your oven heats unevenly. The bottoms should sound hollow when tapped.
Step 9: Cool and Serve
Let the bagels cool on a wire rack for at least 10 to 15 minutes before slicing. Cutting into a hot bagel can make the crumb seem gummy because the steam inside is still setting the structure. Serve warm with cream cheese, butter, avocado, or your favorite sandwich fillings.
Pro Tips for the Fluffiest Bagels
Measure by weight. Bagel dough has a narrow sweet spot for hydration. Using a scale for the flour and water gives consistent results every time. A cup of flour can vary by 20 to 30 grams depending on how you scoop it.
Do not add too much extra flour. It is tempting to keep dusting the counter when the dough feels tacky, but too much flour makes the dough dry and the bagels dense. Aim for a smooth, slightly tacky dough that does not stick to your hands.
Knead thoroughly. Proper gluten development is the secret to a chewy, fluffy bagel. Do not cut the kneading short.
Keep the boiling water at a gentle simmer. A violent rolling boil can damage the delicate surface of the bagels. A steady, gentle bubble is ideal.
Boil in batches. Crowding the pot lowers the water temperature and causes the bagels to stick together. Two or three at a time is plenty.
Bake on the middle rack. This promotes even browning on top and bottom. If the bottoms brown too quickly, slide a second baking tray underneath.
Be patient with cooling. It is hard to wait, but cooling slightly makes slicing cleaner and improves the texture.
Troubleshooting Common Bagel Problems
My bagels came out dense and heavy
This usually comes from under-kneading, under-proofing, or too much added flour. Make sure the dough passes the windowpane test, let it double in size, and avoid dusting with excess flour.
My bagels deflated in the boiling water
Over-proofing is the most common cause. If the bagels rest too long before boiling, they become overinflated and collapse when they hit the water. Stick to a 15 to 20 minute rest, and if your kitchen is very warm, shorten it.
The crust is pale and not golden
Check that you added the baking soda to the boiling water and that your oven is fully preheated. Oven thermometers are inexpensive and can reveal if your oven runs cool. You can also extend the bake time by a few minutes.
The toppings fell off
Add the salt and chia seeds immediately after boiling, while the surface is still wet. If they dry out, lightly brush the bagels with water first.
The bagels are too chewy or tough
A very long boil can create a thick, tough crust. Reduce the boiling time to 30 seconds per side next time. Also make sure you are not over-flouring the dough.
The holes closed up
Make the hole larger when shaping, about one-third of the bagel’s width, since it shrinks during proofing and baking.
Delicious Variations
Once you have mastered the base recipe, there are endless ways to make it your own.
- Everything bagels: Swap the coarse salt for an everything bagel seasoning blend of sesame seeds, poppy seeds, dried garlic, dried onion, and salt.
- Sesame or poppy seed bagels: Replace the chia topping with sesame or poppy seeds for a classic look.
- Whole wheat bagels: Replace up to 30 percent of the bread flour with whole wheat flour. You may need a splash more water since whole wheat absorbs more liquid.
- Cheese bagels: Sprinkle shredded cheddar or parmesan on top during the last five minutes of baking for a melty, savory crust.
- Herb and garlic bagels: Knead a teaspoon of dried rosemary, oregano, or garlic powder into the dough.
- Mini bagels: Divide the dough into 16 pieces and reduce the baking time to 12 to 15 minutes. They are perfect for kids and party platters.
- Seeded multigrain bagels: Mix flax seeds, sunflower seeds, or pumpkin seeds into the dough along with the chia.
- Sweet touch: Add a teaspoon of honey or malt syrup to the boiling water for a slightly deeper color and subtle sweetness, then top with seeds instead of salt.
How to Serve Your Bagels
Fluffy salty bagels are wonderfully versatile. Here are some of the best ways to enjoy them.
Classic breakfast spreads
- Cream cheese with sliced cucumber and cracked black pepper
- Butter and jam for something simple and comforting
- Hummus with sliced tomatoes and fresh herbs
Protein-packed breakfast sandwiches
- Scrambled eggs, cheese, and avocado
- Smoked salmon, cream cheese, capers, and red onion
- Turkey, lettuce, tomato, and mustard
Lunch and snacks
- Toasted bagel with pesto, mozzarella, and tomato
- Chicken salad or tuna salad sandwiched between halves
- Mini bagel pizzas with tomato sauce and cheese, baked until bubbly
Sweet options
- Almond butter with banana slices and a drizzle of honey
- Ricotta with fresh berries
- Cinnamon and a little sugar sprinkled over buttered, toasted halves
For the best texture, slice the bagel horizontally with a serrated knife and toast the halves lightly. The cut surface becomes crisp while the inside stays soft.
Storing, Freezing, and Reheating
At room temperature: Store completely cooled bagels in a paper bag or bread box for up to two days. A paper bag keeps the crust from becoming soggy, while a sealed plastic bag keeps them softer but can dull the crust.
In the refrigerator: Refrigeration tends to dry out bread faster, so it is generally not recommended unless your kitchen is very warm and humid.
In the freezer: This is the best method for long-term storage. Slice the bagels in half, place them in a freezer-safe bag or container, and freeze for up to three months. Slicing before freezing means you can toast them straight from frozen, with no thawing needed.
Reheating: Toast frozen halves directly in a toaster or toaster oven until golden. To refresh a whole day-old bagel, sprinkle it lightly with water and warm it in a 350°F (175°C) oven for 5 to 8 minutes. This revives the crust and softens the crumb.
Frequently Asked Questions
Can I make these bagels without a stand mixer?
Absolutely. This recipe was designed for hand kneading. It takes 8 to 10 minutes of steady kneading, and the stiff dough is actually easier to handle by hand than many wetter bread doughs.
Can I use all-purpose flour instead of bread flour?
You can, but the bagels will be a little softer and less chewy. If you must substitute, reduce the water by about a tablespoon, since all-purpose flour absorbs slightly less liquid, and knead a little longer to develop gluten.
Do I really need to boil the bagels?
Yes. Boiling is what defines a bagel. It sets the crust, creates the glossy surface, and gives that characteristic chewiness. Skipping it will give you a bread roll with a hole in the middle.
What does the baking soda do?
Baking soda raises the pH of the water, which helps the crust brown more deeply and develop that classic bagel flavor. It also contributes to a shinier surface.
Can I prepare the dough ahead of time?
Yes. After shaping, cover the bagels and refrigerate them overnight on the tray. The slow, cold fermentation develops deeper flavor. In the morning, let them sit at room temperature for about 20 minutes, then boil and bake as directed.
Can I leave out the chia seeds?
You can. The recipe will still produce delicious bagels, though you will miss a little of the texture and nutrition that the chia seeds provide. You can substitute sesame, flax, or poppy seeds.
Why are my bagels not shiny?
Gloss comes from the baking soda boil and a properly hot oven. Make sure the water is simmering when the bagels go in and that the oven reaches full temperature before baking. A quick brush of egg wash before baking will add extra shine if you do not mind adding egg.
Are these bagels vegan?
The dough itself contains no animal products, so the bagels are vegan as written. Just choose vegan-friendly spreads and fillings.
How many bagels does this recipe make?
Eight standard-size bagels, each weighing roughly 100 g before baking. You can double the recipe easily, but boil and bake in batches.
How can I tell when the bagels are done?
Look for a deep golden color and a slightly hollow sound when you tap the bottom. If you prefer a precise check, the internal temperature should reach about 200 to 205°F (93 to 96°C).
Final Thoughts
Homemade bagels might sound intimidating, but this recipe proves how approachable they can be. With a few humble ingredients, a bit of kneading, and a quick dip in baking-soda water, you can create fluffy salty bagels with a golden crust, a pillowy interior, and just the right amount of crunch from coarse salt and chia seeds.
Make a batch this weekend, and you may never look at store-bought bagels the same way again. Keep a few in the freezer for busy mornings, experiment with different toppings, and share them with family and friends. Warm, fresh, and fragrant from the oven, they are hard to resist.
If you try the recipe, leave a comment with your favorite topping combination, and do not forget to save and share this recipe with fellow bread lovers. Happy baking! 🥯💛
Print
Fluffy Salty Bagels Recipe
Ingredients
Great bagels come from simple ingredients used well. Here is the full list, followed by a closer look at what each one does.
For the Dough
- 500 g high-protein bread flour
- 10 g salt
- 7 g instant dry yeast
- 300 ml warm water
- 1 tablespoon chia seeds
For Boiling
- Water, as needed
- 1 tablespoon baking soda
For Topping
- Coarse salt, to taste
- Extra chia seeds, optional
Instructions
Step 1: Mix the Dough
Add the bread flour, salt, instant yeast, and chia seeds to a large bowl and stir to combine. Keep the salt and yeast on opposite sides of the bowl at first if you like, although with instant yeast this is not strictly necessary. Gradually pour in the warm water while mixing with a spoon or your hand until the ingredients come together into a shaggy, fairly stiff dough.
The dough will feel firmer than typical bread dough. That is exactly what you want. A stiff dough produces a dense, chewy bagel that holds its shape rather than a flat, puffy one.
Step 2: Knead
Turn the dough out onto a lightly floured surface and knead for 8 to 10 minutes. Push the dough away from you with the heel of your hand, fold it back over itself, rotate a quarter turn, and repeat. At first it may feel dry and rough, but it will gradually become smooth, elastic, and slightly tacky.
To check whether you have kneaded enough, try the windowpane test: pinch off a small piece of dough and stretch it gently between your fingers. If it stretches into a thin, translucent sheet without tearing, the gluten is well developed. If it tears quickly, knead for another couple of minutes.
Step 3: First Rise
Shape the dough into a ball and place it in a lightly oiled bowl. Cover with a damp towel or plastic wrap and let it rise in a warm place for 60 to 90 minutes, or until doubled in size. A turned-off oven with the light on, or a spot near a warm (not hot) appliance, works well.
Rising time varies with the temperature of your kitchen. In a cool room, it may take closer to two hours. Judge by the dough, not the clock: it should look puffy and airy and spring back slowly when poked.
Step 4: Shape the Bagels
Gently deflate the dough and divide it into 8 equal portions. Weighing each piece (roughly 100 g each) ensures the bagels bake evenly. Roll each portion into a smooth, tight ball.
There are two popular ways to form the hole:
- The poke method: Press your thumb through the center of the ball and gently stretch the hole wider by rotating the dough around your fingers until the hole is about one-third of the bagel’s diameter.
- The rope method: Roll the dough into a rope about 8 inches long, wrap it around your hand, and press the ends together firmly at the palm.
The poke method is quicker and easier for beginners. Whichever method you choose, make the hole larger than you think you need, because it will shrink as the bagels rise and bake.
Step 5: Rest
Arrange the shaped bagels on a parchment-lined baking tray, leaving a little space between each. Cover them loosely and let them rest for 15 to 20 minutes. This short rest relaxes the gluten and lets the bagels puff up slightly, which helps them boil and bake evenly.
Step 6: Boil
Preheat your oven to 425°F (220°C). While it heats, fill a large pot with water and bring it to a gentle boil. Add 1 tablespoon of baking soda; the water may foam briefly, which is normal.
Lower the bagels into the water a few at a time, without crowding the pot. Boil each bagel for 30 to 45 seconds per side, flipping gently with a slotted spoon. A shorter boil gives a softer, more tender crust, while a longer boil produces a chewier, thicker crust. Lift each bagel out, let the excess water drain, and return it to the tray.
Step 7: Add Toppings
While the bagels are still wet and tacky from the boil, sprinkle them generously with coarse salt and extra chia seeds if you like. The moisture on the surface acts like glue and helps the toppings stick. Do this right away, because once the surface dries, toppings tend to fall off.
Step 8: Bake
Transfer the tray to the preheated oven and bake for 18 to 22 minutes, until the bagels are a deep, beautiful golden brown. Rotate the tray halfway through if your oven heats unevenly. The bottoms should sound hollow when tapped.
Step 9: Cool and Serve
Let the bagels cool on a wire rack for at least 10 to 15 minutes before slicing. Cutting into a hot bagel can make the crumb seem gummy because the steam inside is still setting the structure. Serve warm with cream cheese, butter, avocado, or your favorite sandwich fillings.