
Icy-Water Sourdough Ciabatta: The Easy High-Hydration Loaf With an Open, Airy Crumb
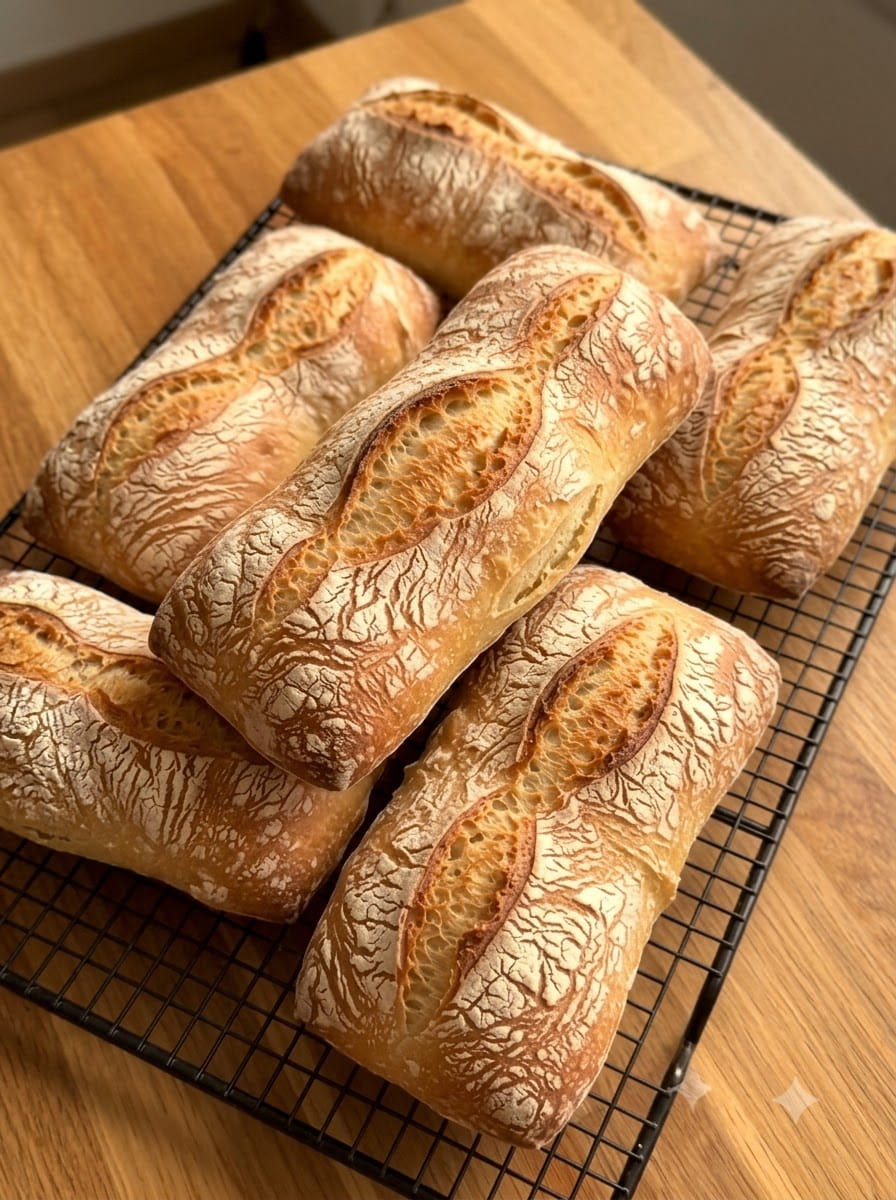
There is something magical about tearing into a fresh ciabatta and seeing the crumb full of big, glossy air pockets. The crust crackles, the inside is soft and chewy, and the flavor has a gentle tang that only sourdough can deliver. For a long time, bakers assumed this kind of bread was reserved for Italian bakeries and professional ovens. It isn’t.
This icy-water sourdough ciabatta is a high-hydration, rustic Italian-style bread you can make at home with five ingredients: bread flour, ice-cold water, active sourdough starter, salt, and olive oil. There is no kneading and no special equipment. You mix, rest, fold, shape, and bake.
The ice-cold water is the key detail. It slows fermentation, gives you more control over a sticky, wet dough, and helps develop flavor and structure over a longer, gentler rise. The result is a golden, crisp-crusted loaf that’s perfect for sandwiches, dipping in olive oil, or eating warm from the oven.
This guide covers the full recipe, why cold water matters, tips for handling wet dough, troubleshooting, variations, storage, and answers to common questions.
Why You’ll Love This Sourdough Ciabatta
Open, airy crumb. The high hydration creates the large, irregular holes ciabatta is famous for, with a soft, chewy interior.
Crisp golden crust. Baking with steam gives you a thin, crackly crust that stays crunchy long after the loaf cools.
No kneading required. Gentle stretch-and-folds build strength while the dough rests. Your hands stay mostly out of it.
Natural sourdough flavor. Using active starter instead of commercial yeast adds depth and a pleasant tang, and many people find sourdough easier to digest.
Versatile. Ciabatta makes excellent sandwiches, panini, garlic bread, bruschetta, and soup dippers, or it can simply be served with butter or olive oil.
Ingredients You’ll Need
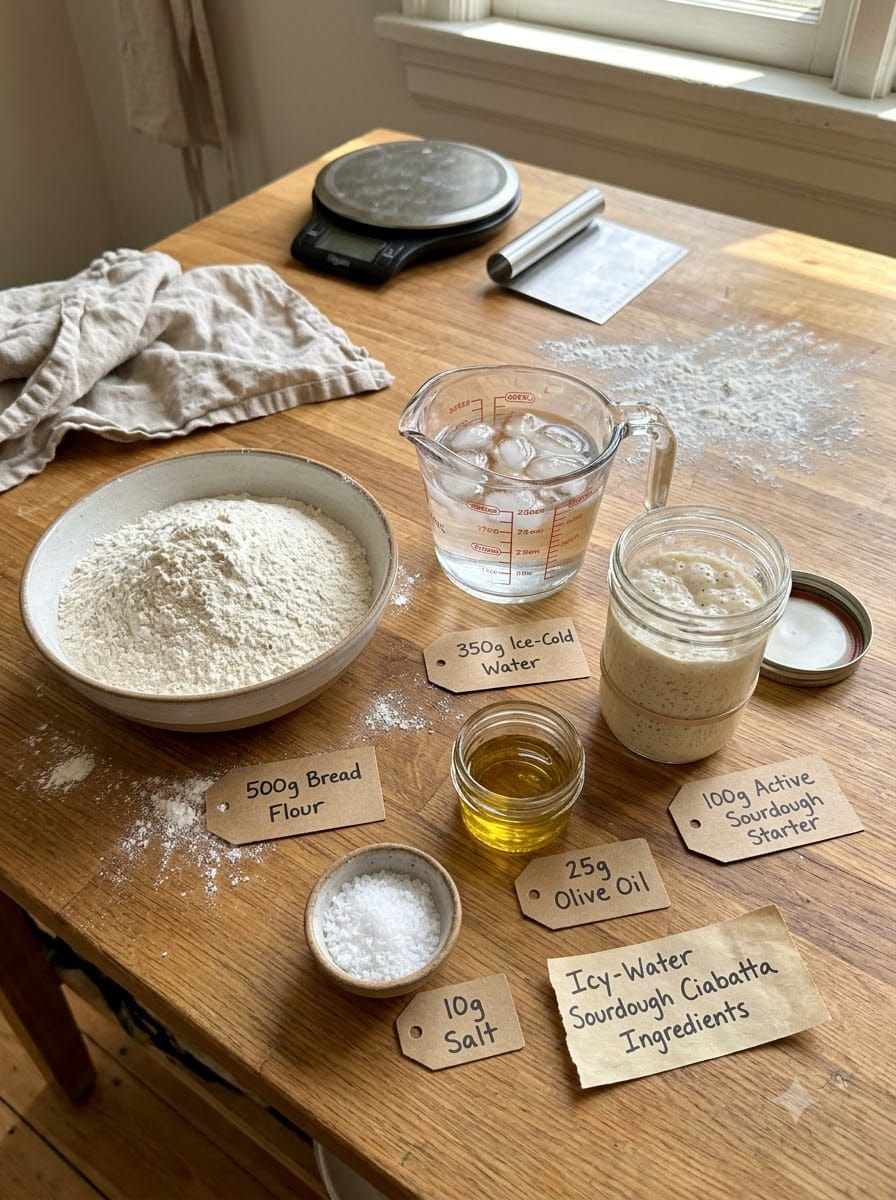
This recipe makes a batch of ciabatta portions.
- 500 g bread flour
- 350 g ice-cold water (adjust depending on flour absorption)
- 100 g active sourdough starter
- 10 g salt
- 25 g olive oil
Weighing ingredients on a kitchen scale is strongly recommended. Bread baking is about ratios, and grams are far more reliable than cups.
Bread Flour
Bread flour has a higher protein content than all-purpose flour, usually around 12 to 13 percent. More protein means more gluten, and more gluten means a dough that can hold the gas bubbles that create an open crumb. For a wet dough like ciabatta, bread flour provides the structure it needs.
Ice-Cold Water
Using ice-cold water slows down yeast and bacteria activity early in the process. That gives the flour time to hydrate fully and gives you a slower, more controlled fermentation. The 350 g of water gives a hydration of about 70 percent on the flour alone. Because the starter also contains water and flour, the true hydration is a bit higher, which is why the dough feels so sticky. If your flour absorbs less water, hold back a little. If it’s thirsty, you can add a splash more.
Active Sourdough Starter
Your starter should be bubbly, doubled in size since its last feeding, and smell pleasantly tangy. A sluggish starter will slow everything down and can lead to a dense loaf. If you’re unsure, drop a small spoonful in water. If it floats, it’s usually ready, though visual signs of bubbling and rise are more reliable.
Salt
Salt strengthens gluten, controls fermentation, and enhances flavor. It’s added after the initial rest so the flour can hydrate first.
Olive Oil
Olive oil adds a subtle fruity richness, softens the crumb, and helps the crust stay tender-crisp. It’s a classic ciabatta ingredient.
Equipment
You don’t need much:
- Large mixing bowl
- Kitchen scale
- Dough scraper (bench scraper)
- Parchment paper and a baking tray
- Baking stone or heavy baking sheet (optional but helpful)
- Wire cooling rack
- A way to create steam, such as a tray of hot water on the oven floor
Step-by-Step Instructions
Step 1: Mix the Dough
In a large mixing bowl, combine the 500 g bread flour, 350 g ice-cold water, and 100 g active sourdough starter. Mix until no dry flour remains. It will look shaggy and rough, and that’s fine.
Step 2: Rest for 1 Hour
Cover the bowl and let the dough rest for 1 hour. This rest, often called an autolyse-style rest, lets the flour absorb water and begins gluten development without any effort from you.
Step 3: Add Salt and Olive Oil
Add the 10 g salt and 25 g olive oil. Mix thoroughly until both are fully incorporated. Wet your hand to prevent sticking and squeeze or fold the dough until the salt dissolves. The dough will be sticky and very high in hydration.
Step 4: Rest for 30 Minutes
Cover the bowl and let the dough rest for 30 minutes.
Step 5: First Stretch and Fold
With a wet hand, lift one side of the dough, stretch it upward gently, and fold it over toward the center. Rotate the bowl and repeat on all four sides.
Step 6: Repeat the Folds
Cover and rest for 30 minutes, then repeat the stretch-and-fold process. Do this 3 to 4 times in total. With each round, the dough should become smoother, stronger, and more elastic, even though it stays soft and wet.
Step 7: Bulk Fermentation
Cover the dough and let it bulk ferment at room temperature until it is noticeably expanded, bubbly, and airy. This can take several hours depending on your starter’s strength and your kitchen’s temperature. Look for bubbles on the surface and sides, a jiggly texture, and a dough that has grown significantly. Don’t rely on the clock alone.
Step 8: Turn Out the Dough
Generously dust your work surface with flour. Carefully turn the dough out, trying not to knock out the air you’ve built up. Dust the top lightly with flour too.
Step 9: Shape and Divide
Gently stretch the dough into a rough rectangle. Using a dough scraper, divide it into ciabatta portions. Don’t try to make them perfectly neat. Rustic, irregular shapes are part of the charm.
Step 10: Transfer to the Tray
Carefully move the portions onto a well-floured, parchment-lined baking tray. Use the scraper and floured hands to lift them gently, stretching slightly into slipper shapes.
Step 11: Final Proof
Cover lightly and let the portions proof until puffy and airy, about 30 to 60 minutes. They should look pillowy and jiggle slightly when the tray is nudged.
Step 12: Preheat the Oven
Preheat your oven to 450°F (230°C), with a baking stone or heavy baking tray inside if you have one. A hot surface helps the bread spring up quickly.
Step 13: Bake With Steam
Bake for approximately 20 to 25 minutes with steam, until the ciabatta is a deep golden brown. To create steam, place a metal tray on the lower rack and carefully pour in hot water as you load the bread, or spray the oven walls with water. Steam keeps the crust soft early on so the loaf can expand fully, then helps it turn crisp and glossy.
Step 14: Transfer to a Rack
Remove the bread from the oven and move it to a wire rack.
Step 15: Cool Before Slicing
Allow the bread to cool before slicing. The crumb is still setting inside, and cutting too early can make it gummy. Then slice and admire that open crumb.
Why Ice-Cold Water Makes a Difference
Most bread recipes call for lukewarm water to speed up yeast. This one does the opposite on purpose, and there are good reasons.
Better control over wet dough. Cold dough is firmer and less slippery than warm dough, which makes it easier to handle at high hydration.
Slower, more even fermentation. Cold water slows the microbes in your starter, so fermentation doesn’t race ahead before the gluten has developed. That gives you a wider window to catch the dough at its peak.
More flavor development. Slower fermentation allows more complex flavors, including mild acidity and subtle sweetness, to build.
A better flour hydration phase. Starting cold gives the flour time to absorb water thoroughly during the first rest.
Keep in mind that room temperature still matters. In a warm kitchen, the cold water will warm up quickly, and bulk fermentation may finish sooner. In a cool kitchen, it may take much longer.
Understanding High-Hydration Dough
Ciabatta dough is wetter than most bread doughs, and that’s what produces the signature texture. Water turns to steam in the oven and pushes the dough outward, forming big holes. But wet dough can be intimidating. Here’s how to handle it:
Wet your hands. A little water on your fingers stops the dough from sticking.
Use a bench scraper. It helps you lift, fold, and move the dough without tearing it.
Flour generously when shaping. You need a heavily floured surface for the final stages, though not during mixing and folding.
Be gentle. Once the dough is full of air, avoid pressing it down. Handle it like something fragile.
Trust the process. The dough will feel unmanageable at first, then smooth and strong after a few folds.
Tips for the Best Sourdough Ciabatta
Use a strong, active starter. Feed it 4 to 8 hours before mixing, and use it when it’s bubbly and at or near its peak.
Watch the dough, not the clock. Bulk fermentation times vary widely. Look for visible growth, bubbles, and a airy, jiggly feel.
Adjust the water. The recipe notes the water may vary depending on flour absorption. Hold back about 20 g at the start if your flour tends to be thirsty or your dough feels too loose, and add it in during the folds if needed.
Don’t skip the steam. Steam is crucial for crust and oven spring. Without it, the crust sets too early and the loaf won’t expand as well.
Use a hot baking surface. A preheated stone or heavy tray gives the bottom of the loaf a strong initial burst of heat.
Keep the flour on the work surface generous. It’s the difference between a clean transfer and a stuck mess.
Cool completely. Resist slicing right away. The wait improves the texture.
Troubleshooting Common Problems
My dough is too sticky to handle. That’s normal for ciabatta. Wet your hands rather than adding more flour to the dough. Use plenty of flour only on the work surface at shaping time.
My dough isn’t bubbly or rising. Your starter may not be active enough, or your kitchen is cold. Move the dough somewhere slightly warmer and give it more time. Next time, feed your starter and wait until it peaks.
The crumb is dense and tight. Possible causes include an under-fermented dough, a weak starter, or too much handling at shaping. Allow fermentation to progress further and handle the dough gently.
The crust is pale and soft. The oven may not be hot enough, or there wasn’t enough steam to finish properly. Bake a few minutes longer and make sure the oven is fully preheated.
The crust is too thick or hard. Too much steam for too long, or overbaking, can cause this. Reduce the baking time slightly.
The loaves spread flat. The dough may have over-proofed or lacked strength. Add another round of stretch-and-folds next time, and shorten the final proof.
The bread tastes too sour. A very long fermentation or an old, acidic starter can make it tangy. Use a freshly fed starter and shorten the rise.
Variations to Try
Olive and herb ciabatta. Fold in chopped olives, rosemary, or thyme during the last stretch and fold.
Garlic ciabatta. Add roasted garlic cloves into the dough, or brush the baked loaves with garlic olive oil.
Cheesy ciabatta. Fold in grated Parmesan or sprinkle cheese on top before baking.
Whole wheat ciabatta. Swap 50 to 100 g of the bread flour for whole wheat flour. You may need slightly more water.
Seeded ciabatta. Top the portions with sesame seeds, poppy seeds, or everything bagel seasoning before baking.
Sun-dried tomato and basil. Fold in chopped sun-dried tomatoes and dried basil for a Mediterranean twist.
Best Ways to Serve Sourdough Ciabatta
Sandwiches and panini. Slice a portion horizontally and fill it with mozzarella, tomato, basil, and pesto, or with roast chicken and arugula.
Dipping bread. Serve warm with extra virgin olive oil, balsamic vinegar, and a pinch of flaky salt.
Bruschetta. Toast slices and top with chopped tomatoes, garlic, basil, and olive oil.
Garlic bread. Spread with garlic butter and bake until golden.
With soup or stew. The sturdy crust and soft interior are perfect for soaking up broth.
Breakfast toast. Toasted slices with avocado, eggs, or ricotta and honey are fantastic.
Storage and Freezing Tips
At room temperature. Store the cooled ciabatta in a paper bag or loosely wrapped in a clean kitchen towel for up to 2 days. Avoid sealing it tightly, which softens the crust.
Reviving the crust. Warm the bread in a 350°F (175°C) oven for 5 to 10 minutes to bring back the crispness.
Freezing. Wrap the cooled portions tightly, or slice them first, and freeze for up to 3 months. Thaw at room temperature or reheat straight from the freezer in the oven.
Avoid the refrigerator. Refrigeration tends to make bread go stale faster.
Frequently Asked Questions
Can I make this ciabatta without a baking stone?
Yes. A heavy baking tray, preheated in the oven, works well. You can also bake on a regular tray, though you may see slightly less oven spring.
How do I know my sourdough starter is active enough?
It should be bubbly, have risen noticeably since feeding, and smell pleasantly sour rather than sharply acidic. A doubled volume is a good sign.
Why is the dough called “icy-water” ciabatta?
Because the recipe uses ice-cold water to slow early fermentation and make the sticky dough easier to manage while building flavor.
How long does bulk fermentation take?
It depends on your starter and kitchen temperature. It can take several hours. Look for visible expansion, bubbles, and an airy, jiggly dough rather than relying on a set time.
Can I use all-purpose flour instead of bread flour?
You can, but the dough will be weaker and harder to handle at this hydration, and the crumb may be less open. Consider reducing the water a little if you try it.
Can I refrigerate the dough overnight?
Many bakers do a long cold ferment to deepen flavor. If you try it, shape and bake the next day after letting the dough warm up slightly. Because this recipe is designed as a same-day bake, treat an overnight rest as an experiment.
How do I get the big holes?
Use a strong starter, keep the dough hydrated, build strength with stretch-and-folds, allow full bulk fermentation, and handle the dough gently when shaping.
Can I make one large loaf instead of several portions?
Yes. Shape the dough into one long rectangle and extend the baking time by a few minutes. Check that it’s golden and sounds hollow when tapped on the bottom.
Why do I need steam?
Steam keeps the surface of the dough flexible during the first minutes of baking, so the loaf can expand fully. It also creates a thin, glossy, crisp crust.
Final Thoughts
This icy-water sourdough ciabatta shows that bakery-quality bread is within reach of any home cook. With bread flour, cold water, active starter, salt, and olive oil, you can create a loaf that is airy, chewy, crisp, and full of flavor.
The process rewards patience more than skill. Mix, rest, fold, and let time do the work. Before long, you’ll be pulling a tray of golden, blistered ciabatta out of your oven and slicing into that beautiful open crumb.
Make a batch this weekend, serve it warm with olive oil, and enjoy every bite. It’s worth every minute.
Print
Icy-Water Sourdough Ciabatta
Ingredients
This recipe makes a batch of ciabatta portions.
- 500 g bread flour
- 350 g ice-cold water (adjust depending on flour absorption)
- 100 g active sourdough starter
- 10 g salt
- 25 g olive oil
Weighing ingredients on a kitchen scale is strongly recommended. Bread baking is about ratios, and grams are far more reliable than cups.
Instructions
In a large mixing bowl, combine the 500 g bread flour, 350 g ice-cold water, and 100 g active sourdough starter. Mix until no dry flour remains. It will look shaggy and rough, and that’s fine.
Cover the bowl and let the dough rest for 1 hour. This rest, often called an autolyse-style rest, lets the flour absorb water and begins gluten development without any effort from you.
Add the 10 g salt and 25 g olive oil. Mix thoroughly until both are fully incorporated. Wet your hand to prevent sticking and squeeze or fold the dough until the salt dissolves. The dough will be sticky and very high in hydration.
Cover the bowl and let the dough rest for 30 minutes.
With a wet hand, lift one side of the dough, stretch it upward gently, and fold it over toward the center. Rotate the bowl and repeat on all four sides.
Cover and rest for 30 minutes, then repeat the stretch-and-fold process. Do this 3 to 4 times in total. With each round, the dough should become smoother, stronger, and more elastic, even though it stays soft and wet.
Cover the dough and let it bulk ferment at room temperature until it is noticeably expanded, bubbly, and airy. This can take several hours depending on your starter’s strength and your kitchen’s temperature. Look for bubbles on the surface and sides, a jiggly texture, and a dough that has grown significantly. Don’t rely on the clock alone.
Generously dust your work surface with flour. Carefully turn the dough out, trying not to knock out the air you’ve built up. Dust the top lightly with flour too.
Gently stretch the dough into a rough rectangle. Using a dough scraper, divide it into ciabatta portions. Don’t try to make them perfectly neat. Rustic, irregular shapes are part of the charm.
Carefully move the portions onto a well-floured, parchment-lined baking tray. Use the scraper and floured hands to lift them gently, stretching slightly into slipper shapes.
Cover lightly and let the portions proof until puffy and airy, about 30 to 60 minutes. They should look pillowy and jiggle slightly when the tray is nudged.
Preheat your oven to 450°F (230°C), with a baking stone or heavy baking tray inside if you have one. A hot surface helps the bread spring up quickly.
Bake for approximately 20 to 25 minutes with steam, until the ciabatta is a deep golden brown. To create steam, place a metal tray on the lower rack and carefully pour in hot water as you load the bread, or spray the oven walls with water. Steam keeps the crust soft early on so the loaf can expand fully, then helps it turn crisp and glossy.
Remove the bread from the oven and move it to a wire rack.
Allow the bread to cool before slicing. The crumb is still setting inside, and cutting too early can make it gummy. Then slice and admire that open crumb.