

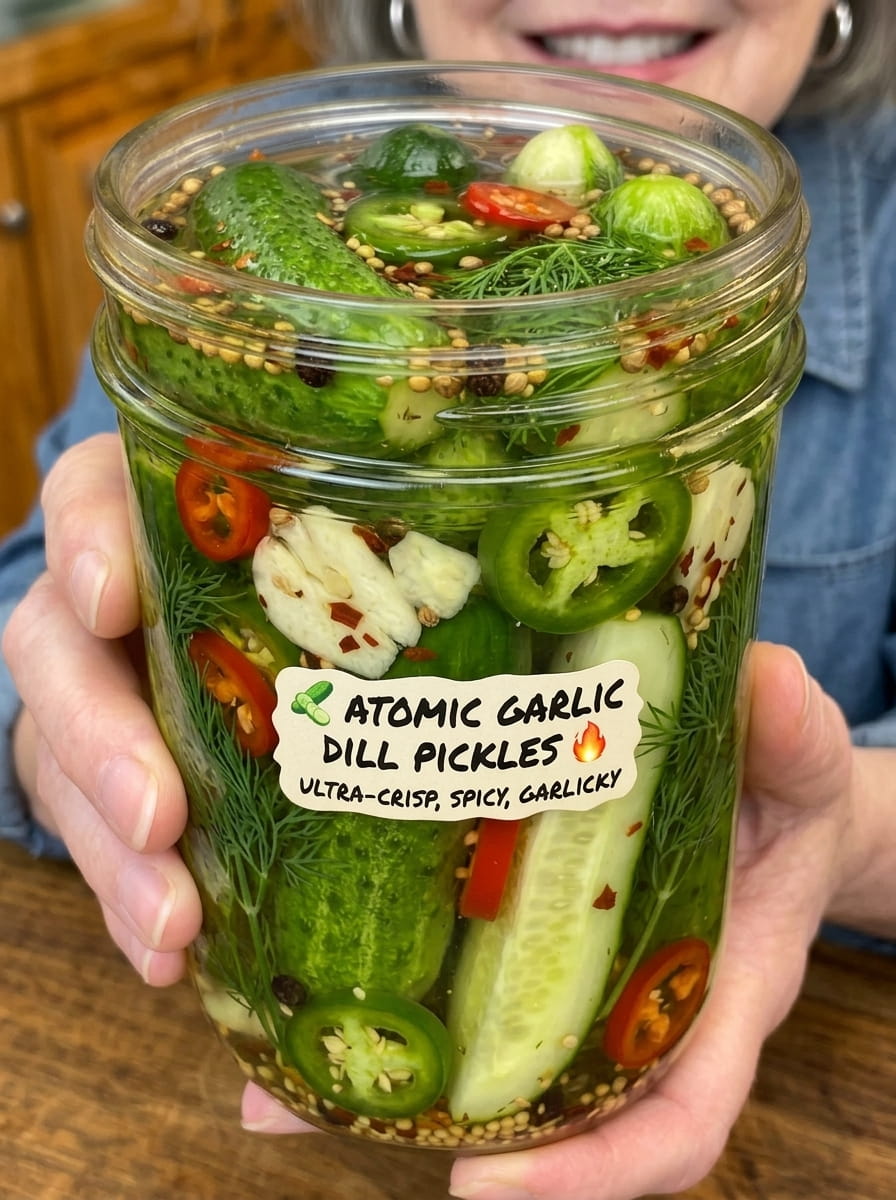
Atomic Garlic Dill Pickles: The Ultra-Crisp, Fiery Refrigerator Pickle You’ll Crave
Meta Description: Learn how to make Atomic Garlic Dill Pickles with this easy recipe. Ultra-crisp, intensely garlicky pickles loaded with fresh dill and fiery peppers — bold and addictive.
If you love pickles with serious bite — both in texture and heat — Atomic Garlic Dill Pickles are about to become your new obsession. This recipe takes classic garlic dill pickles and cranks up the intensity, packing every jar with an aggressive amount of smashed garlic, fresh jalapeños, and additional chili peppers, all suspended in a bright, tangy brine loaded with fresh dill and warm pickling spices. The result is an ultra-crisp, fiery pickle that delivers bold, no-holds-barred flavor in every single bite.
This isn’t a subtle, mild pickle recipe — it’s built for people who want their pickles to pack a punch. The combination of 8 to 10 smashed garlic cloves and multiple fresh chili peppers ensures every cucumber slice is infused with intense, layered heat and pungent garlic flavor, while a full 3 to 5 day rest in the fridge allows that flavor to develop even further. If you’re the kind of person who always reaches for extra garlic and extra spice, this recipe was made for you.
Below, you’ll find the complete recipe along with ingredient breakdowns, step-by-step instructions, storage tips, flavor variations, and plenty of ideas for how to use these bold, fiery pickles once they’re ready.
Why These Pickles Are So Intense
The name “Atomic” isn’t an exaggeration — this recipe is intentionally built to deliver maximum garlic and chili impact. Unlike a standard garlic dill pickle recipe that might call for just two or three garlic cloves, this version uses 8 to 10 smashed cloves, ensuring the brine and cucumbers are deeply infused with pungent, aromatic garlic flavor throughout. On top of that, the combination of fresh jalapeños and additional fresh chili peppers means the heat builds significantly with every bite, especially the longer the pickles sit.
Smashing (rather than slicing) the garlic cloves is an intentional choice here as well — smashed garlic releases more of its essential oils and pungent compounds into the brine compared to whole or lightly sliced cloves, resulting in a more intense garlic flavor throughout the jar. Combined with a generous amount of fresh dill and warm pickling spices like mustard seed and coriander, this recipe delivers layered, complex, seriously bold flavor from start to finish.
Why You’ll Love This Recipe
- Intensely garlicky flavor. A generous amount of smashed garlic ensures every bite is packed with bold, pungent flavor.
- Serious heat. Fresh jalapeños and additional chili peppers deliver real, noticeable spice that builds with each bite.
- Ultra-crisp texture. Trimming the blossom end and using small pickling cucumbers helps ensure a satisfying, crunchy bite.
- Simple, straightforward process. No canning equipment or advanced techniques required — just pack, brine, and chill.
- Perfect for spice and garlic lovers. If you love bold, in-your-face flavor, this recipe delivers exactly that.
- Great fridge staple. Once made, these pickles are always ready for snacking, sandwiches, or a spicy addition to any meal.
Ingredients You’ll Need
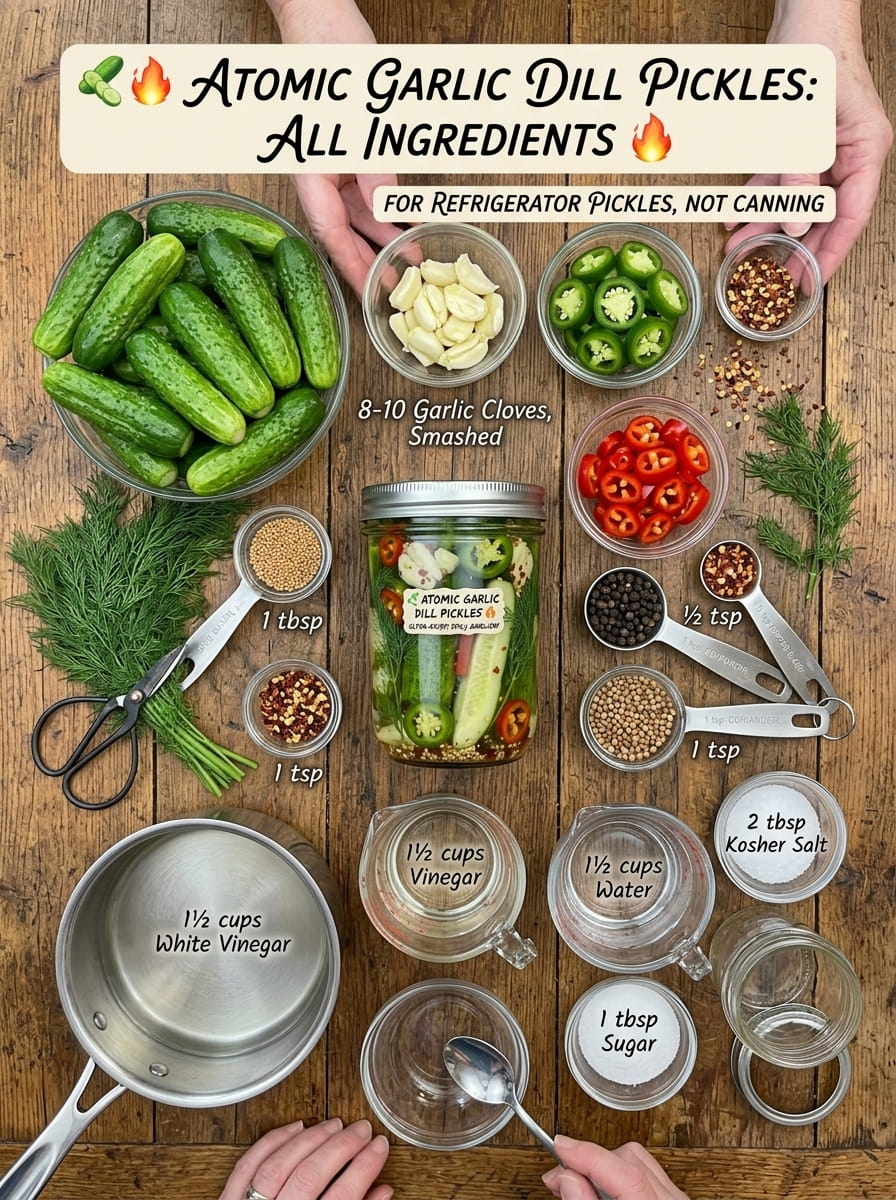
This recipe uses a bold combination of cucumbers, an aggressive amount of garlic, multiple types of chili peppers, and a simple, classic brine. Here’s what you’ll need:
For the Pickles
- 2 lbs small pickling cucumbers
- 8–10 garlic cloves, smashed
- 4–6 fresh jalapeños, sliced
- 2–3 fresh chili peppers, sliced
- ½ cup fresh dill
- 1 tablespoon mustard seeds
- 1 teaspoon black peppercorns
- ½ teaspoon red pepper flakes
- 1 teaspoon coriander seeds
For the Brine
- 1½ cups white vinegar
- 1½ cups water
- 2 tablespoons kosher salt
- 1 tablespoon sugar
Understanding Each Ingredient’s Role
- Small pickling cucumbers are essential for achieving the classic crisp, crunchy pickle texture that holds up well in a strong, spicy brine.
- Smashed garlic cloves deliver maximum garlic flavor, as smashing releases more of the garlic’s natural oils compared to slicing or leaving cloves whole.
- Fresh jalapeños provide the primary source of heat, with their spiciness building as the pickles rest in the brine.
- Additional fresh chili peppers amplify the heat even further, giving these pickles their signature “atomic” intensity — feel free to choose a variety based on your desired spice level.
- Fresh dill brings that classic, aromatic dill pickle flavor that pairs perfectly with garlic and heat.
- Mustard seeds add a gentle tang and pleasant texture, classic in pickling blends.
- Black peppercorns contribute warm, subtle spice that complements the fresh chili heat.
- Red pepper flakes infuse the brine itself with additional background heat.
- Coriander seeds add a subtle citrusy, slightly floral note that rounds out the overall spice blend.
- White vinegar provides the sharp, tangy foundation of the brine and acts as a natural preservative.
- Water balances the vinegar’s acidity while maintaining enough acidity for safe pickling.
- Kosher salt enhances flavor throughout the brine and supports the pickling process.
- Sugar softens the vinegar’s intensity with a touch of sweetness, helping balance the significant heat and garlic in this recipe.
Step-by-Step Instructions
This recipe comes together quickly, with a longer resting period allowing the bold garlic and chili flavors to fully develop.
Step 1: Prep the Cucumbers
Wash the cucumbers thoroughly and trim a thin slice from each blossom end. Trimming the blossom end is an important step, as it removes enzymes that can otherwise cause the pickles to become soft, helping maintain that signature crisp texture.
Step 2: Pack the Jars
Pack the cucumbers into clean glass jars, leaving enough room at the top for the brine and other ingredients.
Step 3: Add the Aromatics and Spices
Add the smashed garlic, sliced jalapeños, sliced chili peppers, fresh dill, mustard seeds, black peppercorns, red pepper flakes, and coriander seeds into the jars with the cucumbers.
Step 4: Make the Brine
Combine the white vinegar, water, salt, and sugar in a saucepan. Bring the brine to a gentle simmer, stirring until the salt and sugar fully dissolve.
Step 5: Pour the Brine
Carefully pour the warm brine into the jars until the cucumbers are completely covered. Full submersion is essential for even pickling and helps prevent spoilage.
Step 6: Cool
Let the jars cool to room temperature on the counter. This step helps prevent thermal shock and ensures safe, gradual cooling before refrigeration.
Step 7: Seal and Refrigerate
Seal the jars tightly and refrigerate for at least 24 hours.
Step 8: Let the Flavor Develop
For maximum garlic and chili flavor, let the pickles rest for 3 to 5 days before serving. This extended resting period is key to this recipe’s signature intensity — the longer they sit, the more pronounced the garlic and heat become.
Step 9: Serve
Serve the pickles chilled, straight from the refrigerator, for the best crisp texture and bold flavor.
How Long Do Atomic Garlic Dill Pickles Last?
Keep the jars refrigerated at all times, and use the pickles within about 2 weeks for the best quality and crunch. Because this is a refrigerator pickle rather than a shelf-stable canned product, it has not gone through a hot water bath canning process and must always be kept cold.
Tips for the Best Atomic Garlic Dill Pickles
- Use fresh, firm pickling cucumbers. Their firm texture and thinner skin result in a much crisper final pickle compared to standard slicing cucumbers.
- Don’t skip trimming the blossom end. This small step plays a real role in helping the pickles stay crisp rather than turning soft over time.
- Smash, don’t slice, the garlic. Smashing releases more of the garlic’s natural oils and pungent flavor into the brine, which is key to this recipe’s intense garlic profile.
- Adjust the chili peppers to your heat tolerance. If you’re unsure how spicy you’d like these, start on the lower end of the jalapeño and chili pepper range and taste-test after the initial 24-hour chill before deciding whether to add more heat to future batches.
- Be patient. The full 3 to 5 day rest is essential for developing this recipe’s signature bold, garlicky, spicy flavor — resist the urge to eat them too soon.
- Fully submerge everything. Any cucumbers, garlic, or peppers exposed to air above the brine line are more prone to spoilage, so make sure the liquid completely covers them.
Flavor Variations to Try
Once you’ve made the classic version, try these variations to switch up the intensity or flavor profile:
- Extra Fiery Version: Add a habanero or ghost pepper alongside the jalapeños and chili peppers for an even more intense heat level.
- Smoky Atomic Pickles: Add a pinch of smoked paprika or a dried chipotle pepper to the brine for a smoky depth alongside the heat.
- Herb Swap: Add fresh thyme or rosemary alongside the dill for a different aromatic profile.
- Sweet Heat Version: Increase the sugar slightly for a more pronounced sweet-and-spicy balance against the intense garlic and heat.
- Extra Garlicky (Yes, Even More): For the truly garlic-obsessed, increase the garlic to a full 12 to 15 cloves per batch.
- Turmeric Twist: Add ½ teaspoon of ground turmeric to the brine for a warm color and subtle earthy flavor.
Delicious Ways to Use Atomic Garlic Dill Pickles
These bold, fiery pickles are a fantastic addition to all kinds of dishes. Here are some of the best ways to enjoy them:
- Burgers – Pile them onto a burger for an intense, garlicky, spicy crunch that cuts through rich, fatty beef.
- Sandwiches – Layer into sandwiches or paninis for a serious flavor and heat upgrade.
- Barbecue Plates – Serve alongside barbecue meats as a bold, tangy, spicy palate cleanser.
- Charcuterie Boards – Add a small bowl to your next charcuterie board for a fiery contrast to cured meats and cheeses.
- Grilled Meats – Serve alongside grilled chicken, steak, or sausages for a crunchy, spicy accompaniment.
- Bloody Marys – Use a pickle spear as a bold, spicy garnish in your favorite Bloody Mary.
- Snacking Straight From the Jar – Simple, crunchy, and seriously addictive on their own.
- Hot Dogs – Top hot dogs or bratwursts with a few slices for a bold, fiery flavor boost.
- Late-Night Snacking – A cold, crunchy, spicy pickle straight from the fridge is a satisfying snack any time of day (or night).
- Deviled Eggs – Finely chop and mix into deviled egg filling for a spicy, garlicky twist on a classic appetizer.
Frequently Asked Questions
How spicy are these pickles really? Very spicy, by design. Between the fresh jalapeños, additional chili peppers, and red pepper flakes, this recipe delivers serious, building heat. If you’re sensitive to spice, start with fewer peppers and adjust future batches based on your preference.
Can I reduce the amount of garlic if it’s too intense for me? Absolutely. While this recipe is designed to be intensely garlicky, feel free to reduce the garlic to 4 to 5 cloves for a milder, though still noticeably garlicky, pickle.
Why do I need to trim the blossom end of the cucumbers? The blossom end contains enzymes that can cause pickles to soften over time. Trimming it off helps the pickles stay crisp and crunchy throughout their shelf life.
Can I use regular cucumbers instead of pickling cucumbers? Pickling cucumbers are strongly recommended for the crispest texture. Regular slicing cucumbers tend to have a higher water content and softer texture, resulting in a less crunchy final pickle.
How long should I wait before eating them? While technically ready after 24 hours, the full 3 to 5 day rest is essential for this recipe’s signature bold garlic and chili flavor. The longer they sit (within the recommended storage window), the more intense the flavor becomes.
Can I reuse the pickling brine for a second batch? It’s best to make a fresh batch of brine each time to ensure proper acidity and the best flavor. Reusing brine can dilute its preservative properties and lead to inconsistent results.
Final Thoughts
Atomic Garlic Dill Pickles are exactly what their name promises: bold, intense, ultra-crisp pickles loaded with pungent garlic and fiery chili heat. With a generous amount of smashed garlic, multiple types of fresh chili peppers, and a full 3 to 5 day rest to let the flavors develop, this recipe is built for garlic lovers and spice enthusiasts who want their pickles to make a serious statement.
Whether you’re piling them onto a burger, serving them alongside barbecue, or snacking straight from the jar, these pickles are guaranteed to deliver a bold, unforgettable bite every single time. Make a batch, let the flavors develop, and get ready for your new favorite spicy pickle obsession.
Print
Atomic Garlic Dill Pickles
Ingredients
This recipe uses a bold combination of cucumbers, an aggressive amount of garlic, multiple types of chili peppers, and a simple, classic brine. Here’s what you’ll need:
For the Pickles
- 2 lbs small pickling cucumbers
- 8–10 garlic cloves, smashed
- 4–6 fresh jalapeños, sliced
- 2–3 fresh chili peppers, sliced
- ½ cup fresh dill
- 1 tablespoon mustard seeds
- 1 teaspoon black peppercorns
- ½ teaspoon red pepper flakes
- 1 teaspoon coriander seeds
For the Brine
- 1½ cups white vinegar
- 1½ cups water
- 2 tablespoons kosher salt
- 1 tablespoon sugar
Understanding Each Ingredient’s Role
- Small pickling cucumbers are essential for achieving the classic crisp, crunchy pickle texture that holds up well in a strong, spicy brine.
- Smashed garlic cloves deliver maximum garlic flavor, as smashing releases more of the garlic’s natural oils compared to slicing or leaving cloves whole.
- Fresh jalapeños provide the primary source of heat, with their spiciness building as the pickles rest in the brine.
- Additional fresh chili peppers amplify the heat even further, giving these pickles their signature “atomic” intensity — feel free to choose a variety based on your desired spice level.
- Fresh dill brings that classic, aromatic dill pickle flavor that pairs perfectly with garlic and heat.
- Mustard seeds add a gentle tang and pleasant texture, classic in pickling blends.
- Black peppercorns contribute warm, subtle spice that complements the fresh chili heat.
- Red pepper flakes infuse the brine itself with additional background heat.
- Coriander seeds add a subtle citrusy, slightly floral note that rounds out the overall spice blend.
- White vinegar provides the sharp, tangy foundation of the brine and acts as a natural preservative.
- Water balances the vinegar’s acidity while maintaining enough acidity for safe pickling.
- Kosher salt enhances flavor throughout the brine and supports the pickling process.
- Sugar softens the vinegar’s intensity with a touch of sweetness, helping balance the significant heat and garlic in this recipe.
Instructions
This recipe comes together quickly, with a longer resting period allowing the bold garlic and chili flavors to fully develop.
Wash the cucumbers thoroughly and trim a thin slice from each blossom end. Trimming the blossom end is an important step, as it removes enzymes that can otherwise cause the pickles to become soft, helping maintain that signature crisp texture.
Pack the cucumbers into clean glass jars, leaving enough room at the top for the brine and other ingredients.
Add the smashed garlic, sliced jalapeños, sliced chili peppers, fresh dill, mustard seeds, black peppercorns, red pepper flakes, and coriander seeds into the jars with the cucumbers.
Combine the white vinegar, water, salt, and sugar in a saucepan. Bring the brine to a gentle simmer, stirring until the salt and sugar fully dissolve.
Carefully pour the warm brine into the jars until the cucumbers are completely covered. Full submersion is essential for even pickling and helps prevent spoilage.
Let the jars cool to room temperature on the counter. This step helps prevent thermal shock and ensures safe, gradual cooling before refrigeration.
Seal the jars tightly and refrigerate for at least 24 hours.
For maximum garlic and chili flavor, let the pickles rest for 3 to 5 days before serving. This extended resting period is key to this recipe’s signature intensity — the longer they sit, the more pronounced the garlic and heat become.
Serve the pickles chilled, straight from the refrigerator, for the best crisp texture and bold flavor.






