

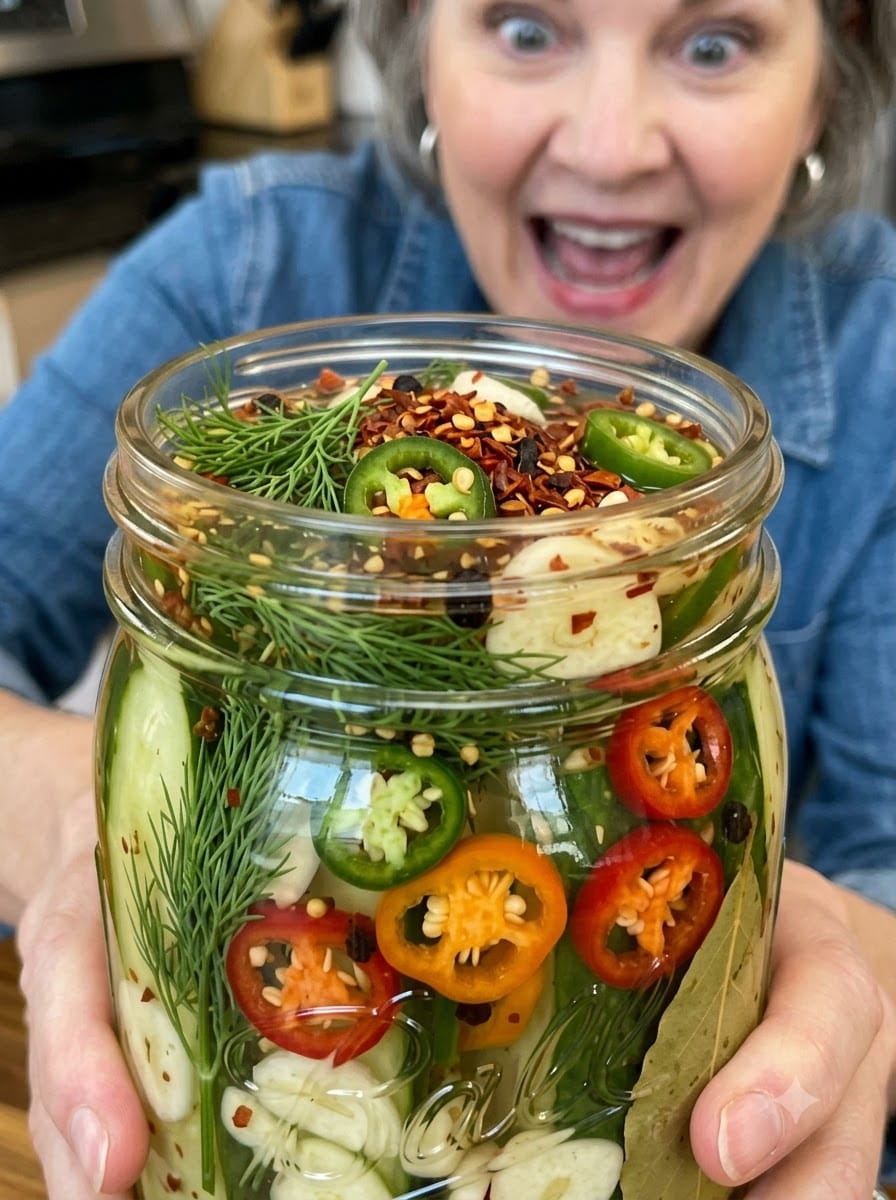
Atomic Garlic Dill Pickles: The Fiery Homemade Pickle Recipe You Can’t Stop Eating
If you thought you knew spicy pickles, get ready to meet your match. These Atomic Garlic Dill Pickles are packed with fiery, bold, impossible-to-stop-eating flavor — spicy, tangy, crunchy, and loaded with a serious three-pepper punch that earns every bit of the word “atomic” in the name. One bite delivers a crisp, garlicky crunch followed immediately by a wave of heat that builds with every pepper layered into the jar: jalapeño, serrano, and habanero, all working together to create a pickle that spice lovers will be talking about for weeks.
This isn’t a pickle for the faint of heart, and that’s exactly the point. While classic dill pickles offer a familiar, comforting tang, this recipe takes that same beloved garlicky dill base and cranks the heat up to eleven. The result is a fiercely flavorful, deeply aromatic pickle that’s just as addictive as it is intense — the kind of jar that disappears fast once word gets around that it’s in the fridge.
In this guide, we’ll cover everything you need to know to make the boldest, crispest, most flavor-packed batch of atomic garlic dill pickles possible: a full ingredient breakdown, step-by-step instructions, tips for balancing heat and crunch, ways to customize the spice level, the best ways to serve these pickles, storage guidance, and answers to the most frequently asked questions about spicy homemade pickles. Whether you’re a die-hard heat seeker or just curious about leveling up your pickle game, this recipe is about to become a new favorite.
Why These Are the Ultimate Spicy Pickle Recipe
Three peppers, three layers of heat. Most spicy pickle recipes rely on a single pepper for their kick. This recipe layers jalapeño, serrano, and habanero together, creating a more complex, building heat rather than a single, flat spiciness. The jalapeño brings a familiar, approachable warmth, the serrano adds a sharper, more immediate kick, and the habanero delivers a slow-building, fruity intensity that lingers.
Still deeply garlicky and herby. Despite all that heat, this recipe doesn’t lose sight of what makes a great dill pickle great in the first place. Fresh sliced garlic and fragrant dill sprigs are packed generously into every jar, ensuring the classic pickle flavor you love is still front and center, just with a serious fiery upgrade.
Crisp, snappy texture in every bite. Because this is a raw-pack refrigerator pickle — meaning the cucumbers go into the jar uncooked, with only the brine being heated — these pickles retain that essential crunch that makes a great dill pickle so satisfying to eat.
Fully customizable heat level. Whether you want a pickle with just a gentle kick or one that pushes your limits, this recipe is easy to scale up or down depending on how much of each pepper (and how many seeds) you include.
No canning equipment required. Like most refrigerator pickle recipes, this one requires no water bath canning, no pressure canner, and no special equipment. Just a saucepan, some clean jars, and a little patience while the flavors develop.
Understanding the Heat: Jalapeño, Serrano, and Habanero
Part of what makes this recipe so special is the layered use of three different peppers, each contributing something distinct to the overall flavor and heat profile.
Jalapeño peppers sit at the milder end of the spice spectrum, typically ranging from 2,500 to 8,000 Scoville Heat Units (SHU). They bring a bright, grassy flavor along with a manageable warmth that most people can handle without much trouble.
Serrano peppers step things up considerably, typically landing in the 10,000 to 23,000 SHU range — noticeably hotter than jalapeños, with a sharper, more immediate bite and a slightly brighter, more citrusy flavor.
Habanero peppers bring the real heat, typically ranging from 100,000 to 350,000 SHU. Habaneros are known not just for their intensity but for their distinct fruity, almost tropical flavor underneath all that fire, which is part of why a single habanero can transform an entire jar of pickles without making the flavor one-dimensional.
By combining all three, this recipe creates a heat that builds in layers rather than hitting all at once — you get the immediate warmth of the jalapeño and serrano up front, followed by the slow-building intensity of the habanero that lingers on the palate. It’s a more interesting, dynamic spice experience than relying on a single pepper alone.
Ingredients You’ll Need
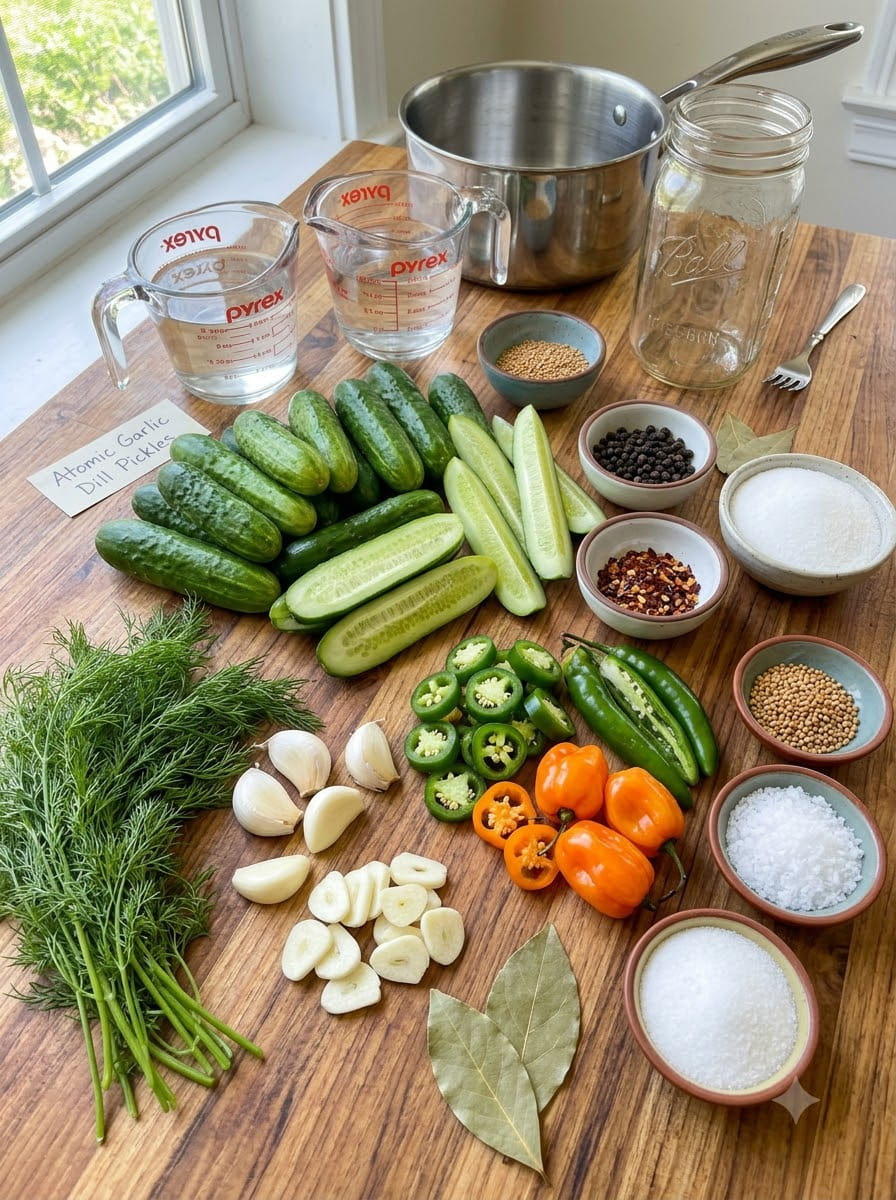
- 2 lbs pickling cucumbers
- 2 cups white vinegar
- 1 cup water
- 2 tablespoons granulated sugar
- 1½ tablespoons kosher salt
- 6 cloves garlic, thinly sliced
- ½ cup fresh dill sprigs
- 2 fresh jalapeños, thinly sliced
- 2 fresh serrano peppers, thinly sliced
- 1 habanero pepper, thinly sliced
- 1 teaspoon whole black peppercorns
- 1 teaspoon mustard seeds
- ½ teaspoon crushed red pepper flakes
- 2 bay leaves
A quick note on ingredient choices: white vinegar provides the clean, sharp acidity that classic dill pickles are known for, letting the garlic, dill, and pepper flavors take center stage rather than competing with a more complex vinegar. Kosher salt dissolves cleanly without clouding the brine, and a modest amount of granulated sugar helps round out the sharp acidity without making these pickles taste sweet — this is very much a savory, fiery, garlic-forward recipe. The crushed red pepper flakes in the brine add an extra layer of background heat that works alongside the fresh peppers rather than duplicating their flavor.
Step-by-Step Directions
Step 1: Wash and Trim the Cucumbers
Wash the cucumbers thoroughly and trim a thin slice from both ends of each one. Trimming the ends, especially the blossom end, helps remove enzymes that can lead to softer pickles over the several weeks they’ll be stored.
Step 2: Cut Into Spears or Slices
Cut the cucumbers into spears or thick slices, whichever shape you prefer. Aim for pieces of a similar size and thickness so they pickle at a consistent rate, ensuring every piece ends up with the same bold, spicy flavor.
Step 3: Pack the Jars
Pack the cucumbers tightly into clean glass jars, layering them with the sliced garlic, fresh dill, jalapeños, serrano peppers, and habanero as you go. Distributing the peppers evenly throughout the jar, rather than dumping them all in one spot, helps ensure that every cucumber piece gets exposed to that fiery flavor rather than just the pieces sitting closest to the peppers.
Step 4: Combine the Brine Ingredients
In a medium saucepan, combine the white vinegar, water, sugar, kosher salt, black peppercorns, mustard seeds, crushed red pepper flakes, and bay leaves.
Step 5: Simmer the Brine
Bring the brine to a gentle simmer over medium heat, stirring until the sugar and salt have completely dissolved. The brine is ready once it looks clear (aside from the visible spices) and no longer feels gritty when tested with a spoon.
Step 6: Cool Slightly
Remove the saucepan from the heat and allow the brine to cool slightly before pouring. This step matters for texture — pouring boiling-hot brine directly over raw cucumbers can begin to soften them prematurely, robbing you of that essential crunch.
Step 7: Pour the Brine Over the Cucumbers and Peppers
Carefully pour the warm brine over the cucumbers and peppers until everything is completely submerged. Make sure the liquid reaches every piece, including any tucked toward the bottom or sides of the jar.
Step 8: Release Air Bubbles
Gently press the cucumbers down with a clean spoon to release any trapped air bubbles and ensure the garlic, dill, and peppers are evenly distributed throughout the jar. This step also confirms that every piece stays fully submerged in the brine.
Step 9: Cool and Seal
Allow the jars to cool to room temperature before sealing them tightly with their lids. Sealing while the jars are still warm can trap excess condensation inside, which isn’t ideal for a refrigerator pickle meant to last several weeks.
Step 10: Refrigerate and Wait
Refrigerate for at least 24 hours before serving. For maximum atomic flavor, let the pickles marinate for 3 to 5 days. The longer they sit, the more the garlic, dill, and pepper heat penetrate the cucumbers, resulting in a deeper, more well-rounded fiery flavor throughout every bite.
Tips for the Best Atomic Garlic Dill Pickles
Handle hot peppers with care. When slicing jalapeños, serranos, and especially habaneros, consider wearing gloves to protect your skin from the capsaicin oils, and be sure to wash your hands thoroughly afterward. Avoid touching your face or eyes while working with these peppers.
Adjust the heat to your comfort level. If you want a milder version, remove the seeds and membranes from the peppers before slicing, since that’s where most of the heat is concentrated. For an even more intense version, leave the seeds in or add a second habanero.
Use pickling cucumbers for the best crunch. Standard slicing cucumbers have a higher water content and thinner tolerance for brine, making them more likely to turn soft. Pickling or Kirby cucumbers hold up far better over several weeks of storage.
Don’t skip trimming the ends. This small step plays a real role in preventing mushy pickles, especially given how long these will be stored in the refrigerator.
Let the brine cool slightly before pouring. As mentioned above, this helps preserve the crisp texture of the cucumbers by preventing them from being shocked by extremely hot liquid.
Pack the jars tightly. Snugly packed cucumbers and peppers are less likely to float above the brine line, which helps ensure even pickling and reduces the risk of spoilage on any exposed pieces.
Give it time. While these pickles are technically ready after 24 hours, the full atomic flavor really develops between days 3 and 5, once the heat has had a chance to fully infuse the cucumbers.
Always use a clean utensil. Every time you reach into the jar, use a clean fork or tongs rather than your fingers, which helps your pickles stay fresh and safe throughout their entire storage window.
Flavor Variations to Try
This recipe is a great base for adjusting the heat and flavor to your exact preference:
- Milder version: Remove the seeds and membranes from all three peppers, or skip the habanero entirely and stick with just jalapeño and serrano for a more moderate heat level.
- Even hotter: Add a second habanero, or swap in a ghost pepper or scotch bonnet for those who want to push the heat even further.
- Smoky atomic pickles: Add a chipotle pepper in adobo sauce or a pinch of smoked paprika to the brine for a smoky depth alongside the heat.
- Extra garlicky: Add a few whole peeled garlic cloves directly into the jar in addition to the sliced garlic for an even bolder bite.
- Sweet heat twist: Increase the sugar slightly for a sweet-and-spicy contrast that balances the fiery peppers with a touch of sweetness.
- Tropical habanero twist: Add a few thin slices of fresh pineapple to the jar to play up the habanero’s natural fruity notes.
How to Serve Atomic Garlic Dill Pickles
These fiery pickles are just as versatile as they are bold. Here are some of the best ways to enjoy them:
- Straight from the jar as an intense, crunchy snack for spice lovers
- Piled onto burgers and sandwiches for a fiery upgrade to a classic
- Chopped and added to tacos or nachos for a spicy, tangy kick
- Served alongside barbecue plates and grilled meats to cut through rich, smoky flavors
- Arranged on charcuterie boards for guests who love heat
- Added to a spicy snack platter alongside hot sauces, spicy nuts, and other fiery bites
- Blended into a spicy pickle dip or used to spike a bloody mary for extra fire
Because these pickles carry such a bold, fiery flavor, they work especially well paired with rich, fatty foods like burgers, barbecue, and grilled meats, where the heat and acidity help cut through the richness.
Storage Information
Store the Atomic Garlic Dill Pickles in airtight glass jars in the refrigerator for up to 3 to 4 weeks. Keep the pickles fully submerged in the brine at all times, and always use a clean utensil when serving to help prevent introducing bacteria that could shorten the shelf life of your pickles.
Because this is a refrigerator pickle rather than a shelf-stable canned product, it’s important to keep the jars chilled at all times rather than storing them at room temperature. Give the pickles a quick visual and smell check before eating each time — if you notice any off odor, unusual cloudiness beyond the visible spices and peppers, or any sign of mold, it’s best to discard that batch.
Recipe Quick Facts
- Prep Time: 15 minutes
- Cook Time: 5 minutes
- Total Time: 20 minutes, plus chilling time
- Servings: 10
- Calories: Approximately 30 per serving
Frequently Asked Questions
How spicy are these pickles, really? With jalapeño, serrano, and habanero peppers all combined, these pickles land firmly on the spicy end of the spectrum — noticeably hotter than a typical spicy dill pickle. The heat builds as you eat, starting with a warm kick and finishing with a lingering intensity from the habanero.
Can I make these pickles milder? Yes. Removing the seeds and membranes from the peppers before slicing significantly reduces the heat, and you can also omit the habanero entirely and rely on just the jalapeño and serrano for a more moderate spice level.
Do I need to wear gloves when slicing the peppers? It’s strongly recommended, especially when handling the habanero. Capsaicin, the compound responsible for a pepper’s heat, can linger on your skin and cause irritation if you touch your face or eyes afterward. Gloves make cleanup and handling much safer and easier.
Do I need to use pickling cucumbers? Pickling cucumbers (often labeled Kirby cucumbers) are strongly recommended for the best texture, since they have thinner skins and denser flesh than standard slicing cucumbers, helping them stay crisp throughout weeks of storage.
How long should I wait before eating these pickles? They’re technically safe to eat after 24 hours in the refrigerator, but the full atomic flavor really develops between days 3 and 5, once the peppers, garlic, and dill have had time to fully infuse the cucumbers.
Can I reuse the brine for a new batch? It’s best to make a fresh batch of brine each time. Reused brine has already lost some of its salt and sugar balance and picked up extra moisture from the previous batch of cucumbers and peppers, increasing the risk of spoilage.
Are these pickles shelf-stable, or do they need to stay refrigerated? These are a refrigerator pickle, not a shelf-stable canned product. There’s no water bath processing involved, so the jars must remain refrigerated at all times and be used within the recommended 3-to-4-week storage window.
Final Thoughts
Atomic Garlic Dill Pickles take everything you love about a classic garlicky dill pickle and turn the intensity all the way up with a bold, layered combination of jalapeño, serrano, and habanero peppers. The result is a fiery, crunchy, deeply flavorful pickle that spice lovers won’t be able to stop reaching for. Whether you’re piling them onto a burger, serving them alongside barbecue, or eating them straight from the jar as a fearless snack, these pickles deliver an unforgettable kick in every single bite.
Give this recipe a try, adjust the heat level to match your spice tolerance, and get ready for a jar that won’t last long once people know it’s in the fridge.
Print
Atomic Garlic Dill Pickles
Ingredients
- 2 lbs pickling cucumbers
- 2 cups white vinegar
- 1 cup water
- 2 tablespoons granulated sugar
- 1½ tablespoons kosher salt
- 6 cloves garlic, thinly sliced
- ½ cup fresh dill sprigs
- 2 fresh jalapeños, thinly sliced
- 2 fresh serrano peppers, thinly sliced
- 1 habanero pepper, thinly sliced
- 1 teaspoon whole black peppercorns
- 1 teaspoon mustard seeds
- ½ teaspoon crushed red pepper flakes
- 2 bay leaves
A quick note on ingredient choices: white vinegar provides the clean, sharp acidity that classic dill pickles are known for, letting the garlic, dill, and pepper flavors take center stage rather than competing with a more complex vinegar. Kosher salt dissolves cleanly without clouding the brine, and a modest amount of granulated sugar helps round out the sharp acidity without making these pickles taste sweet — this is very much a savory, fiery, garlic-forward recipe. The crushed red pepper flakes in the brine add an extra layer of background heat that works alongside the fresh peppers rather than duplicating their flavor.
Instructions
Wash the cucumbers thoroughly and trim a thin slice from both ends of each one. Trimming the ends, especially the blossom end, helps remove enzymes that can lead to softer pickles over the several weeks they’ll be stored.
Cut the cucumbers into spears or thick slices, whichever shape you prefer. Aim for pieces of a similar size and thickness so they pickle at a consistent rate, ensuring every piece ends up with the same bold, spicy flavor.
Pack the cucumbers tightly into clean glass jars, layering them with the sliced garlic, fresh dill, jalapeños, serrano peppers, and habanero as you go. Distributing the peppers evenly throughout the jar, rather than dumping them all in one spot, helps ensure that every cucumber piece gets exposed to that fiery flavor rather than just the pieces sitting closest to the peppers.
In a medium saucepan, combine the white vinegar, water, sugar, kosher salt, black peppercorns, mustard seeds, crushed red pepper flakes, and bay leaves.
Bring the brine to a gentle simmer over medium heat, stirring until the sugar and salt have completely dissolved. The brine is ready once it looks clear (aside from the visible spices) and no longer feels gritty when tested with a spoon.
Remove the saucepan from the heat and allow the brine to cool slightly before pouring. This step matters for texture — pouring boiling-hot brine directly over raw cucumbers can begin to soften them prematurely, robbing you of that essential crunch.
Carefully pour the warm brine over the cucumbers and peppers until everything is completely submerged. Make sure the liquid reaches every piece, including any tucked toward the bottom or sides of the jar.
Gently press the cucumbers down with a clean spoon to release any trapped air bubbles and ensure the garlic, dill, and peppers are evenly distributed throughout the jar. This step also confirms that every piece stays fully submerged in the brine.
Allow the jars to cool to room temperature before sealing them tightly with their lids. Sealing while the jars are still warm can trap excess condensation inside, which isn’t ideal for a refrigerator pickle meant to last several weeks.
Refrigerate for at least 24 hours before serving. For maximum atomic flavor, let the pickles marinate for 3 to 5 days. The longer they sit, the more the garlic, dill, and pepper heat penetrate the cucumbers, resulting in a deeper, more well-rounded fiery flavor throughout every bite.






