


Bacon Ranch Stuffed Pepperoncini: The Ultimate Bite-Sized Party Appetizer
If you’re looking for an appetizer that disappears within minutes of hitting the table, these Bacon Ranch Stuffed Pepperoncini are exactly what you need. Creamy, savory, tangy, and loaded with smoky bacon flavor, this bite-sized snack combines the briny punch of pickled pepperoncini with a rich, cheesy ranch filling studded with crispy bacon, Parmesan, and fresh herbs. It’s the kind of appetizer that looks impressive on a platter, takes minimal effort to make, and gets devoured the second it’s set out.
Whether you’re hosting a game-day gathering, putting together a holiday appetizer spread, building out a charcuterie board, or just want an easy make-ahead snack for movie night, this recipe checks every box. Below, you’ll find a complete breakdown of the ingredients, detailed step-by-step instructions, expert tips for the best texture and flavor, storage guidance, serving suggestions, and answers to the most common questions about making stuffed pepperoncini at home.
Why You’ll Love This Bacon Ranch Stuffed Pepperoncini Recipe
There are countless stuffed appetizers out there, but this one stands out for several key reasons.
It’s the perfect balance of flavors. The mild pickled pepperoncini brings a tangy, slightly spicy brightness that cuts through the rich, creamy filling. Combined with smoky bacon, nutty Parmesan, herby ranch seasoning, and fresh chopped herbs, every bite delivers a little bit of everything: tang, creaminess, smokiness, and savory depth.
It requires no cooking beyond the bacon. Aside from crisping up a few slices of bacon, this entire recipe comes together without turning on the oven. That makes it an especially easy option when you’re already juggling other dishes for a party or holiday spread.
It’s a fantastic make-ahead appetizer. These stuffed peppers can be assembled well in advance and refrigerated until you’re ready to serve, making them one less thing to worry about on the day of your gathering.
It’s endlessly crowd-pleasing. Bacon, ranch, and cream cheese are a beloved flavor trio for a reason. This appetizer taps into that same crave-worthy combination that shows up in dips, potato skins, and stuffed jalapeños, but with the bonus tang of pickled pepperoncini instead of the heat of a jalapeño.
It’s naturally low-carb and keto-friendly. With no breading, no rice, and no added sugar, this appetizer fits neatly into low-carb, keto, and gluten-free eating styles, making it a great option for parties where guests have different dietary preferences.
It’s visually stunning on a platter. The bright green pepperoncini stuffed with a creamy, flecked filling and garnished with extra bacon and herbs make for a beautiful, colorful addition to any appetizer spread or charcuterie board.
What Are Pepperoncini, Exactly?
Pepperoncini are mild, tangy pickled peppers, typically pale yellow-green in color, with a wrinkled skin and a slightly sweet, tangy flavor. They’re a staple on antipasto platters, in Greek salads, and as a topping for sandwiches and subs, particularly Italian beef sandwiches and Subway-style sandwiches. Unlike jalapeños, pepperoncini have very mild heat, usually just a whisper of spice, which makes them an ideal vessel for a rich, savory filling since they add tang and brightness without overwhelming heat.
Because pepperoncini come pre-pickled in a jar, this recipe skips the pickling process entirely and instead focuses on transforming the peppers into a stuffed appetizer, making it one of the quickest and easiest party snacks you can put together.
Ingredients You’ll Need
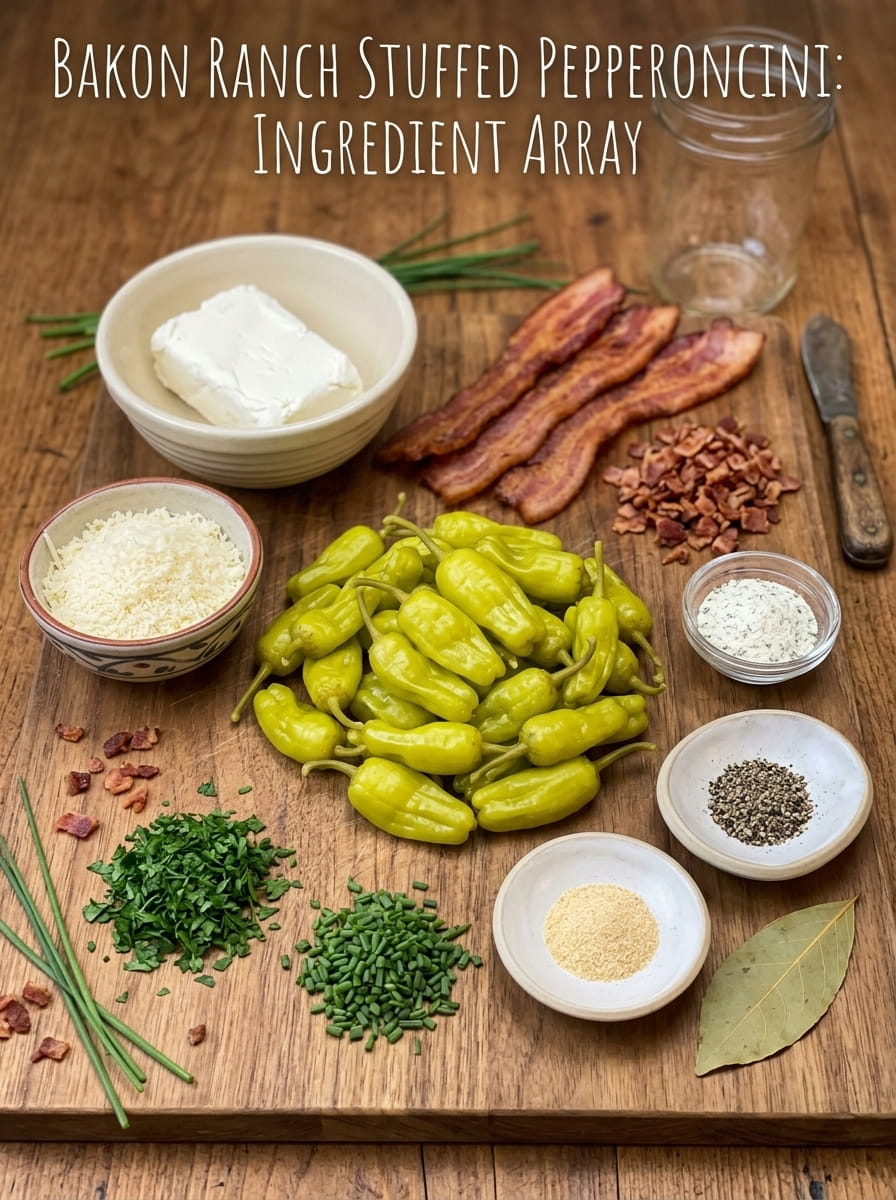
This recipe uses simple, easy-to-find ingredients that combine to create a rich, flavorful filling.
24 mild pickled pepperoncini peppers — Look for pepperoncini in the pickle or condiment aisle of your grocery store, often sold whole in jars. Choose peppers that are relatively uniform in size for easy stuffing and a consistent presentation.
8 oz cream cheese, softened — Cream cheese forms the rich, creamy base of the filling. Make sure it’s fully softened to room temperature so it mixes smoothly without lumps.
4 slices bacon, cooked until crispy and finely chopped — Crispy bacon adds smoky, savory flavor and a satisfying textural contrast to the creamy filling. Cooking it until very crispy, rather than just done, ensures it holds its crunch even after mixing into the cream cheese.
1/4 cup grated Parmesan cheese — Parmesan adds a salty, nutty, umami-rich flavor that deepens the overall taste of the filling.
1 tablespoon ranch seasoning — Ranch seasoning mix brings that classic herby, garlicky, tangy ranch flavor everyone loves, without needing a dozen separate spices.
1 tablespoon fresh parsley, finely chopped — Fresh parsley adds a pop of color and a light, fresh, slightly peppery flavor.
1 tablespoon fresh chives, finely chopped — Chives contribute a mild, oniony flavor that complements the ranch seasoning beautifully.
1/4 teaspoon garlic powder — A little extra garlic powder reinforces the savory, garlicky notes already present in the ranch seasoning.
1/4 teaspoon black pepper — Black pepper adds a subtle warmth and rounds out the overall seasoning of the filling.
How to Make Bacon Ranch Stuffed Pepperoncini (Step-by-Step)
This recipe comes together quickly and requires no special equipment beyond a mixing bowl and a piping bag or zip-top bag. Here’s exactly how to make it from start to finish.
Step 1: Prep the Pepperoncini
Drain the pepperoncini from their jar and gently pat them dry with paper towels. Removing excess moisture helps the filling adhere better and prevents the finished appetizer from becoming watery or diluting the ranch flavor.
Step 2: Deseed the Peppers
Using a small paring knife, make a lengthwise slit down one side of each pepperoncini, being careful not to cut all the way through. Carefully use the tip of the knife or a small spoon to remove the seeds and membrane from inside each pepper, creating a hollow pocket ready to be filled.
Step 3: Mix the Base Filling
In a mixing bowl, combine the softened cream cheese, grated Parmesan, ranch seasoning, garlic powder, and black pepper. Stir everything together until fully combined and smooth. Using softened cream cheese here is key, as cold cream cheese will be difficult to mix evenly and pipe later on.
Step 4: Fold in the Bacon and Herbs
Add the finely chopped crispy bacon, parsley, and chives to the cream cheese mixture. Gently fold everything together until the bacon and herbs are evenly distributed throughout the filling.
Step 5: Load the Piping Bag
Transfer the bacon ranch filling into a piping bag fitted with a wide round or star tip, or simply use a zip-top bag with one corner snipped off. This makes filling each pepperoncini quick and mess-free.
Step 6: Fill the Pepperoncini
Carefully pipe the filling into each prepared pepperoncini, gently squeezing the bag and filling from the opening you created. Fill each pepper generously so the filling is visible and slightly mounded at the opening.
Step 7: Arrange on a Platter
Once all the pepperoncini are filled, arrange them on a serving platter. For the best presentation, position them cut-side up so the colorful filling is visible.
Step 8: Chill Before Serving
Refrigerate the stuffed pepperoncini for at least 30 minutes before serving. This resting time allows the filling to firm up slightly, making the peppers easier to pick up and eat, while also giving the flavors time to meld together.
Step 9: Garnish and Serve
Just before serving, garnish the platter with a little extra crispy bacon, a sprinkle of Parmesan, and a scattering of fresh chives for an extra pop of color and flavor. Serve chilled or at room temperature.
Tips for the Best Stuffed Pepperoncini
Make sure the cream cheese is fully softened. Cold cream cheese is difficult to mix smoothly and will make piping the filling much harder. Let it sit at room temperature for about 30 minutes to an hour before starting.
Cook the bacon until very crispy. Bacon that’s just barely cooked can turn soft and chewy once mixed into the creamy filling. Cooking it until deeply crispy ensures it retains some crunch and texture in the finished appetizer.
Pat the pepperoncini dry. Excess moisture on the peppers can make the filling slide around or become watery, so take an extra minute to pat them dry with paper towels after draining.
Choose peppers of a similar size. Selecting pepperoncini that are roughly the same size makes for a more visually appealing platter and ensures each pepper holds a similar amount of filling.
Don’t skip the chilling step. While it might be tempting to serve them right away, chilling the stuffed peppers for at least 30 minutes helps the filling set up, making them much easier to eat without the filling squeezing out.
Use a piping bag for a cleaner presentation. While you could stuff the peppers with a small spoon, a piping bag or zip-top bag with the corner snipped off makes the process faster, neater, and results in a more polished, professional-looking appetizer.
Make it ahead of time. These stuffed pepperoncini can be assembled up to a day in advance, covered, and refrigerated until you’re ready to garnish and serve, making them an excellent stress-free party appetizer.
How to Store Bacon Ranch Stuffed Pepperoncini
Because this appetizer contains cream cheese and cooked bacon, it should always be stored in the refrigerator, whether before or after serving. Once assembled, store the stuffed pepperoncini in an airtight container or tightly covered platter in the refrigerator for up to 3 to 4 days. If you’re prepping ahead for a party, it’s best to add the fresh herb garnish just before serving to keep everything looking bright and fresh.
These are not intended to be frozen, as the texture of both the cream cheese filling and the pickled peppers will suffer significantly after thawing, becoming watery and losing their pleasant texture.
If serving at a party, keep in mind general food safety guidelines: this appetizer should not sit out at room temperature for more than about 2 hours, since it contains dairy. If you’re serving a large batch over an extended period, consider setting out smaller portions and replenishing from the refrigerator as needed.
Ways to Serve Bacon Ranch Stuffed Pepperoncini
This appetizer is delicious on its own, but here are some of the best ways to work it into a larger spread.
Game-day spreads — Add these stuffed pepperoncini to your game-day appetizer lineup alongside wings, dips, and other finger foods for a tangy, creamy contrast to heavier, saucier snacks.
Holiday appetizer trays — These make a beautiful, colorful addition to a holiday appetizer table, offering guests a lighter, tangier bite among richer holiday dishes.
Charcuterie and grazing boards — Nestle the stuffed pepperoncini among cured meats, cheeses, crackers, and olives for an eye-catching, flavor-packed addition to any charcuterie board.
Potluck and party platters — Since they can be made ahead and travel well when chilled, these are a great option to bring to a potluck or party without last-minute prep.
Alongside cocktails — The tangy, briny, savory flavor of these stuffed peppers pairs especially well with cocktails, beer, or a glass of crisp white wine.
As part of a low-carb snack spread — Pair with other low-carb appetizers like deviled eggs, cheese cubes, and cured meats for a spread that fits keto or low-carb diets.
Simple everyday snacking — You don’t need a party as an excuse. These stuffed pepperoncini make a satisfying, protein-rich snack any day of the week.
Frequently Asked Questions
Can I make these ahead of time? Yes. These stuffed pepperoncini can be fully assembled up to a day in advance and stored covered in the refrigerator. For the best presentation, add the fresh herb and bacon garnish just before serving.
What if I can’t find mild pepperoncini? Regular pepperoncini found in most grocery stores are typically mild by nature. If you’d like more heat, you can substitute a portion of the peppers with pickled banana peppers or a spicier pickled pepper variety.
Can I use a different cheese instead of Parmesan? Yes. Shredded cheddar, crumbled feta, or grated Pecorino Romano can all be used in place of or alongside the Parmesan for a different flavor profile.
Do I have to use a piping bag? No. While a piping bag or zip-top bag with the corner snipped off makes filling the peppers faster and neater, you can also use a small spoon or butter knife to fill each pepper by hand.
Can I make a vegetarian version? Yes. Simply omit the bacon, or substitute a plant-based bacon alternative or crumbled cooked mushroom for a similar smoky, savory element.
How far in advance should I chill them before serving? At minimum, chill the stuffed pepperoncini for 30 minutes before serving so the filling firms up. If made further in advance, they can be chilled for several hours or overnight.
Can I use homemade ranch seasoning instead of a store-bought packet? Absolutely. If you prefer to make your own, combine dried dill, parsley, chives, garlic powder, onion powder, and a pinch of salt and pepper to replicate the flavor of a store-bought ranch seasoning packet.
How long do these stay fresh in the refrigerator? Properly stored in an airtight container, these stuffed pepperoncini will stay fresh for up to 3 to 4 days in the refrigerator.
Can I freeze stuffed pepperoncini? Freezing isn’t recommended, as both the cream cheese filling and the pickled peppers tend to become watery and lose their texture after thawing.
Final Thoughts
These Bacon Ranch Stuffed Pepperoncini prove that a handful of simple, flavorful ingredients can come together to create an appetizer that feels far more impressive than the effort it actually takes. The combination of tangy pickled peppers, rich and creamy ranch-seasoned filling, smoky crispy bacon, and fresh herbs creates a bite that’s bursting with flavor in every mouthful. Whether you’re serving them at a party, adding them to a charcuterie board, or simply craving a savory, low-carb snack, this recipe is guaranteed to become a go-to favorite that disappears from the platter almost as fast as you can set it down.
Print
Bacon Ranch Stuffed Pepperoncini
Ingredients
This recipe uses simple, easy-to-find ingredients that combine to create a rich, flavorful filling.
24 mild pickled pepperoncini peppers — Look for pepperoncini in the pickle or condiment aisle of your grocery store, often sold whole in jars. Choose peppers that are relatively uniform in size for easy stuffing and a consistent presentation.
8 oz cream cheese, softened — Cream cheese forms the rich, creamy base of the filling. Make sure it’s fully softened to room temperature so it mixes smoothly without lumps.
4 slices bacon, cooked until crispy and finely chopped — Crispy bacon adds smoky, savory flavor and a satisfying textural contrast to the creamy filling. Cooking it until very crispy, rather than just done, ensures it holds its crunch even after mixing into the cream cheese.
1/4 cup grated Parmesan cheese — Parmesan adds a salty, nutty, umami-rich flavor that deepens the overall taste of the filling.
1 tablespoon ranch seasoning — Ranch seasoning mix brings that classic herby, garlicky, tangy ranch flavor everyone loves, without needing a dozen separate spices.
1 tablespoon fresh parsley, finely chopped — Fresh parsley adds a pop of color and a light, fresh, slightly peppery flavor.
1 tablespoon fresh chives, finely chopped — Chives contribute a mild, oniony flavor that complements the ranch seasoning beautifully.
1/4 teaspoon garlic powder — A little extra garlic powder reinforces the savory, garlicky notes already present in the ranch seasoning.
1/4 teaspoon black pepper — Black pepper adds a subtle warmth and rounds out the overall seasoning of the filling.
Instructions
Drain the pepperoncini from their jar and gently pat them dry with paper towels. Removing excess moisture helps the filling adhere better and prevents the finished appetizer from becoming watery or diluting the ranch flavor.
Using a small paring knife, make a lengthwise slit down one side of each pepperoncini, being careful not to cut all the way through. Carefully use the tip of the knife or a small spoon to remove the seeds and membrane from inside each pepper, creating a hollow pocket ready to be filled.
In a mixing bowl, combine the softened cream cheese, grated Parmesan, ranch seasoning, garlic powder, and black pepper. Stir everything together until fully combined and smooth. Using softened cream cheese here is key, as cold cream cheese will be difficult to mix evenly and pipe later on.
Add the finely chopped crispy bacon, parsley, and chives to the cream cheese mixture. Gently fold everything together until the bacon and herbs are evenly distributed throughout the filling.
Transfer the bacon ranch filling into a piping bag fitted with a wide round or star tip, or simply use a zip-top bag with one corner snipped off. This makes filling each pepperoncini quick and mess-free.
Carefully pipe the filling into each prepared pepperoncini, gently squeezing the bag and filling from the opening you created. Fill each pepper generously so the filling is visible and slightly mounded at the opening.
Once all the pepperoncini are filled, arrange them on a serving platter. For the best presentation, position them cut-side up so the colorful filling is visible.
Refrigerate the stuffed pepperoncini for at least 30 minutes before serving. This resting time allows the filling to firm up slightly, making the peppers easier to pick up and eat, while also giving the flavors time to meld together.
Just before serving, garnish the platter with a little extra crispy bacon, a sprinkle of Parmesan, and a scattering of fresh chives for an extra pop of color and flavor. Serve chilled or at room temperature.






