

Opening Description
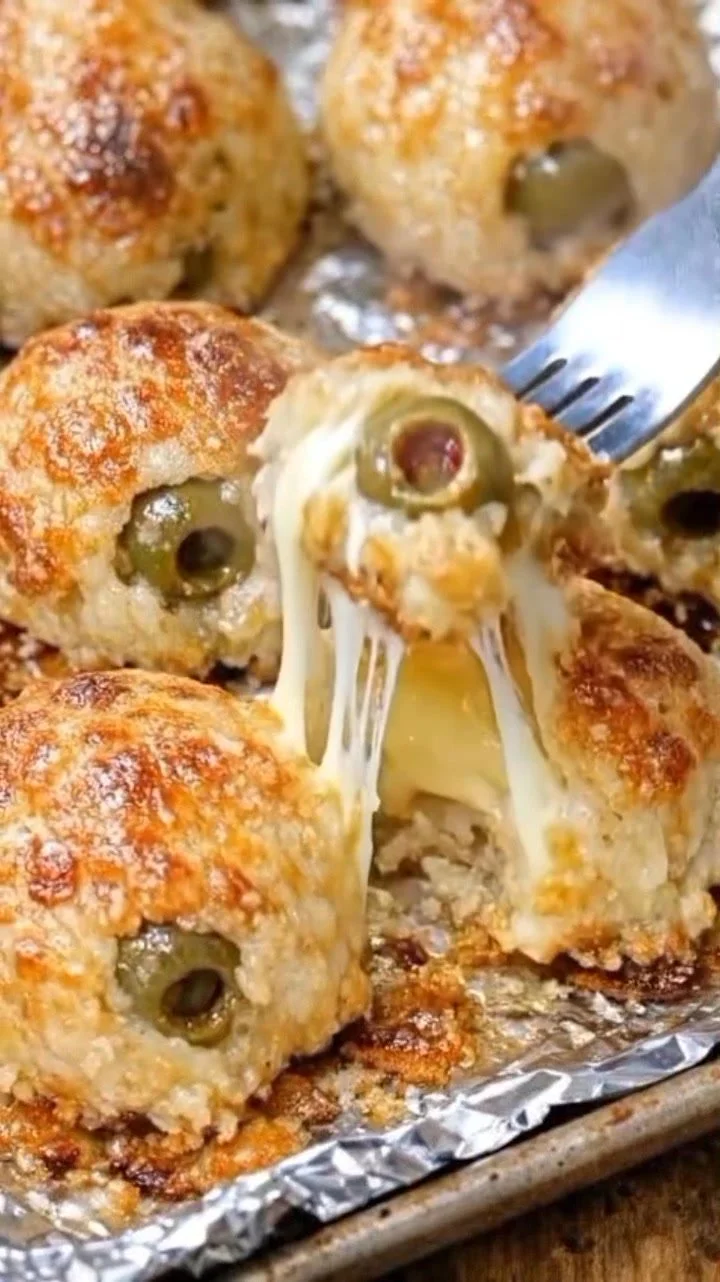
Dive into a symphony of flavor and texture that unfolds with each delightful bite of Cheesy Olive Bites. Imagine tearing through a golden, crispy exterior that gives way to a soft, creamy, and oh-so-cheesy filling. The moment you pop one in your mouth, the unmistakable tang of green olives mingles with the richness of melted cheddar and Parmesan, creating a culinary experience that dances on your palate. It’s a party for your taste buds, a perfect balance of savory goodness wrapped in a cloud of cheesy warmth.
Each bite offers a satisfying crunch, the aroma of garlic and spices wafting through the air, enticing everyone around you. Guests will be lured in by the warm, inviting scent that fills your kitchen. Whether they’re devouring these on game day, at a cozy family gathering, or as a standout appetizer at a holiday party, Cheesy Olive Bites never fail to impress. They not only taste divine but also stir up that warm feeling of connectedness that only good food can inspire.
Why You’ll Love This Recipe
Cheesy Olive Bites effortlessly steal the spotlight on any appetizer platter, bringing a unique twist to your culinary repertoire. Their unparalleled taste offers a delightful combination of cheesy goodness with the briny punch of olives, making every mouthful a flavor explosion that lingers in the mind long after the last bite. These incredible bites are undeniably versatile, serving as a perfect party snack, a hearty hors d’oeuvre, or even a comforting treat for a cozy movie night at home.
What makes this recipe stand out is its simplicity and quick preparation. In less than half an hour, you can create a gourmet-inspired dish that impresses guests as much as it satisfies your own cravings. Packed with delightful textures and flavors, these bites are sure to be a conversation starter and a favorite among friends and family. Plus, the best part? They’re completely customizable—feel free to swap out the cheeses, mix in herbs, or experiment with different varieties of olives to put your personal stamp on this irresistible treat.
Preparation Phase & Tools to Use
Creating your Cheesy Olive Bites requires minimal tools, ensuring a straightforward cooking experience that maximizes your time in the kitchen. Here’s what you’ll need:
- Mixing Bowl: A large bowl allows for mixing all ingredients effortlessly, giving you enough space to work with the dough.
- Baking Tray: A lined baking tray provides a non-stick surface and helps evenly distribute heat, ensuring those delectable bites become crisp and golden.
- Parchment Paper: Lining your baking tray with parchment paper makes for easy cleanup and prevents sticking, allowing your Cheesy Olive Bites to slide off effortlessly without any fuss.
- Tablespoon or Cookie Scoop: For portioning out the dough around each olive, using an accurate scooping tool makes the process simple and helps ensure uniform sizes for even cooking.
Preparation tips to keep in mind:
- Make sure your butter is softened to room temperature, ensuring it blends smoothly into your mixture.
- Use shredded cheese rather than block cheese to achieve that gooey, melted texture you want in every bite.
Ingredients for Cheesy Olive Bites
Gathering fresh, delicious ingredients is key to elevating your Cheesy Olive Bites. Here’s what you’ll need:
- 1 cup shredded cheese (cheddar or mozzarella): Both cheeses create a creamy and melty interior, but don’t hesitate to explore a blend for unique flavor profiles.
- 1/2 cup Parmesan cheese, grated: Adds a nutty flavor and a delightful richness that pairs beautifully with the other components.
- 3/4 cup all-purpose flour: Provides the structure for your bites; aim for just the right amount for the perfect consistency.
- 2 tbsp butter, softened: Enables the dough to bind and lends a rich flavor.
- 1 tsp garlic powder: Infuses the bites with a savory aroma that enhances every taste.
- 1/2 tsp paprika: Offers a subtle hint of smokiness and a touch of color.
- 1/2 tsp black pepper: Adds necessary warmth without overpowering the dish.
- 1 jar green olives (pitted & drained): The star of the show! Make sure to choose high-quality olives for the best results.
Feel free to swap out green olives for black olives or even sun-dried tomatoes for a twist. Experimenting with the cheeses can give you a unique flavor experience, too—consider using pepper jack for an added kick!
How to Make Cheesy Olive Bites
With your ingredients at the ready, let’s transform them into irresistible Cheesy Olive Bites. Follow these simple steps for a rewarding cooking experience:
-
Make the Dough: In a large mixing bowl, combine the shredded cheese, grated Parmesan, flour, softened butter, garlic powder, paprika, and black pepper. Use a wooden spoon or spatula to mix until a soft dough forms, ensuring all ingredients are well incorporated.
-
Shape the Bites: Take a small portion of the dough, about the size of a tablespoon. Flatten it gently in your hand and wrap it around each olive, rolling it into a ball. Ensure the olive is fully encased in the dough for a beautiful surprise when bitten into.
-
Bake: Preheat your oven to 180°C / 350°F. Arrange your dough-wrapped olives on a lined baking tray, leaving space between each to allow for expansion. Bake them for 15–20 minutes or until they turn golden brown and the aroma fills your home with warmth.
-
Serve: Once they’ve baked to perfection, let the bites cool slightly before indulging. Enjoy them warm for the ultimate taste sensation!
Chef’s Notes & Helpful Tips
- Make-Ahead Tips: You can prepare the dough a day in advance. Store it wrapped in plastic wrap in the refrigerator. Just allow it to come to room temperature before shaping the bites on baking day.
- Cooking Alternatives: If you’re looking for a quicker option, toss these bites in an air fryer at 190°C / 375°F for about 12–15 minutes until golden brown. This method yields delightful crispiness!
- Customization Ideas: Spice things up by adding fresh herbs like oregano or basil, or incorporate diced jalapeños for a flavorful kick. You could even switch to different cheeses for unique flavor combinations!
Common Mistakes to Avoid
When crafting your Cheesy Olive Bites, a few common pitfalls may hinder your culinary success:
- Overworking the Dough: Mixing too much can lead to tough bites. Stir just until combined for that tender, melt-in-your-mouth texture.
- Not Draining Olives Properly: Excess moisture can lead to soggy bites. Ensure your olives are well-drained and patted dry before wrapping them in dough.
- Skipping Parchment Paper: Forgoing this step can cause the bites to stick to the tray. Always use parchment to prevent sticky situations.
What to Serve With Cheesy Olive Bites
Your Cheesy Olive Bites shine on their own, but they pair superbly with a variety of accompaniments for a complete feast. Here are some ideas:
- Marinara Sauce: The classic pairing for an added layer of flavor. Dunking your bites into rich, tangy marinara makes each bite even more satisfying.
- Hummus: A scoop of creamy hummus offers a delightful contrast to the cheesy crunch. Opt for classic, roasted red pepper, or garlic-infused varieties!
- Guacamole: The creamy richness of guacamole complements the olive bites beautifully, making for a refreshing combination.
- Cheese Platter: Create a visually stunning arrangement with assorted cheeses, meats, crackers, and fresh fruit to impress your guests.
- Fresh Salad: A light, crisp salad balances the richness of the bites. Consider arugula with a citrus vinaigrette for a refreshing contrast.
- Breadsticks: For a filling and tasty pairing, serve these bites alongside warm, buttery breadsticks.
- Pickles: The sharp acidity of pickles offers a zesty contrast to the cheesy bites, enhancing their flavors.
- Spicy Mustard: A touch of mustard adds a delightful tangy twist that complements the savory notes of the olives.
Storage & Reheating Instructions
Leftover Cheesy Olive Bites can be stored with ease. Place them in an airtight container in the refrigerator, where they’ll stay fresh for up to four days. For longer storage, you can freeze them; simply arrange the cooked bites in a single layer on a baking sheet and freeze until solid. Then transfer them to a freezer-safe container, where they’ll keep for up to three months.
To reheat, pop them back into a preheated oven at 180°C / 350°F for about 10-12 minutes. This method ensures they regain their crispy, crunchy exterior while warming through perfectly.
Estimated Nutrition Information
While indulging in Cheesy Olive Bites, be mindful that each serving has approximately:
- Calories: 175
- Protein: 7g
- Carbohydrates: 12g
- Fat: 12g
- Fiber: 1g
Please note that nutritional values may vary based on ingredient choices and portion sizes.
FAQs
1. Can I use different types of cheese?
Absolutely! Feel free to mix and match cheeses to your liking. Goat cheese, feta, or even gouda would create intriguing flavor profiles.
2. Are there gluten-free options available?
Certainly! Substitute all-purpose flour with gluten-free flour or almond flour to cater to gluten-sensitive guests, ensuring the proportions remain balanced.
3. How can I spice these up?
If you’re craving a bit more heat, add crushed red pepper flakes to the dough or mix in diced jalapeños along with the olives for an extra kick!
4. Can I pre-make these bites?
Definitely! Shape them into balls, place them on a baking tray, cover with plastic wrap, and store in the refrigerator overnight before baking.
5. What can I do with leftover olives?
Leftover olives make a fantastic addition to salads, pasta dishes, or can be paired with antipasto platters, adding delightful flavor to any dish.
Conclusion
You have all the tools, tips, and enthusiasm needed to make your own Cheesy Olive Bites that will leave everyone asking for seconds. So, roll up your sleeves and dive into this delightful recipe. Experience the rich flavors and textures that promise to transport you and your guests into a world of savory bliss. Gather your loved ones, prepare a batch, and enjoy the heartwarming joy that only homemade treats can bring. Your next gathering deserves these delicious bites, so embrace the culinary journey today!
Print
Cheesy Olive Bites
- Total Time: 30 minutes
- Yield: 4 servings 1x
- Diet: Vegetarian
Description
Cheesy Olive Bites offer a delightful combination of creamy melted cheeses wrapped around tangy green olives, creating a perfect appetizer for any occasion.
Ingredients
- 1 cup shredded cheese (cheddar or mozzarella)
- 1/2 cup Parmesan cheese, grated
- 3/4 cup all-purpose flour
- 2 tbsp butter, softened
- 1 tsp garlic powder
- 1/2 tsp paprika
- 1/2 tsp black pepper
- 1 jar green olives (pitted & drained)
Instructions
- Make the Dough: In a large mixing bowl, combine the shredded cheese, grated Parmesan, flour, softened butter, garlic powder, paprika, and black pepper. Use a wooden spoon or spatula to mix until a soft dough forms.
- Shape the Bites: Take a small portion of the dough, flatten it gently in your hand, and wrap it around each olive, rolling it into a ball.
- Bake: Preheat your oven to 180°C / 350°F. Arrange dough-wrapped olives on a lined baking tray, leaving space between each. Bake for 15–20 minutes until golden brown.
- Serve: Let the bites cool slightly before enjoying them warm.
Notes
Feel free to customize with different cheeses or add herbs for extra flavor. These bites can also be made in advance and refrigerated before baking.
- Prep Time: 10 minutes
- Cook Time: 20 minutes
- Category: Appetizer
- Method: Baking
- Cuisine: American
Nutrition
- Serving Size: 2 bites
- Calories: 175
- Sugar: 1g
- Sodium: 500mg
- Fat: 12g
- Saturated Fat: 7g
- Unsaturated Fat: 3g
- Trans Fat: 0g
- Carbohydrates: 12g
- Fiber: 1g
- Protein: 7g
- Cholesterol: 30mg






