Cranberry Orange Scones: Buttery, Flaky, and Glazed with Fresh Orange
These Cranberry Orange Scones are buttery, tender, and filled with bright citrus flavor and tart cranberries, making them a delicious homemade treat for breakfast, brunch, or an afternoon coffee break. Each scone has golden edges, a soft, delicate crumb, juicy cranberry pieces, and a sweet orange glaze that adds the perfect finishing touch. Made with simple baking ingredients and fresh orange zest, this easy cranberry orange scone recipe brings bakery-style flavor straight to your kitchen.
If you love the combination of sweet and tart flavors, these homemade scones are sure to become a favorite. Fresh cranberries add a beautiful pop of color and a pleasantly tangy taste, while orange zest gives the dough a refreshing citrus aroma. Cold grated butter creates a tender texture, and heavy cream adds richness without making the dough overly complicated to prepare.
The best part is that you do not need a stand mixer, special equipment, or advanced baking skills. With a few simple techniques and about 20 minutes in the oven, you can make eight delicious scones that look beautiful on a breakfast table or holiday brunch spread.
Serve them warm with a cup of coffee, tea, or hot chocolate, or arrange them on a platter for Thanksgiving breakfast, Christmas morning, or a cozy weekend gathering. Whether you bake them for your family or share them with friends, these Cranberry Orange Scones deliver a wonderful balance of buttery richness, fruity tartness, and sweet citrus flavor.
Why You Will Love These Cranberry Orange Scones
1. A Delicious Sweet and Tart Flavor Combination
Cranberries and oranges are a classic pairing for a reason. Fresh cranberries bring a sharp, fruity tartness that balances the sweetness of the dough and glaze.
Orange zest adds fragrant citrus oils that make every bite taste fresh and vibrant. The orange juice in the dough and glaze reinforces that flavor without overpowering the cranberries.
2. Buttery, Tender Texture
The secret to tender scones is cold butter and gentle mixing. Grated frozen butter distributes easily throughout the flour, creating small pockets of fat that help produce a delicate crumb.
As the scones bake, the butter melts and contributes richness, while the baking powder helps the dough rise. The result is a lightly crisp exterior with a soft, tender center.
3. Easy Homemade Bakery-Style Baking
You do not need to make yeast dough, wait for a rise, or spend hours preparing these scones.
The dough comes together in one bowl for the dry ingredients and another for the wet ingredients. Once combined, it is shaped into a circle, cut into wedges, and baked.
This straightforward process makes the recipe approachable for beginners and experienced home bakers alike.
4. A Beautiful Orange Glaze
The simple orange glaze gives these scones their finishing touch. Powdered sugar and fresh orange juice create a smooth, sweet topping that complements the tart cranberries.
Drizzle it over slightly cooled scones for a pretty bakery-style presentation. The glaze adds sweetness without requiring a complicated frosting or filling.
5. Perfect for Breakfast, Brunch, and Holidays
These scones are versatile enough for everyday breakfasts but attractive enough for special occasions.
Serve them at a holiday brunch, package them as a homemade food gift, or enjoy one with your afternoon coffee. Their cranberry-orange flavor is especially popular during fall and winter, although they can be baked whenever fresh cranberries are available.
Ingredients for Cranberry Orange Scones
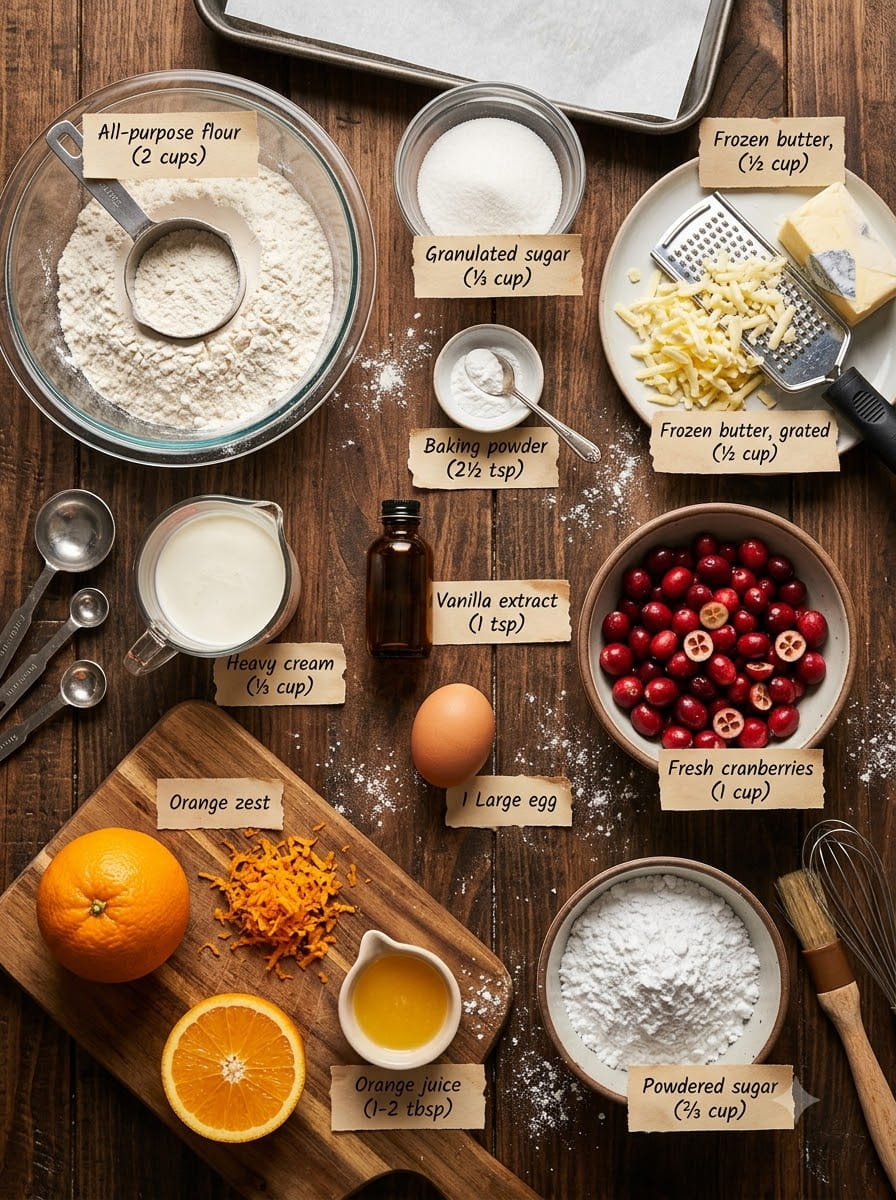
This recipe makes approximately eight scones.
For the Scones
- 2 cups all-purpose flour
- ⅓ cup granulated sugar
- 2½ teaspoons baking powder
- ½ cup unsalted butter, 113 g, frozen and grated
- ⅓ cup heavy cream
- 1 teaspoon vanilla extract
- 1 cup fresh cranberries, halved
- Zest of 1 orange
- 1 large egg
- 1–2 tablespoons orange juice, as needed
For the Orange Glaze
- ⅔ cup powdered sugar
- 1–2 tablespoons fresh orange juice
Each ingredient plays an important role in creating the scones’ flavor and texture. Measuring accurately and keeping the butter cold will help you achieve the best results.
Ingredient Tips for the Best Results
Choose Fresh Cranberries
Fresh cranberries provide a bright, tart flavor and attractive red color. Rinse them, remove any damaged berries, dry them thoroughly, and cut them in half before adding them to the dough.
Dry cranberries are easier to distribute evenly and help prevent unnecessary moisture from affecting the dough.
Frozen cranberries can also work. Use them straight from the freezer and avoid thawing them first, which can release excess liquid and color.
Use Fresh Orange Zest
Orange zest gives the scones much of their distinctive citrus aroma.
Wash and dry the orange before zesting. Use a fine grater to remove only the orange outer layer, avoiding the white pith underneath because it can taste bitter.
Freshly grated zest distributes beautifully throughout the flour mixture and provides more fragrant flavor than relying on orange juice alone.
Keep the Butter Frozen
Frozen grated butter is one of the most useful techniques in this recipe.
Grating the butter creates small pieces that can be incorporated into the flour quickly. Keeping those pieces cold helps preserve the texture of the dough and reduces the chance of the butter becoming greasy before baking.
If the dough becomes warm or sticky while shaping, refrigerate it for 10–15 minutes before baking.
Measure the Flour Correctly
Too much flour can make scones dry and heavy.
For the most consistent results, use a kitchen scale if available. If measuring with cups, fluff the flour first, spoon it into the measuring cup, and level the top without packing it down.
Use Heavy Cream
Heavy cream adds richness and helps bring the dough together. Its fat content contributes to a tender crumb and a satisfying buttery flavor.
Add the orange juice gradually because the amount of liquid needed can vary slightly depending on the flour and the moisture in the other ingredients.
How to Make Cranberry Orange Scones
Follow these steps for tender scones with golden edges and a bright orange glaze.
Step 1: Preheat the Oven
Preheat your oven to 400°F (200°C).
Line a baking sheet with parchment paper. This prevents the scones from sticking and makes cleanup easier.
If your kitchen is warm, keep the grated butter refrigerated until you are ready to mix the dough.
Step 2: Combine the Dry Ingredients
In a large mixing bowl, whisk together the all-purpose flour, granulated sugar, baking powder, and orange zest.
Whisking distributes the baking powder evenly and helps prevent concentrated pockets of leavening in the finished scones.
Rub the orange zest gently into the sugar with your fingertips if you want to release more of its fragrant citrus oils before adding the remaining dry ingredients.
Step 3: Add the Frozen Butter
Add the frozen grated butter to the flour mixture.
Use a fork or pastry cutter to distribute the butter throughout the flour until the mixture resembles coarse crumbs.
Work quickly so the butter stays cold. The mixture does not need to become completely uniform; small pieces of butter are desirable.
Avoid melting the butter or mixing until the dough becomes greasy. The cold butter contributes to the tender texture of the finished scones.
Step 4: Mix the Wet Ingredients
In a separate bowl, whisk together the heavy cream, egg, vanilla extract, and one tablespoon of orange juice.
Reserve the remaining orange juice in case the dough needs a little additional moisture.
Whisk just until the egg is incorporated and the mixture is smooth. There is no need to beat it until fluffy.
Step 5: Make the Dough
Pour the wet ingredients into the dry mixture.
Add the halved cranberries and gently stir with a spatula or fork until a shaggy dough begins to form.
The dough should hold together when pressed but should not look wet or runny. If it seems too dry to come together, add the remaining orange juice a little at a time.
Avoid overmixing. Excessive mixing can develop too much gluten in the flour and make the scones tougher rather than tender.
Step 6: Shape the Dough
Lightly flour a clean work surface and transfer the dough onto it.
Gently bring the dough together with your hands and shape it into a circle approximately 1 inch thick.
Do not knead it like bread dough. A few gentle presses are enough to form the circle.
Use a sharp knife or bench scraper to cut the circle into eight wedges. If the dough becomes soft or sticky, chill it briefly before cutting.
Step 7: Arrange the Scones
Place the wedges on the prepared baking sheet, leaving space between them so the heat can circulate.
For more defined edges, use a sharp knife and avoid pressing down too heavily when cutting.
If desired, refrigerate the shaped scones for about 10–15 minutes before baking. This can help the butter stay cold, particularly in a warm kitchen.
Step 8: Bake Until Golden
Bake the scones at 400°F (200°C) for approximately 18–22 minutes.
The edges should turn lightly golden, and the centers should look set rather than wet. Baking time can vary depending on the size of the wedges and the characteristics of your oven.
If the scones are browning too quickly on the bottom, move the baking sheet to a higher oven rack for the remaining time.
Remove them from the oven when baked through and allow them to cool on the baking sheet for a few minutes before transferring them to a wire rack.
Step 9: Prepare the Orange Glaze
While the scones cool, add the powdered sugar to a small bowl.
Gradually whisk in one tablespoon of fresh orange juice until the mixture is smooth. Add more juice a little at a time until you reach your preferred consistency.
For a thicker glaze that sits visibly on top of the scones, use less juice. For a thinner drizzle, add a few extra drops.
The glaze should be smooth enough to drizzle from a spoon without becoming watery.
Step 10: Glaze and Serve
Allow the scones to cool until warm or nearly at room temperature before adding the glaze.
Drizzle the orange glaze over the tops, allowing some to run naturally down the sides.
Let the glaze set briefly before serving if you prefer a neater presentation.
Enjoy the scones with coffee, tea, or your favorite breakfast beverage.
The Secret to Tender, Flaky Scones
Great scones depend on how the butter, flour, and liquid interact.
When cold butter is distributed throughout the flour, it remains in small pieces until the scones enter the oven. During baking, the butter melts, contributing richness and helping create a tender crumb.
The baking powder releases gas as the dough heats, helping the scones rise. Meanwhile, the egg and cream provide moisture and structure.
The key is to handle the dough gently. Unlike bread dough, scone dough should not be kneaded extensively. Too much handling can warm the butter and develop excess gluten, resulting in a tougher texture.
A slightly shaggy dough is perfectly acceptable. It does not need to look perfectly smooth before shaping.
Common Mistakes to Avoid
Overmixing the Dough
Mix only until the ingredients come together. A few visible crumbs are better than a dough that has been worked excessively.
Overmixing can lead to dense, chewy scones instead of a tender crumb.
Using Warm Butter
Soft butter blends too thoroughly into the flour and can make the dough greasy.
Frozen grated butter is convenient because it distributes quickly while remaining cold. If the butter begins to soften during preparation, chill the mixture before proceeding.
Adding Too Much Orange Juice
Orange juice adds flavor and moisture, but too much can make the dough sticky and difficult to shape.
Begin with one tablespoon in the wet mixture and add the second tablespoon only if needed. The goal is a cohesive dough that holds its shape.
Skipping the Cooling Period
Adding glaze to piping-hot scones can cause it to melt and run off rather than forming a delicate coating.
Let the scones cool slightly before glazing.
Baking at the Wrong Temperature
A properly preheated oven helps the butter melt at the right stage and allows the baking powder to work effectively.
Use an oven thermometer if your oven tends to run hot or cold.
Fresh Cranberries vs. Dried Cranberries
Fresh and dried cranberries can both be used, but they create different results.
Fresh cranberries have a bright, tart flavor and release some moisture during baking. Cutting them in half helps distribute their flavor throughout the scones.
Dried cranberries are sweeter, chewier, and less juicy. They can be substituted if fresh cranberries are unavailable, although the finished scones will have a different flavor and texture.
If using dried cranberries, start with a similar volume and check the dough consistency before adding any extra liquid. Some dried cranberries may benefit from a brief soak, but drain them thoroughly if you choose to do so.
Fresh orange zest pairs well with either option.
Delicious Ways to Customize Your Scones
The original cranberry orange combination is delicious on its own, but a few additions can create new variations.
White Chocolate Cranberry Orange Scones
Add a small amount of white chocolate chips to the dough for a sweeter, dessert-like version.
White chocolate provides creamy sweetness that balances the tart cranberries and bright orange zest.
Almond Cranberry Orange Scones
Add a small amount of sliced almonds for a delicate crunch and nutty flavor.
Almonds pair particularly well with citrus and berries. Keep the quantity modest so they do not make the wedges difficult to shape.
Cinnamon Orange Scones
Add a little ground cinnamon to the dry ingredients for a warm, cozy flavor.
This variation works well for autumn breakfasts and holiday brunches.
Orange Vanilla Scones
Increase the emphasis on vanilla for a softer, bakery-style aroma. The orange glaze will still provide a bright citrus finish.
Extra-Citrusy Scones
For a stronger orange flavor, increase the orange zest slightly while keeping the liquid amount controlled.
Using more zest rather than a large amount of extra juice helps intensify the aroma without making the dough too wet.
What to Serve with Cranberry Orange Scones
These scones are delicious on their own, but they also pair beautifully with a range of breakfast and brunch favorites.
Coffee or espresso: The slightly bitter flavor of coffee balances the sweet glaze and fruity cranberries.
Black or herbal tea: A warm cup of tea makes these scones an ideal afternoon snack.
Fresh fruit: Serve with orange segments, berries, or sliced apples for a colorful breakfast plate.
Greek yogurt: Plain or lightly sweetened yogurt provides a creamy contrast to the buttery scones.
Scrambled eggs: For a more substantial breakfast, pair a scone with eggs and fresh fruit.
Clotted cream or softened butter: A small amount can make the scones feel extra indulgent, although the orange glaze already provides sweetness.
For a festive brunch, arrange the scones on a platter with fruit, coffee, tea, and a few other simple breakfast dishes.
How to Store Cranberry Orange Scones
Allow the scones to cool completely before storing them.
Place them in an airtight container and keep them refrigerated if you want to extend their freshness, particularly because the recipe contains egg and cream. For the best texture, enjoy them within approximately three to four days.
If stacking the scones, place parchment paper between the layers to help protect the glaze.
To reheat, warm an unglazed or glazed scone in a low oven until heated through. A brief warming period can restore some of the fresh-baked texture, although the glaze may soften.
For longer storage, freeze the cooled scones in a freezer-safe container or bag. Freeze them in a single layer initially if possible, then stack them with parchment between the pieces.
For the best quality, use frozen baked scones within about two to three months. Thaw them in the refrigerator or at room temperature for a short period, then warm gently if desired.
You can also freeze the shaped, unbaked wedges before baking. Arrange them on a tray until firm, transfer them to a freezer-safe container, and bake from frozen, adding extra baking time as needed. Check that the centers are fully baked before serving.
Frequently Asked Questions
Can I Make Cranberry Orange Scones Ahead of Time?
Yes. You can prepare the shaped dough wedges ahead of time and refrigerate them briefly before baking. For longer preparation, freeze the unbaked wedges and bake them when needed.
You can also bake the scones a day ahead and glaze them after they have cooled.
Why Are My Scones Dry?
Dry scones may result from too much flour, insufficient liquid, or overbaking.
Measure the flour carefully and add orange juice gradually until the dough comes together. Check the scones toward the beginning of the baking window and remove them when the centers are set.
Why Did My Scones Spread Too Much?
The butter may have become too warm, or the dough may have contained too much liquid.
Keep the butter cold, avoid adding unnecessary juice, and chill the shaped wedges briefly if the dough feels soft.
Can I Use Bottled Orange Juice?
Yes, bottled orange juice can be used in the dough and glaze. However, fresh orange juice and freshly grated zest usually provide a brighter citrus aroma.
If possible, use fresh zest even when bottled juice is more convenient.
Can I Make Smaller Scones?
Yes. Divide the dough into smaller wedges, but reduce the baking time and check them early. Smaller pieces bake faster than the original eight large wedges.
Can I Skip the Glaze?
Absolutely. The scones have plenty of flavor from the butter, cranberries, vanilla, and orange zest.
For a less sweet version, serve them plain or brush the tops with a little cream before baking for a simple golden finish.
Can I Use Salted Butter?
Yes, although unsalted butter gives you more control over the seasoning. If using salted butter, the recipe will still work, but the flavor may be slightly different.
How Do I Know When the Scones Are Done?
Look for lightly golden edges, a set center, and a surface that no longer appears wet. The exact baking time depends on the size of the scones and your oven.
Avoid waiting until the entire surface becomes deeply brown, as this can dry out the crumb.
Why Cranberry Orange Scones Are Perfect for the Holidays
Cranberry orange is a particularly appealing flavor combination during fall and winter. The bright red cranberries and fragrant orange zest make these scones look festive without requiring elaborate decoration.
They are a wonderful addition to Thanksgiving breakfast, Christmas brunch, holiday potlucks, or a relaxed weekend morning when you want something special to serve with coffee.
The recipe is also easy to scale for gatherings. Prepare multiple batches, keeping the butter cold and working with one batch at a time for the most consistent texture.
For a beautiful presentation, arrange the glazed scones on a white platter and add a few orange slices or fresh cranberries around the edges. Keep decorative fruit separate from the dough and glaze so the finished scones remain easy to serve.
Homemade scones also make a thoughtful food gift. Once completely cooled and the glaze has set, package them carefully in a bakery box or food-safe container.
Final Thoughts
These Cranberry Orange Scones are a wonderful combination of buttery richness, tender texture, tart cranberries, and bright citrus flavor. The fresh orange zest adds fragrance, the grated cold butter helps create a delicate crumb, and the simple orange glaze gives every wedge a sweet finishing touch.
With easy-to-find ingredients and straightforward preparation, this recipe is suitable for beginner bakers and experienced home cooks alike. The dough comes together quickly, the scones bake in about 18–22 minutes, and the result is a homemade treat that feels special without requiring hours in the kitchen.
Serve them warm with coffee or tea, add them to a holiday brunch spread, or freeze a batch for a future breakfast. However you enjoy them, these homemade Cranberry Orange Scones bring a little bakery-style comfort to your table.
If you love easy homemade baking recipes, save this recipe for your next breakfast or brunch and share it with someone who loves the combination of cranberries and fresh orange.
Print
Cranberry Orange Scones
Ingredients
This recipe makes approximately eight scones.
For the Scones
- 2 cups all-purpose flour
- ⅓ cup granulated sugar
- 2½ teaspoons baking powder
- ½ cup unsalted butter, 113 g, frozen and grated
- ⅓ cup heavy cream
- 1 teaspoon vanilla extract
- 1 cup fresh cranberries, halved
- Zest of 1 orange
- 1 large egg
- 1–2 tablespoons orange juice, as needed
For the Orange Glaze
- ⅔ cup powdered sugar
- 1–2 tablespoons fresh orange juice
Each ingredient plays an important role in creating the scones’ flavor and texture. Measuring accurately and keeping the butter cold will help you achieve the best results.
Instructions
Follow these steps for tender scones with golden edges and a bright orange glaze.
Step 1: Preheat the Oven
Preheat your oven to 400°F (200°C).
Line a baking sheet with parchment paper. This prevents the scones from sticking and makes cleanup easier.
If your kitchen is warm, keep the grated butter refrigerated until you are ready to mix the dough.
Step 2: Combine the Dry Ingredients
In a large mixing bowl, whisk together the all-purpose flour, granulated sugar, baking powder, and orange zest.
Whisking distributes the baking powder evenly and helps prevent concentrated pockets of leavening in the finished scones.
Rub the orange zest gently into the sugar with your fingertips if you want to release more of its fragrant citrus oils before adding the remaining dry ingredients.
Step 3: Add the Frozen Butter
Add the frozen grated butter to the flour mixture.
Use a fork or pastry cutter to distribute the butter throughout the flour until the mixture resembles coarse crumbs.
Work quickly so the butter stays cold. The mixture does not need to become completely uniform; small pieces of butter are desirable.
Avoid melting the butter or mixing until the dough becomes greasy. The cold butter contributes to the tender texture of the finished scones.
Step 4: Mix the Wet Ingredients
In a separate bowl, whisk together the heavy cream, egg, vanilla extract, and one tablespoon of orange juice.
Reserve the remaining orange juice in case the dough needs a little additional moisture.
Whisk just until the egg is incorporated and the mixture is smooth. There is no need to beat it until fluffy.
Step 5: Make the Dough
Pour the wet ingredients into the dry mixture.
Add the halved cranberries and gently stir with a spatula or fork until a shaggy dough begins to form.
The dough should hold together when pressed but should not look wet or runny. If it seems too dry to come together, add the remaining orange juice a little at a time.
Avoid overmixing. Excessive mixing can develop too much gluten in the flour and make the scones tougher rather than tender.
Step 6: Shape the Dough
Lightly flour a clean work surface and transfer the dough onto it.
Gently bring the dough together with your hands and shape it into a circle approximately 1 inch thick.
Do not knead it like bread dough. A few gentle presses are enough to form the circle.
Use a sharp knife or bench scraper to cut the circle into eight wedges. If the dough becomes soft or sticky, chill it briefly before cutting.
Step 7: Arrange the Scones
Place the wedges on the prepared baking sheet, leaving space between them so the heat can circulate.
For more defined edges, use a sharp knife and avoid pressing down too heavily when cutting.
If desired, refrigerate the shaped scones for about 10–15 minutes before baking. This can help the butter stay cold, particularly in a warm kitchen.
Step 8: Bake Until Golden
Bake the scones at 400°F (200°C) for approximately 18–22 minutes.
The edges should turn lightly golden, and the centers should look set rather than wet. Baking time can vary depending on the size of the wedges and the characteristics of your oven.
If the scones are browning too quickly on the bottom, move the baking sheet to a higher oven rack for the remaining time.
Remove them from the oven when baked through and allow them to cool on the baking sheet for a few minutes before transferring them to a wire rack.
Step 9: Prepare the Orange Glaze
While the scones cool, add the powdered sugar to a small bowl.
Gradually whisk in one tablespoon of fresh orange juice until the mixture is smooth. Add more juice a little at a time until you reach your preferred consistency.
For a thicker glaze that sits visibly on top of the scones, use less juice. For a thinner drizzle, add a few extra drops.
The glaze should be smooth enough to drizzle from a spoon without becoming watery.
Step 10: Glaze and Serve
Allow the scones to cool until warm or nearly at room temperature before adding the glaze.
Drizzle the orange glaze over the tops, allowing some to run naturally down the sides.
Let the glaze set briefly before serving if you prefer a neater presentation.
Enjoy the scones with coffee, tea, or your favorite breakfast beverage.