

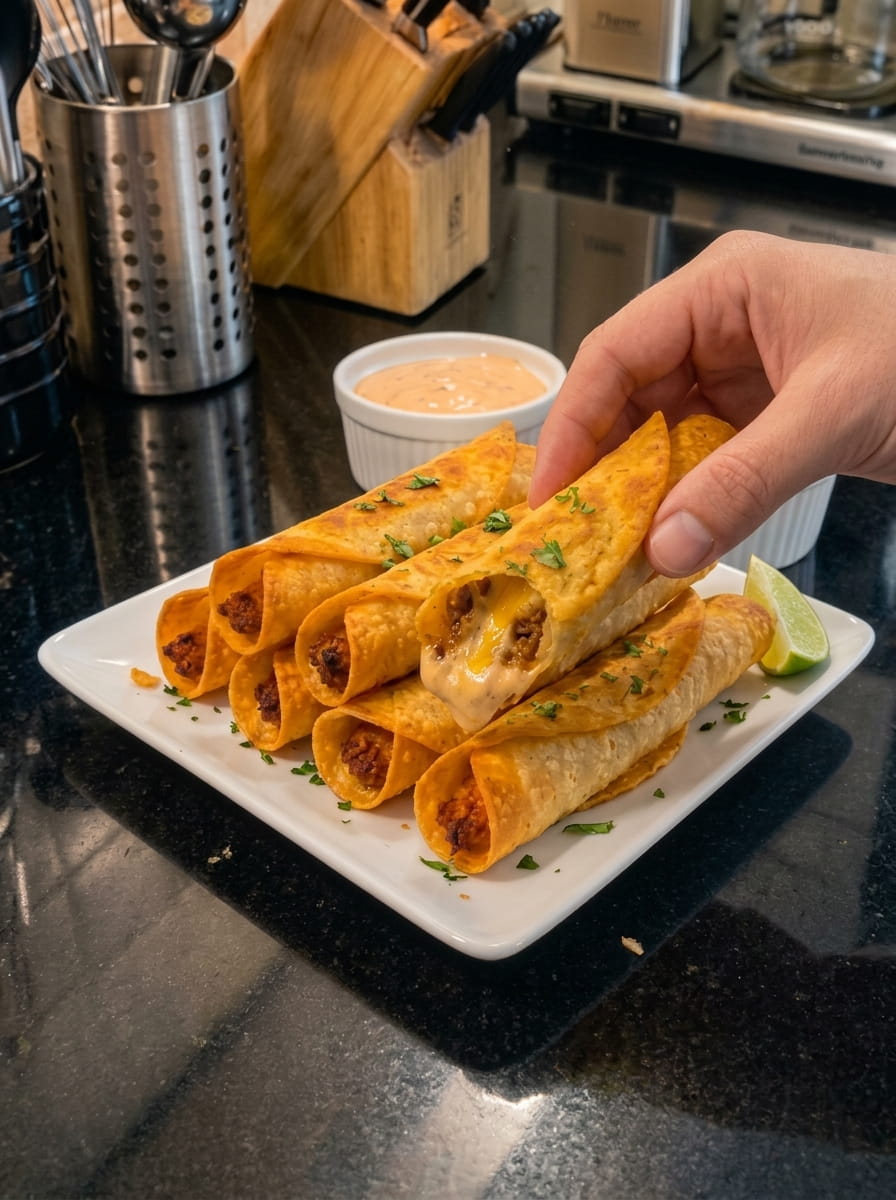
Crispy Beef Taquitos: The Ultimate Cheesy, Crunchy Recipe You’ll Make on Repeat
If you’re searching for a recipe that delivers restaurant-quality flavor with minimal effort, these crispy beef taquitos are about to become your new go-to. Packed with seasoned ground beef, melted cheddar, and a rich swirl of cream cheese, then rolled tight and fried to golden perfection, these taquitos check every box: crunchy exterior, gooey interior, and a smoky chipotle dipping sauce that ties the whole dish together.
Whether you’re planning a game day spread, a quick weeknight dinner, or an appetizer platter for your next gathering, this crispy beef taquitos recipe is endlessly versatile, freezer-friendly, and guaranteed to disappear fast. Below, you’ll find everything you need — from ingredient breakdowns to pro tips, storage tricks, and answers to the most common questions — to make the best homemade taquitos you’ve ever tasted.
Why You’ll Love This Crispy Beef Taquitos Recipe
There’s a reason taquitos have earned a permanent spot on restaurant appetizer menus and in home kitchens across the country. They’re small, handheld, endlessly customizable, and satisfy that craving for something crispy and savory all at once. Here’s why this particular recipe stands out:
- Big flavor, simple ingredients. You likely already have most of what you need in your pantry and fridge.
- Restaurant-style texture at home. Frying the tortillas gives you that shatteringly crisp shell you can’t fully replicate in the oven or air fryer (though we’ll cover those methods too).
- Cheesy, creamy filling. The combination of melted cheddar and softened cream cheese creates a rich, luscious filling that holds together beautifully inside each tortilla.
- A dipping sauce worth writing home about. The smoky chipotle sour cream sauce is tangy, creamy, and just spicy enough to make every bite more exciting.
- Perfect for meal prep and freezing. Make a big batch, freeze what you don’t eat, and fry them up fresh whenever the craving strikes.
If you’re a fan of Mexican-inspired comfort food, this recipe belongs in the same rotation as your favorite quesadillas, flautas, and loaded nachos.
What Are Taquitos, Exactly?
Taquitos — sometimes called flautas, depending on the region and tortilla size — are rolled tortillas filled with a savory mixture (often shredded chicken, beef, or cheese) and then fried until crisp. The name “taquito” translates to “little taco,” and that’s essentially what you’re making: a tightly rolled, bite-sized taco that’s fried instead of folded and grilled.
The beauty of taquitos lies in their versatility. You can fill them with virtually anything — beans, chicken, cheese, or in this case, a rich beef and cheese blend — and customize the seasoning to your taste. This crispy beef taquitos recipe leans into bold Tex-Mex flavors, using classic taco seasoning combined with two kinds of cheese for maximum creaminess.
Ingredients You’ll Need
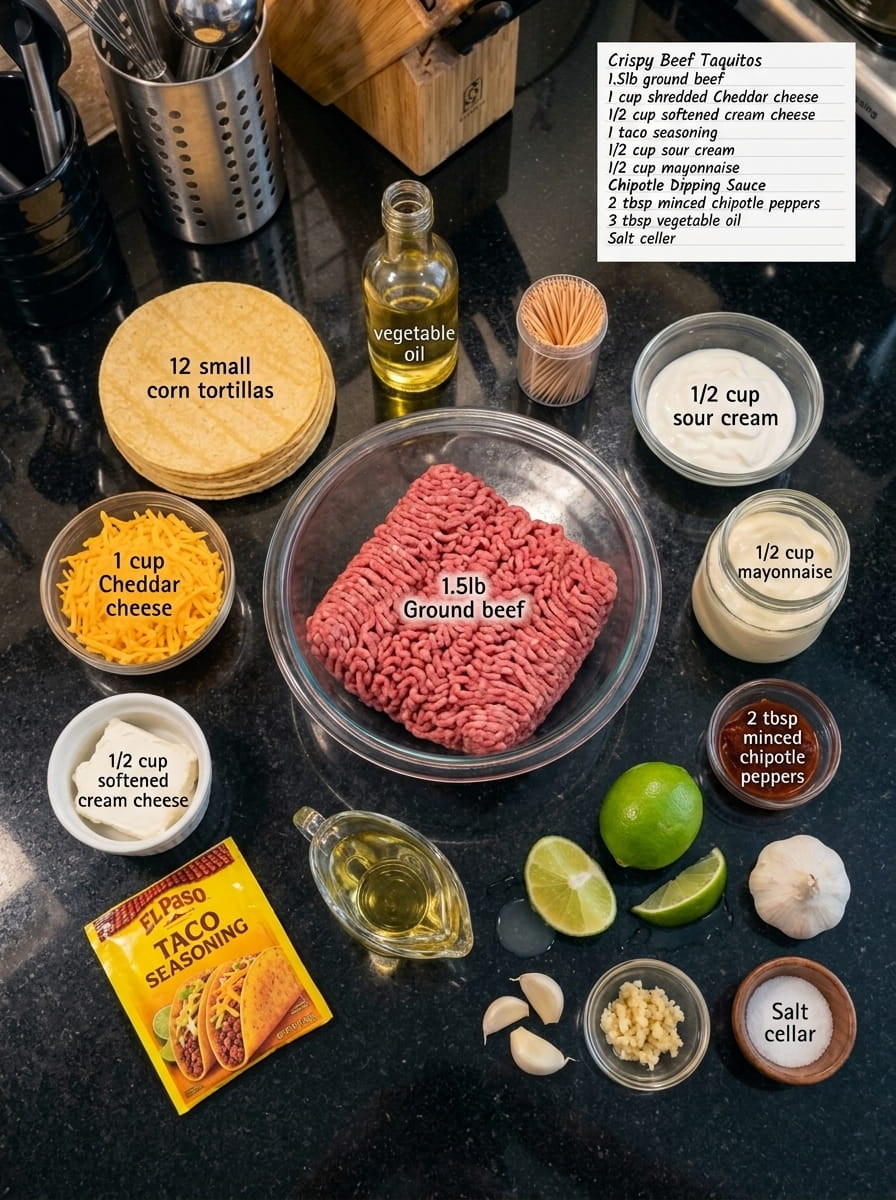
Here’s a closer look at what goes into these crispy beef taquitos and why each ingredient matters.
For the Beef and Cheese Filling
- 1½ lbs ground beef – The star of the filling. An 80/20 blend works well here since a little extra fat helps keep the filling moist and flavorful, though you can use leaner beef if you prefer.
- 1 cup shredded Cheddar cheese – Adds sharpness and that classic melty pull. Freshly shredded cheese melts more smoothly than pre-shredded bags, which contain anti-caking agents.
- ½ cup cream cheese, softened – This is the secret to the ultra-creamy texture. Cream cheese binds the filling together and prevents it from feeling dry once fried.
- 1 packet taco seasoning – A quick way to add a well-balanced blend of chili powder, cumin, garlic, and onion flavors. You can also make a homemade blend if you prefer to control the sodium and spice level.
- 12 small corn or flour tortillas – Corn tortillas offer a more traditional, slightly nutty flavor and crispier bite, while flour tortillas are more pliable and easier to roll tightly without cracking. Either works beautifully in this recipe.
- 3 tbsp vegetable oil – Used for pan-frying. You can substitute canola or avocado oil if you prefer a higher smoke point.
- Toothpicks – Essential for keeping the taquitos sealed shut while they fry.
For the Chipotle Dipping Sauce
- ½ cup sour cream – Provides tang and a cool, creamy base.
- ½ cup mayonnaise – Adds richness and helps balance the acidity of the sour cream and lime juice.
- 2 tbsp chipotle peppers in adobo sauce, minced – The star of the sauce. Chipotles in adobo bring smoky heat and deep flavor; adjust the quantity based on your spice tolerance.
- 1 tbsp lime juice – Freshly squeezed lime juice brightens the sauce and cuts through the richness.
- 1 clove garlic, minced – Adds a punch of savory depth.
- Salt, to taste – Rounds out and balances all the flavors.
Step-by-Step Instructions
Step 1: Brown the Beef
Heat a large skillet over medium-high heat and add the ground beef. Cook, breaking it into small crumbles with a wooden spoon or spatula, until it’s fully browned and no longer pink — this typically takes about 6–8 minutes. Once cooked, drain any excess grease from the pan to prevent the filling from becoming greasy.
Step 2: Season the Beef
Stir in the taco seasoning according to the instructions on the packet, usually along with a small splash of water. Cook for another 1–2 minutes, stirring frequently, until the beef is evenly coated and the seasoning has thickened slightly.
Step 3: Make It Creamy
Remove the skillet from the heat. This step matters — adding the cheese off the heat prevents it from breaking or turning oily. Mix in the softened cream cheese and shredded cheddar, stirring until everything is melted together into a rich, cohesive filling. The mixture should be creamy, thick, and easy to scoop.
Step 4: Warm the Tortillas
Warm the tortillas in the microwave for 20–30 seconds, or until soft and pliable. This step is crucial — cold tortillas crack and tear when rolled, which leads to filling leaking out during frying. If you don’t have a microwave handy, you can warm them briefly in a dry skillet instead.
Step 5: Fill and Roll
Spoon a portion of the beef mixture onto the lower third of each tortilla, being careful not to overfill — about 2–3 tablespoons per tortilla is usually right, depending on size. Roll each tortilla tightly, tucking as you go, and secure it with a toothpick to keep it from unraveling during frying.
Step 6: Make the Chipotle Dipping Sauce
While the taquitos rest, whisk together the sour cream, mayonnaise, minced chipotle peppers, lime juice, garlic, and salt in a small bowl until smooth and fully combined. Taste and adjust the seasoning or heat level as needed. Cover and refrigerate the sauce until you’re ready to serve — this also gives the flavors time to meld.
Step 7: Fry Until Golden
Heat the vegetable oil in a large skillet over medium-high heat. You’ll know the oil is ready when a small piece of tortilla sizzles immediately when dropped in. Place the taquitos seam-side down in the hot oil, working in batches if necessary to avoid overcrowding the pan. Fry for 2–3 minutes per side, turning carefully with tongs, until each taquito is evenly golden brown and crispy on all sides.
Step 8: Drain and Serve
Transfer the fried taquitos to a plate lined with paper towels to drain any excess oil. Let them rest for a minute or two, then carefully remove the toothpicks before serving. Serve immediately, piping hot, alongside the chilled chipotle dipping sauce.
Tips for the Crispiest Taquitos
Getting that perfect crunch takes a little technique. Keep these tips in mind:
- Don’t overfill. Overstuffed taquitos are harder to roll tightly and more likely to burst open in the hot oil.
- Warm your tortillas properly. Skipping this step is the number one cause of cracked, leaky taquitos.
- Fry seam-side down first. This helps seal the tortilla shut before you flip it, reducing the chance of unrolling.
- Maintain consistent oil temperature. Oil that’s too cool leads to greasy, soggy taquitos, while oil that’s too hot burns the outside before the inside heats through. Medium-high heat, around 350°F, is ideal.
- Fry in batches. Overcrowding the pan drops the oil temperature and leads to uneven cooking.
- Let them rest before serving. A brief rest on paper towels helps excess oil drain away, keeping the taquitos crisp rather than greasy.
Baked and Air Fryer Variations
While frying delivers the most authentic crispy texture, you can absolutely make lighter versions of these beef taquitos using your oven or air fryer.
Oven-Baked Method
Preheat your oven to 425°F. Arrange the rolled taquitos seam-side down on a parchment-lined baking sheet. Lightly brush or spray them with oil to help them crisp up and brown. Bake for 15–20 minutes, flipping halfway through, until golden and crisp.
Air Fryer Method
Preheat your air fryer to 400°F. Arrange the taquitos in a single layer in the basket, making sure they aren’t touching. Lightly spray them with oil and air fry for 8–10 minutes, flipping halfway through, until crispy and golden brown.
Both methods produce a slightly less crunchy result than pan-frying, but they’re excellent lower-mess, lower-oil alternatives that still deliver on flavor.
Ingredient Substitutions and Variations
One of the best things about this recipe is how easy it is to adapt. Here are some popular variations:
- Swap the protein. Shredded chicken, ground turkey, or seasoned black beans all work well in place of ground beef.
- Change the cheese. Monterey Jack, pepper jack, or a Mexican cheese blend can be used instead of, or alongside, the cheddar for a different flavor profile.
- Add vegetables. Finely diced onions, bell peppers, or roasted corn can be stirred into the beef mixture for added texture and flavor.
- Spice it up. Add a diced jalapeño or a pinch of cayenne to the beef mixture for extra heat.
- Make it milder. Reduce or omit the chipotle peppers in the dipping sauce, replacing them with a mild taco sauce or salsa if you’re serving a crowd that’s sensitive to spice.
What to Serve with Crispy Beef Taquitos
These taquitos are hearty enough to serve as a main dish but also shine as an appetizer or party snack. Here are a few serving ideas:
- Mexican rice and refried beans for a complete, satisfying dinner plate.
- A simple green salad with lime vinaigrette to balance the richness of the fried tortillas.
- Guacamole and pico de gallo as additional dipping options alongside the chipotle sauce.
- Elote (Mexican street corn) for a classic pairing that rounds out any taco-night spread.
- A cold Mexican lager or agua fresca to complement the smoky, savory flavors.
For game day, arrange the taquitos on a large platter with small bowls of chipotle sauce, guacamole, and salsa for a build-your-own dipping station that’s always a hit.
How to Store and Reheat Leftovers
If you happen to have leftovers — though they rarely last long — proper storage keeps them tasting fresh.
Refrigerating
Store cooled taquitos in an airtight container in the refrigerator for up to 3–4 days. To reheat, place them on a baking sheet in a 375°F oven for about 8–10 minutes, or use an air fryer at 375°F for 4–5 minutes, until heated through and re-crisped. Microwaving is not recommended, as it tends to make the tortillas soft and chewy rather than crispy.
Freezing Before Frying
For make-ahead convenience, you can freeze the rolled, uncooked taquitos. Arrange them in a single layer on a baking sheet and freeze until solid, about 1–2 hours, then transfer to a freezer-safe bag or container. They’ll keep well for up to 2 months. When ready to eat, fry them directly from frozen, adding an extra minute or two to the cooking time per side.
Freezing After Frying
You can also freeze fully cooked taquitos. Let them cool completely, then freeze in a single layer before transferring to a storage bag. Reheat from frozen in the oven or air fryer at 375°F for 12–15 minutes, until hot and crispy throughout.
The chipotle dipping sauce can be stored separately in an airtight container in the refrigerator for up to a week, making it easy to whip up a fresh batch of taquitos anytime without extra prep work.
Frequently Asked Questions
Can I use corn tortillas instead of flour tortillas? Yes. Corn tortillas are actually more traditional for taquitos and offer a firmer, slightly nuttier bite. Just be sure to warm them thoroughly before rolling, as corn tortillas crack more easily than flour tortillas if they’re not pliable.
Why do my taquitos keep unrolling while frying? This usually happens when the tortillas weren’t warmed enough before rolling, or when they’re overfilled. Using toothpicks and frying seam-side down first will also help keep them sealed shut.
Can I make these taquitos ahead of time? Absolutely. You can prepare the filling up to two days in advance and store it in the refrigerator, or roll the taquitos completely and refrigerate them for a few hours before frying. They also freeze exceptionally well, both before and after cooking.
What’s the best oil for frying taquitos? A neutral oil with a high smoke point works best, such as vegetable, canola, or avocado oil. These oils won’t overpower the flavor of the filling and can withstand the medium-high heat needed for frying.
Is there a way to make this recipe healthier? Baking or air frying instead of pan-frying reduces the overall oil content significantly while still producing a crisp, satisfying texture. You can also use lean ground beef or swap in ground turkey or chicken.
Can I make the dipping sauce less spicy? Yes, simply reduce the amount of chipotle peppers, or omit them and add a small amount of smoked paprika for a milder, smoky flavor without the heat.
What’s the difference between taquitos and flautas? The terms are often used interchangeably, but traditionally, flautas are made with larger flour tortillas and are slightly bigger, while taquitos are typically made with smaller corn tortillas. This recipe works well with either.
Final Thoughts
These crispy beef taquitos bring together everything that makes Mexican-inspired comfort food so satisfying: a rich, cheesy, well-seasoned filling; a perfectly crisp, golden shell; and a smoky, tangy dipping sauce that takes every bite to the next level. Whether you fry them the traditional way or opt for a lighter baked or air-fried version, this recipe is endlessly adaptable, easy to prep ahead, and always a hit at the table.
Make a batch for taco night, stash some in the freezer for busy weeknights, or serve them up for your next game day gathering — however you enjoy them, these taquitos are guaranteed to become a regular in your recipe rotation.
Print
Crispy Beef Taquitos
Ingredients
Here’s a closer look at what goes into these crispy beef taquitos and why each ingredient matters.
For the Beef and Cheese Filling
- 1½ lbs ground beef – The star of the filling. An 80/20 blend works well here since a little extra fat helps keep the filling moist and flavorful, though you can use leaner beef if you prefer.
- 1 cup shredded Cheddar cheese – Adds sharpness and that classic melty pull. Freshly shredded cheese melts more smoothly than pre-shredded bags, which contain anti-caking agents.
- ½ cup cream cheese, softened – This is the secret to the ultra-creamy texture. Cream cheese binds the filling together and prevents it from feeling dry once fried.
- 1 packet taco seasoning – A quick way to add a well-balanced blend of chili powder, cumin, garlic, and onion flavors. You can also make a homemade blend if you prefer to control the sodium and spice level.
- 12 small corn or flour tortillas – Corn tortillas offer a more traditional, slightly nutty flavor and crispier bite, while flour tortillas are more pliable and easier to roll tightly without cracking. Either works beautifully in this recipe.
- 3 tbsp vegetable oil – Used for pan-frying. You can substitute canola or avocado oil if you prefer a higher smoke point.
- Toothpicks – Essential for keeping the taquitos sealed shut while they fry.
For the Chipotle Dipping Sauce
- ½ cup sour cream – Provides tang and a cool, creamy base.
- ½ cup mayonnaise – Adds richness and helps balance the acidity of the sour cream and lime juice.
- 2 tbsp chipotle peppers in adobo sauce, minced – The star of the sauce. Chipotles in adobo bring smoky heat and deep flavor; adjust the quantity based on your spice tolerance.
- 1 tbsp lime juice – Freshly squeezed lime juice brightens the sauce and cuts through the richness.
- 1 clove garlic, minced – Adds a punch of savory depth.
- Salt, to taste – Rounds out and balances all the flavors.
Instructions
Heat a large skillet over medium-high heat and add the ground beef. Cook, breaking it into small crumbles with a wooden spoon or spatula, until it’s fully browned and no longer pink — this typically takes about 6–8 minutes. Once cooked, drain any excess grease from the pan to prevent the filling from becoming greasy.
Stir in the taco seasoning according to the instructions on the packet, usually along with a small splash of water. Cook for another 1–2 minutes, stirring frequently, until the beef is evenly coated and the seasoning has thickened slightly.
Remove the skillet from the heat. This step matters — adding the cheese off the heat prevents it from breaking or turning oily. Mix in the softened cream cheese and shredded cheddar, stirring until everything is melted together into a rich, cohesive filling. The mixture should be creamy, thick, and easy to scoop.
Warm the tortillas in the microwave for 20–30 seconds, or until soft and pliable. This step is crucial — cold tortillas crack and tear when rolled, which leads to filling leaking out during frying. If you don’t have a microwave handy, you can warm them briefly in a dry skillet instead.
Spoon a portion of the beef mixture onto the lower third of each tortilla, being careful not to overfill — about 2–3 tablespoons per tortilla is usually right, depending on size. Roll each tortilla tightly, tucking as you go, and secure it with a toothpick to keep it from unraveling during frying.
While the taquitos rest, whisk together the sour cream, mayonnaise, minced chipotle peppers, lime juice, garlic, and salt in a small bowl until smooth and fully combined. Taste and adjust the seasoning or heat level as needed. Cover and refrigerate the sauce until you’re ready to serve — this also gives the flavors time to meld.
Heat the vegetable oil in a large skillet over medium-high heat. You’ll know the oil is ready when a small piece of tortilla sizzles immediately when dropped in. Place the taquitos seam-side down in the hot oil, working in batches if necessary to avoid overcrowding the pan. Fry for 2–3 minutes per side, turning carefully with tongs, until each taquito is evenly golden brown and crispy on all sides.
Transfer the fried taquitos to a plate lined with paper towels to drain any excess oil. Let them rest for a minute or two, then carefully remove the toothpicks before serving. Serve immediately, piping hot, alongside the chilled chipotle dipping sauce.






