

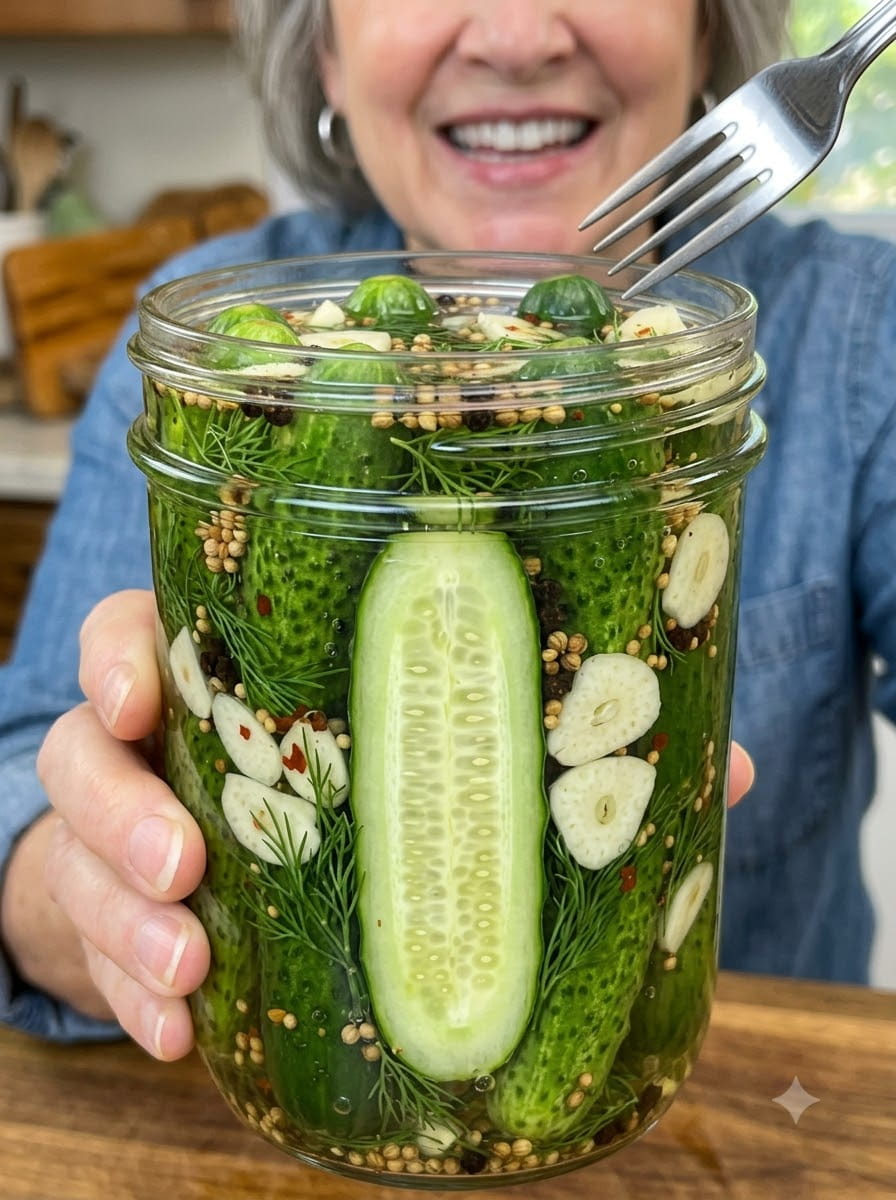
Crunchy Refrigerator Dill Pickles: The Easy, Classic Recipe You’ll Make Again and Again
If you’re craving that perfect classic dill pickle crunch — garlicky, tangy, and full of fresh herbal flavor — these Crunchy Refrigerator Dill Pickles are exactly what you need. Crisp cucumber spears or halves are packed with fresh dill, sliced garlic, and a simple blend of pickling spices, then submerged in a straightforward vinegar brine that delivers all the classic pickle flavor you love without any complicated canning process.
This recipe is the perfect starting point for anyone new to homemade pickling, and a reliable go-to for experienced picklers who want a quick, no-fuss classic dill pickle. Below, you’ll find a complete breakdown of this recipe, including ingredient details, step-by-step instructions, expert tips, storage guidance, and answers to frequently asked questions.
Why These Refrigerator Dill Pickles Are a Must-Make
Classic dill pickles are a staple for good reason, and this homemade version offers several advantages over store-bought jars:
- Real, fresh dill flavor. Using fresh dill sprigs rather than dried creates a brighter, more authentic pickle flavor than most commercial brands offer.
- Perfectly balanced garlic and tang. Six cloves of garlic infuse every jar with bold, classic pickle flavor that pairs beautifully with the tangy vinegar brine.
- The perfect crunchy texture. Using pickling cucumbers and a properly balanced brine ensures these pickles stay satisfyingly crisp from the first bite to the last.
- No canning equipment required. This is a true refrigerator pickle recipe — no water bath canner or specialized sealing equipment needed.
- Quick and easy. With just 15 minutes of prep and 5 minutes of cooking, this recipe comes together fast, even though the flavor benefits from a few days of resting time.
- Incredibly versatile. These pickles are the perfect all-purpose condiment, equally at home on burgers, sandwiches, charcuterie boards, or eaten straight from the jar.
If you’ve been wanting to try homemade pickling but weren’t sure where to start, this classic dill recipe is the perfect introduction — simple, reliable, and endlessly satisfying.
Understanding the Key Ingredients
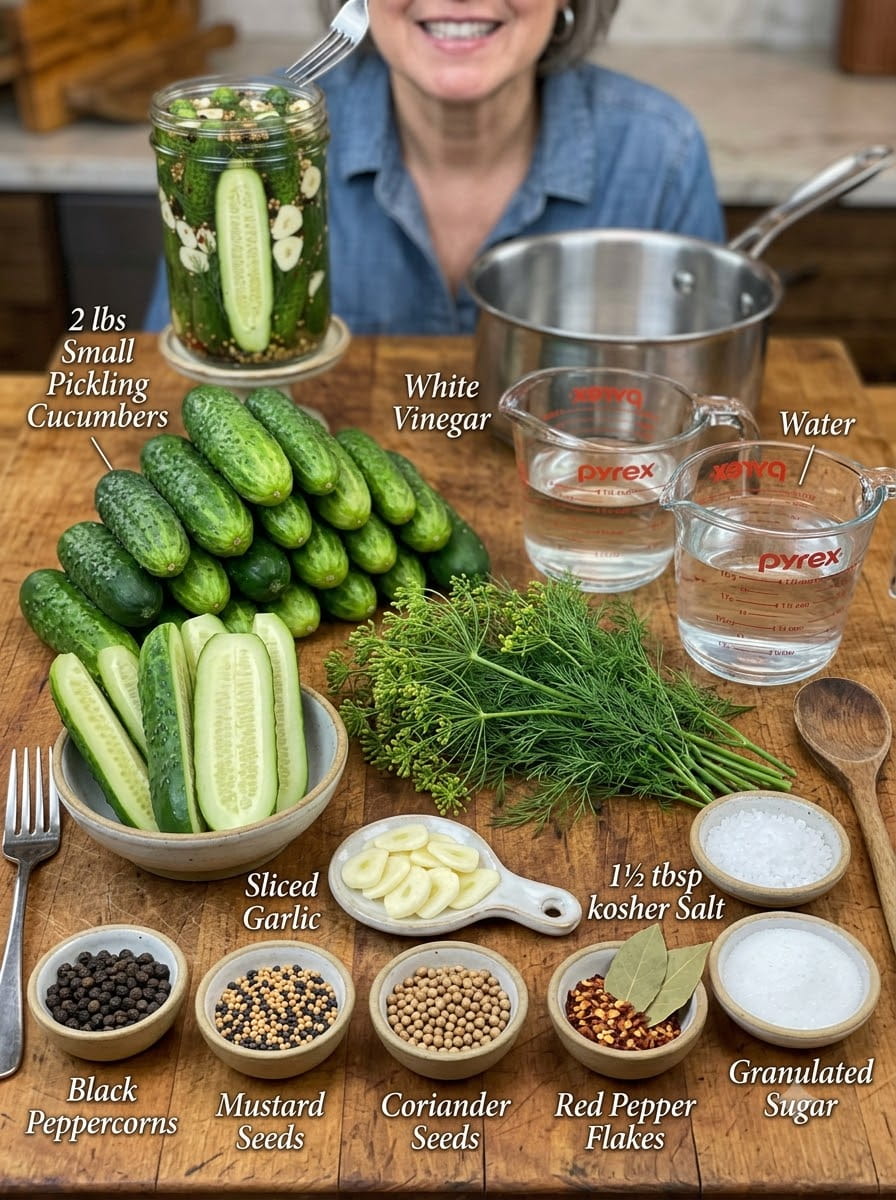
Let’s take a closer look at what goes into this recipe and why each ingredient matters.
The Pickles
- 2 lbs pickling cucumbers, cut into spears or halves – Pickling cucumbers, often labeled as Kirby cucumbers, are essential for this recipe thanks to their firm texture and thin skin, both of which contribute to that classic pickle crunch.
- 6 cloves garlic, thinly sliced – Infuse the pickles with bold, classic garlic flavor that becomes more pronounced the longer they sit in the brine.
- ½ cup fresh dill sprigs – The defining flavor of a classic dill pickle. Fresh dill offers a brighter, more aromatic flavor than dried dill alone could achieve.
- 1 tsp black peppercorns – Add a mild, peppery bite throughout the jar.
- 1 tsp mustard seeds – Contribute a subtle tang and pleasant textural pop, a classic addition in traditional pickle recipes.
- ½ tsp coriander seeds – Add a warm, slightly citrusy note that rounds out the overall spice blend.
- ½ tsp red pepper flakes – Add a gentle, background heat that complements the garlic and dill without overwhelming the classic pickle flavor.
- 2 bay leaves – Contribute a subtle herbal note that develops as the pickles sit in the brine.
The Brine
- 1½ cups white vinegar – Forms the tangy, acidic base of the brine, essential for both flavor and preservation.
- 1½ cups water – Balances the acidity of the vinegar, ensuring the brine isn’t overwhelmingly sharp.
- 1½ tbsp kosher salt – Essential for seasoning the brine and helping to draw moisture from the cucumbers as they pickle.
- 1 tbsp granulated sugar – Adds a touch of sweetness that helps balance the acidity of the vinegar, without making the pickles taste sweet.
Step-by-Step Instructions
Step 1: Prepare the Cucumbers
Wash the cucumbers thoroughly and trim a thin slice from both ends. Cut them into spears or halves, depending on your preference. Trimming the ends is a classic pickling step that some believe helps improve the final texture of the pickle.
Step 2: Pack the Jars
Pack the cucumbers tightly into clean glass jars, leaving enough room at the top for the pickling brine.
Step 3: Add the Aromatics
Divide the sliced garlic, fresh dill, black peppercorns, mustard seeds, coriander seeds, red pepper flakes, and bay leaves evenly between the jars.
Step 4: Make the Brine
In a medium saucepan, combine the white vinegar, water, kosher salt, and granulated sugar.
Step 5: Simmer the Brine
Bring the brine to a gentle simmer over medium heat, stirring until the salt and sugar have completely dissolved.
Step 6: Cool Slightly
Remove the saucepan from the heat and allow the brine to cool slightly before pouring it over the cucumbers.
Step 7: Pour Over the Cucumbers
Carefully pour the warm brine into the jars, completely covering the cucumbers.
Step 8: Release Air Bubbles
Gently tap the jars on the counter or use a clean utensil to release any trapped air bubbles, which helps ensure the brine fully surrounds the cucumbers.
Step 9: Cool and Seal
Allow the jars to cool to room temperature before sealing tightly.
Step 10: Refrigerate
Refrigerate for at least 24 hours before serving. For the best flavor and crunch, let the pickles rest for 2–3 days before enjoying.
Step 11: Serve
Serve chilled alongside burgers, sandwiches, barbecue, grilled meats, charcuterie boards, wraps, salads, or enjoy them straight from the jar as a crunchy snack.
Tips for the Best Refrigerator Dill Pickles
A few small techniques can make a noticeable difference in the final result:
- Use pickling cucumbers, not regular cucumbers. Pickling cucumbers have a firmer texture and thinner skin, both of which contribute to a crisper, more traditional pickle texture.
- Trim the ends of the cucumbers. This classic step is thought to help remove enzymes near the blossom end that can contribute to softer pickles.
- Use fresh dill for the best flavor. While dried dill can work in a pinch, fresh dill sprigs offer a brighter, more authentic classic pickle flavor.
- Pack the jars tightly. Fitting the cucumbers snugly into the jars helps ensure they stay fully submerged in the brine throughout the pickling process.
- Release trapped air bubbles. Gently tapping the jars helps the brine settle evenly around the cucumbers, ensuring more consistent pickling.
- Be patient. While these pickles are technically ready after 24 hours, letting them rest for 2–3 days results in a much more developed, well-rounded flavor.
Ingredient Substitutions and Variations
This recipe is easy to adapt based on what you have on hand or your personal taste preferences:
- Adjust the garlic. For a milder pickle, reduce the garlic to 3–4 cloves; for an even bolder flavor, increase it to 8–10 cloves.
- Swap the vinegar. Apple cider vinegar can be used in place of white vinegar for a slightly different, more rounded flavor.
- Change the sweetener. Honey can be used in place of granulated sugar for a more natural sweetness.
- Adjust the heat. Increase the red pepper flakes for a spicier version, or omit them entirely for a completely classic, mild dill pickle.
- Add extra aromatics. A few slices of fresh jalapeño or a small piece of horseradish root can be added to the jars for extra complexity.
How to Use Crunchy Refrigerator Dill Pickles
Part of what makes this recipe so valuable is its classic, all-purpose versatility. Here are just a few ways to enjoy these pickles:
- On burgers – Add a few slices for that essential tangy, crunchy pickle bite.
- On sandwiches – Layer them onto deli sandwiches or serve whole spears on the side.
- At barbecues – Serve alongside grilled meats, ribs, and pulled pork for a classic, tangy contrast.
- On charcuterie boards – Add a few spears to your spread for a crunchy, palate-cleansing element.
- In salads – Chop and toss into potato salad, pasta salad, or egg salad for extra crunch and tang.
- Straight from the jar – Enjoy as a classic, crunchy snack any time the craving strikes.
How to Store Refrigerator Dill Pickles
These pickles store exceptionally well in the refrigerator, making them a convenient staple to keep on hand at all times.
- Store in airtight glass jars in the refrigerator for up to 3–4 weeks.
- Keep the cucumbers fully submerged in the brine to maintain their flavor and crunch over time.
- Always use a clean utensil when serving to help prevent contamination and extend their shelf life.
- Avoid freezing these pickles, as the texture of the cucumbers will not hold up well after thawing.
Frequently Asked Questions
Do I need special canning equipment for this recipe? No, this is a true refrigerator pickle recipe, meaning there’s no need for a water bath canner or specialized sealing equipment. Simply use clean glass jars with tight-fitting lids.
How long do these pickles last? When stored in airtight jars in the refrigerator, these pickles will keep well for up to 3–4 weeks, with the flavor continuing to develop over the first several days.
Can I use regular cucumbers instead of pickling cucumbers? While regular cucumbers can technically be used, pickling cucumbers (such as Kirby cucumbers) are strongly recommended, as their firmer texture and thinner skin result in a much crisper, more traditional pickle.
Can I use dried dill instead of fresh? Fresh dill is recommended for the brightest, most authentic flavor, but dried dill can be used in a pinch — use about one-third of the amount called for, since dried herbs are more concentrated than fresh.
How spicy are these pickles? As written, these pickles have a very mild heat level from the red pepper flakes. For a completely classic, non-spicy pickle, simply omit the red pepper flakes; for more heat, increase the amount or add sliced fresh chili peppers.
Why did my pickles turn out soft instead of crunchy? Soft pickles are often the result of using cucumbers that weren’t fresh, skipping the use of pickling cucumbers specifically, or allowing the brine to sit at too warm a temperature before refrigerating. Using fresh pickling cucumbers and chilling the jars promptly helps ensure a crisp result.
Can I cut the cucumbers into chips instead of spears? Yes, cucumber chips or rounds work well in this recipe and may pickle slightly faster than spears due to their thinner shape, though the overall process remains the same.
Can I double this recipe for a larger batch? Yes, this recipe scales easily. Simply double or triple the ingredients as needed, keeping the same ratios intact, and divide the mixture among enough jars to hold the increased volume.
Final Thoughts
These Crunchy Refrigerator Dill Pickles bring together everything that makes a classic dill pickle so beloved: bold garlic flavor, bright fresh dill, and that essential satisfying crunch. Whether you’re topping a burger, serving alongside barbecue, or snacking straight from the jar, this simple, reliable recipe delivers everything you want in a homemade pickle.
Make a batch, let the flavors develop, and keep a jar stocked in your refrigerator at all times — these classic, crunchy dill pickles are guaranteed to become a staple you’ll turn to again and again.
Print
Garlic Dill Pickles
Ingredients
Let’s take a closer look at what goes into this recipe and why each ingredient matters.
The Pickles
- 2 lbs pickling cucumbers, cut into spears or halves – Pickling cucumbers, often labeled as Kirby cucumbers, are essential for this recipe thanks to their firm texture and thin skin, both of which contribute to that classic pickle crunch.
- 6 cloves garlic, thinly sliced – Infuse the pickles with bold, classic garlic flavor that becomes more pronounced the longer they sit in the brine.
- ½ cup fresh dill sprigs – The defining flavor of a classic dill pickle. Fresh dill offers a brighter, more aromatic flavor than dried dill alone could achieve.
- 1 tsp black peppercorns – Add a mild, peppery bite throughout the jar.
- 1 tsp mustard seeds – Contribute a subtle tang and pleasant textural pop, a classic addition in traditional pickle recipes.
- ½ tsp coriander seeds – Add a warm, slightly citrusy note that rounds out the overall spice blend.
- ½ tsp red pepper flakes – Add a gentle, background heat that complements the garlic and dill without overwhelming the classic pickle flavor.
- 2 bay leaves – Contribute a subtle herbal note that develops as the pickles sit in the brine.
The Brine
- 1½ cups white vinegar – Forms the tangy, acidic base of the brine, essential for both flavor and preservation.
- 1½ cups water – Balances the acidity of the vinegar, ensuring the brine isn’t overwhelmingly sharp.
- 1½ tbsp kosher salt – Essential for seasoning the brine and helping to draw moisture from the cucumbers as they pickle.
- 1 tbsp granulated sugar – Adds a touch of sweetness that helps balance the acidity of the vinegar, without making the pickles taste sweet.
Instructions
Wash the cucumbers thoroughly and trim a thin slice from both ends. Cut them into spears or halves, depending on your preference. Trimming the ends is a classic pickling step that some believe helps improve the final texture of the pickle.
Pack the cucumbers tightly into clean glass jars, leaving enough room at the top for the pickling brine.
Divide the sliced garlic, fresh dill, black peppercorns, mustard seeds, coriander seeds, red pepper flakes, and bay leaves evenly between the jars.
In a medium saucepan, combine the white vinegar, water, kosher salt, and granulated sugar.
Bring the brine to a gentle simmer over medium heat, stirring until the salt and sugar have completely dissolved.
Remove the saucepan from the heat and allow the brine to cool slightly before pouring it over the cucumbers.
Carefully pour the warm brine into the jars, completely covering the cucumbers.
Gently tap the jars on the counter or use a clean utensil to release any trapped air bubbles, which helps ensure the brine fully surrounds the cucumbers.
Allow the jars to cool to room temperature before sealing tightly.
Refrigerate for at least 24 hours before serving. For the best flavor and crunch, let the pickles rest for 2–3 days before enjoying.
Serve chilled alongside burgers, sandwiches, barbecue, grilled meats, charcuterie boards, wraps, salads, or enjoy them straight from the jar as a crunchy snack.






