

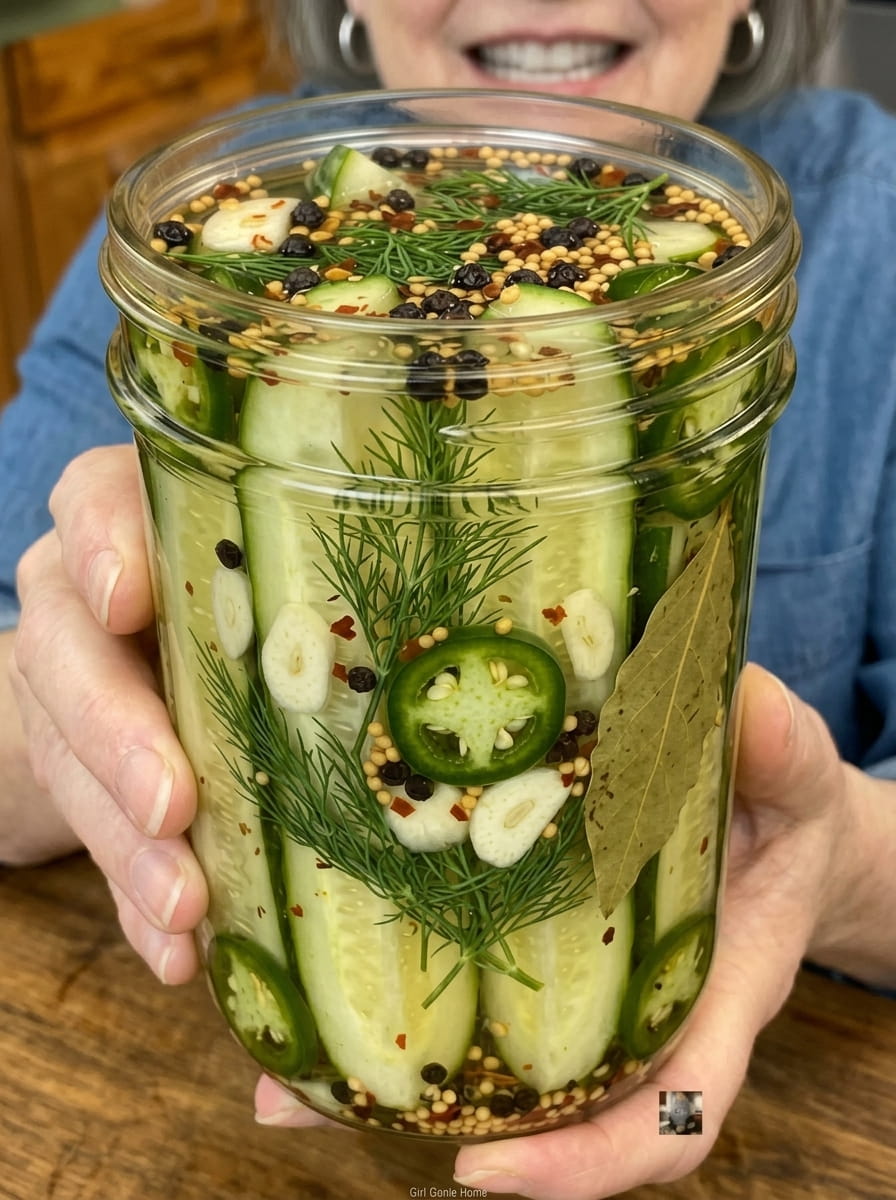
Grandma’s Spicy Dill Garlic Refrigerator Pickles: An Easy Homemade Recipe with a Kick
SEO Title: Spicy Dill Garlic Pickles Recipe: Easy Homemade Refrigerator Pickles
Meta Description: Make crisp, tangy spicy dill garlic pickles at home with this easy refrigerator recipe. No canning needed, just cucumbers, garlic, fresh dill, and red pepper flakes.
Primary Keyword: spicy dill garlic pickles
Secondary Keywords: homemade pickles recipe, refrigerator pickles, easy pickle recipe, spicy pickles, quick pickled cucumbers, garlic dill pickles
The scent of fresh dill and garlic always takes me back to my grandmother’s kitchen. There was always a jar of something tangy cooling on the counter, and the whole house smelled of vinegar, herbs, and summer. These spicy dill garlic pickles keep those timeless flavors alive with a little extra heat.
Crisp cucumbers soak up a tangy vinegar brine infused with garlic, fresh dill, and red pepper flakes. The result tastes like a classic homemade pickle with a spicy kick. Best of all, this is a no-canning refrigerator pickle recipe, so you don’t need special equipment, a water bath, or hours of work. If you can boil a little brine and fill a jar, you can make these. 🥒🧄🌿🌶️
In this guide you’ll find the full recipe, tips for the crunchiest pickles, ways to adjust the heat, serving ideas, storage advice, and answers to common questions.
Why You’ll Love This Spicy Dill Garlic Pickle Recipe
Plenty of pickle recipes are out there, but this one earns a permanent spot in the fridge for good reasons:
- It’s quick and easy. About 15 minutes of hands-on time is all you need.
- It requires no canning. These are refrigerator pickles, so there’s no sterilizing, pressure, or processing.
- It has bold flavor. Garlic, dill, mustard seeds, and peppercorns build layers of savory, tangy, and spicy flavor.
- It uses simple pantry ingredients. Most of the list is probably in your kitchen already.
- It makes crunchy pickles. Pouring the warm brine over fresh cucumber spears keeps them snappy.
- The heat is adjustable. Add more red pepper flakes for fire or fewer for a gentle warmth.
- It makes a small batch. The recipe fits in one jar, which is ideal if you want to try it before making a big batch.
What Are Refrigerator Pickles?
Refrigerator pickles, also called quick pickles, are cucumbers preserved in a vinegar brine and stored in the fridge instead of being canned for the pantry. They’re not fermented like traditional deli pickles, which rely on salt and time to develop sourness. Instead, the vinegar does the work, so you get tangy flavor within a day or two.
The main differences from canned pickles:
| Feature | Refrigerator Pickles | Canned Pickles |
|---|---|---|
| Equipment | A jar and a saucepan | Canning jars, lids, water bath canner |
| Prep time | About 15 minutes | 1 to 2 hours |
| Texture | Very crisp | Softer after heat processing |
| Shelf life | Several weeks in the fridge | Many months in the pantry |
| Best for | Small batches, beginners | Large harvests, long storage |
Because the cucumbers are never cooked, refrigerator pickles stay noticeably crunchier than shelf-stable versions. That makes them a favorite for burgers, sandwiches, and snacking straight from the jar.
Ingredients for Spicy Dill Garlic Pickles
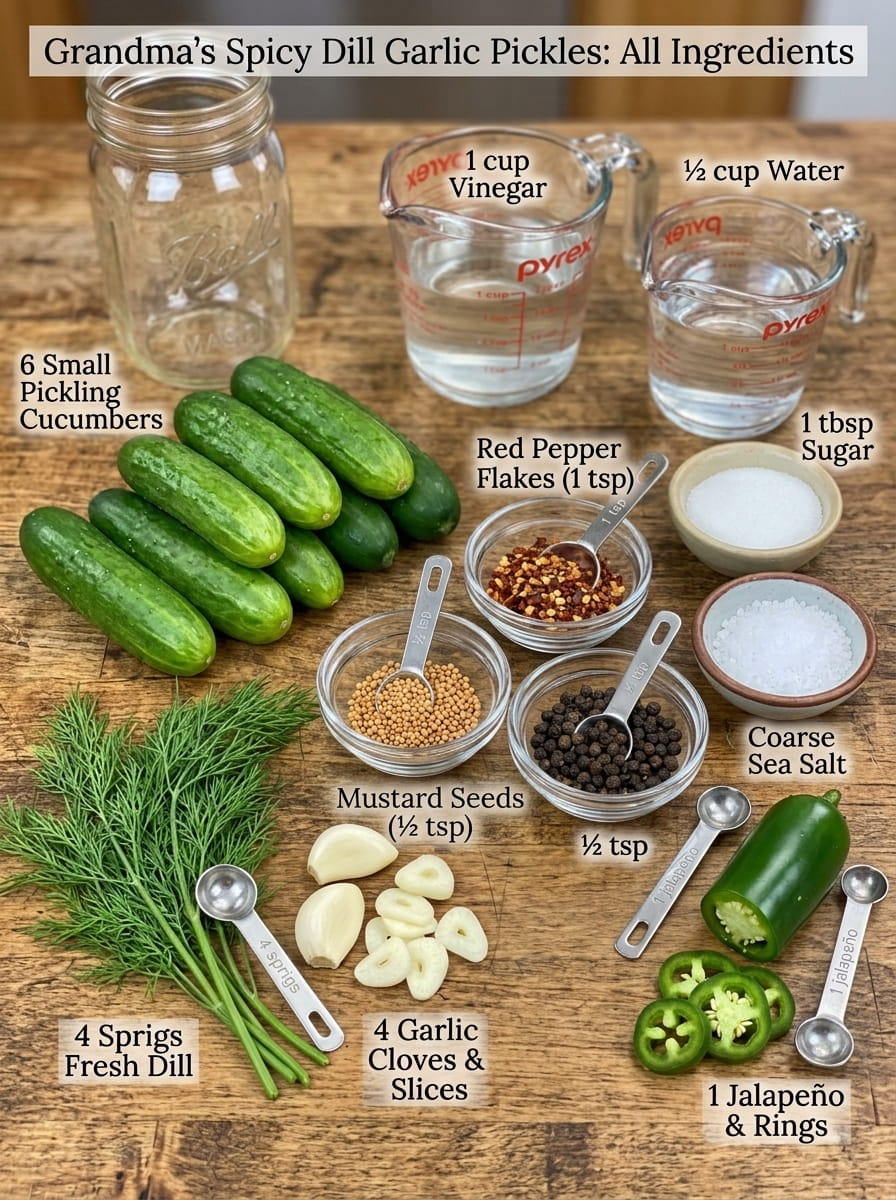
Here’s everything you need for one jar of pickles:
- 6 small pickling cucumbers, sliced into spears
- 4 cloves garlic, thinly sliced
- 4 sprigs fresh dill
- 1 cup white vinegar
- ½ cup water
- 1 tablespoon granulated sugar
- 1½ teaspoons salt
- 1 teaspoon red pepper flakes
- ½ teaspoon black peppercorns
- ½ teaspoon mustard seeds
A Closer Look at the Key Ingredients
Pickling cucumbers. Look for small, firm cucumbers labeled “pickling” or “Kirby.” They have thinner skin, fewer seeds, and a denser flesh than slicing cucumbers, so they hold their crunch in brine. If you can’t find Kirbys, small Persian cucumbers are a good substitute. Avoid large waxy slicing cucumbers, which turn soft and watery.
Fresh dill. Fresh dill gives these pickles their classic aroma and bright, grassy flavor. Dried dill weed isn’t a good substitute here, since it tastes dull by comparison. Use whole sprigs, fronds and stems included.
Garlic. Thinly sliced garlic releases flavor into the brine while still looking pretty in the jar. Over a few days, it becomes mellow and slightly sweet, and many people love eating the pickled garlic too.
White vinegar. Distilled white vinegar provides clean, sharp acidity and keeps the brine clear. Its 5% acidity is the standard for pickling.
Salt. Use pickling salt or kosher salt if you can. Table salt often contains anti-caking agents or iodine that can cloud the brine. If you only have table salt, it will still taste good, but the liquid may look hazy.
Red pepper flakes, peppercorns, and mustard seeds. This trio brings the heat and the traditional pickle-spice flavor. Mustard seeds add a subtle earthy tang, peppercorns give a gentle warmth, and red pepper flakes deliver the main spice.
How to Make Spicy Dill Garlic Pickles: Step-by-Step
Step 1: Prepare the Cucumbers
Wash the cucumbers well under cool running water and scrub off any dirt. Trim a thin slice off the blossom end of each cucumber, since that end contains enzymes that can soften pickles over time. Then cut the cucumbers lengthwise into spears that will fit your jar with a little room at the top.
Step 2: Pack the Jar
Use a clean glass jar, about a 1-quart (32 oz) size. Pack the cucumber spears upright into the jar, snug but not crushed. As you pack, tuck in the sliced garlic, fresh dill sprigs, red pepper flakes, black peppercorns, and mustard seeds. Distributing the aromatics throughout the jar, rather than piling them on top, gives more even flavor.
Step 3: Make the Brine
In a small saucepan, combine the vinegar, water, sugar, and salt.
Step 4: Simmer the Brine
Bring the mixture to a simmer over medium heat, stirring until the sugar and salt dissolve completely. You don’t need a hard boil. Once the liquid turns clear and the crystals disappear, you’re ready to pour.
Step 5: Pour and Submerge
Carefully pour the warm brine over the cucumbers, making sure they are completely submerged. Cucumbers poking above the liquid can spoil or discolor, so top off with a splash of extra brine (equal parts vinegar and water) if needed. Gently tap the jar on the counter to release trapped air bubbles.
Step 6: Cool to Room Temperature
Let the jar cool on the counter until it reaches room temperature. Cooling it first prevents condensation and temperature shock inside the fridge.
Step 7: Seal and Refrigerate
Seal the jar tightly and move it to the refrigerator. Chill for at least 24 hours before eating.
Step 8: Wait for the Best Flavor
You can technically eat the pickles after one day, but patience pays off. For the best flavor and crunch, chill for 2 to 3 days before serving. During that time, the brine fully penetrates the cucumbers and the garlic, dill, and spices meld together.
Tips for the Crunchiest Homemade Pickles
Nobody wants a limp pickle. Follow these tips for a satisfying snap every time:
- Start with fresh cucumbers. Use them within a day or two of buying or picking. Older cucumbers lose moisture and turn soft in brine.
- Choose the right variety. Pickling cucumbers are your best bet for crunch.
- Trim the blossom end. This small step removes softening enzymes.
- Chill the cucumbers first. Soaking cut spears in ice water for 30 minutes to an hour before packing helps firm them up.
- Don’t overcook the brine. Simmer only until the sugar and salt dissolve. Prolonged boiling isn’t needed.
- Keep them cold. Store the jar in the coldest part of the refrigerator, not the door.
- Add a natural crisping agent (optional). A fresh grape leaf, oak leaf, or horseradish leaf in the jar contains tannins that help keep pickles firm.
How to Adjust the Heat Level
This recipe has a pleasant, noticeable heat, but you can easily tune it to your taste:
- Milder pickles: Reduce the red pepper flakes to ½ teaspoon or skip them and rely on the peppercorns.
- Extra spicy pickles: Increase the red pepper flakes to 2 teaspoons, or add a sliced fresh jalapeño, serrano, or habanero.
- Smoky heat: Add a dried chile de árbol or a pinch of smoked paprika.
- Sweet heat: Increase the sugar slightly to 1½ tablespoons to balance more chile.
Remember that the spice intensifies the longer the pickles sit, so a jar that tastes mild on day one can be noticeably hotter by day five.
Flavor Variations to Try
Once you’ve mastered the base recipe, experiment with these twists:
- Extra garlicky: Double the garlic to 8 cloves for a garlic-lover’s pickle.
- Lemon dill: Add a few strips of lemon zest for a bright, citrusy note.
- Bread and butter heat: Increase the sugar to 3 tablespoons and add a few thin slices of onion.
- Whole-seed spice: Add ½ teaspoon coriander seeds or a bay leaf for more depth.
- Pickled veggie mix: Use the same brine for carrots, green beans, cauliflower, radishes, or sliced red onions.
- Apple cider vinegar version: Swap the white vinegar for apple cider vinegar for a slightly fruitier, mellower tang.
How to Serve Spicy Dill Garlic Pickles
These pickles are wonderful straight from the jar, but they also add life to many dishes:
- Burgers and sandwiches: Layer spears or slices onto burgers, grilled cheese, pastrami, or fried chicken sandwiches.
- Charcuterie boards: Serve alongside cheese, cured meats, olives, and crackers.
- Bloody Mary garnish: A spicy pickle spear is the perfect finishing touch.
- Pickle brine cocktails: Use a splash of the brine in a dirty martini or a pickleback shot.
- Potato salad and deviled eggs: Chop them up for tang and crunch.
- Tacos and wraps: Add a briny, spicy bite to rich or fatty fillings.
- Snack time: Enjoy them with sharp cheddar, cold sandwiches, or as a low-calorie crunchy snack.
- Gifts: Pack them in a pretty jar with a handwritten label for a thoughtful homemade present.
How to Store Your Pickles
Because these are refrigerator pickles and not canned, they must be stored in the fridge at all times.
- Storage: Keep them in the sealed jar in the refrigerator, with the cucumbers submerged in brine.
- Shelf life: For the best texture and flavor, enjoy them within about 2 to 4 weeks. They may remain safe a bit longer, but they’ll gradually soften.
- Use clean utensils. Always use a clean fork or tongs to remove pickles so you don’t introduce bacteria.
- Don’t leave them out. Never store the jar at room temperature after the initial cooling period.
- Not for the pantry. This recipe has not been formulated or processed for shelf-stable canning, so don’t try to store it in the pantry.
If you notice a bad smell, slimy texture, mold, or an unusual fizz, discard the batch.
Can You Reuse the Brine?
You can reuse the brine once for a second quick batch of vegetables like sliced onions, carrots, or radishes, but it’s best to do so within a few days. Because the cucumbers dilute the brine as they release water, a reused batch will be milder. Don’t reuse the brine a third time, and always keep it refrigerated.
Troubleshooting Common Pickle Problems
My pickles are soft. The cucumbers may not have been fresh, or they may have been a large slicing variety. Next time, use fresh Kirby cucumbers, trim the blossom end, and chill the spears before packing.
My brine is cloudy. Cloudiness often comes from table salt additives, hard water, or the garlic and spices. It’s usually harmless if the pickles smell and taste fine. Use pickling or kosher salt next time for a clearer brine.
My garlic turned blue or green. This is a natural reaction between the garlic’s sulfur compounds and the acid in the brine. The garlic is still safe to eat and tastes fine.
The pickles are too sour. Add a little more sugar next time, or dilute the brine with a bit more water.
The pickles aren’t spicy enough. Add more red pepper flakes, or include a sliced fresh chile in the jar.
The cucumbers float. This is normal. Press them down with a small fermentation weight or a piece of folded dill so they stay submerged.
Frequently Asked Questions
How long do spicy dill garlic pickles need to sit before eating?
You can eat them after 24 hours in the refrigerator, but the flavor and crunch are best after 2 to 3 days.
Do I need to can these pickles?
No. This is a refrigerator pickle recipe, so no canning or water-bath processing is required. The trade-off is that they must be stored in the fridge and eaten within a few weeks.
Can I use regular cucumbers instead of pickling cucumbers?
You can, but the pickles will be softer and more watery. For the best crunch, use Kirby or other pickling cucumbers. Small Persian cucumbers also work well.
Can I use dried dill instead of fresh?
Fresh dill gives the best flavor and aroma. In a pinch you can use about 1 teaspoon of dill seed or dried dill weed per sprig, but the flavor will be different.
Can I use apple cider vinegar or rice vinegar?
Yes. Apple cider vinegar adds a slightly fruity tang, and rice vinegar is milder. Choose a vinegar with at least 5% acidity.
Can I make these pickles without sugar?
Yes. The sugar balances the acidity but isn’t essential. Leave it out for a sharper, more savory pickle, or use a sugar substitute if you prefer.
Are these pickles gluten-free and vegan?
Yes. As written, the recipe contains no gluten, dairy, meat, or animal products. Check your vinegar label if you have a severe gluten sensitivity.
Can I double or triple the recipe?
Absolutely. Multiply the ingredients and use multiple jars or a larger container. Keep the ratio of vinegar, water, and salt the same so the brine stays balanced.
Why do I need to cool the jar before refrigerating?
Letting the jar reach room temperature first prevents sudden temperature changes and excess condensation. It also helps the flavors begin to infuse.
Can I eat the pickled garlic?
Yes! The garlic becomes mellow and tangy and is delicious on sandwiches, in salads, or on its own.
Final Thoughts
There’s something deeply comforting about opening a jar of homemade pickles. The first bite is crisp and cold, with a punch of garlic, a fresh hit of dill, and a slow-building heat that makes you reach for another spear. These Grandma’s spicy dill garlic pickles honor the classic flavors of a traditional kitchen while adding just enough fire to keep things exciting.
They take minutes to prepare, need no canning skills, and use ingredients you can find at any grocery store or farmers’ market. Whether you’re a pickle beginner or a seasoned preserver, this easy refrigerator pickle recipe is a keeper. Make a jar this weekend, wait the two or three days (the hardest part), and enjoy a taste of homemade tradition.
If you try the recipe, leave a comment and tell us how spicy you made yours, and share your favorite way to eat them. Happy pickling!
Print
Grandma’s Spicy Dill Garlic Pickles
Ingredients
Here’s everything you need for one jar of pickles:
- 6 small pickling cucumbers, sliced into spears
- 4 cloves garlic, thinly sliced
- 4 sprigs fresh dill
- 1 cup white vinegar
- ½ cup water
- 1 tablespoon granulated sugar
- 1½ teaspoons salt
- 1 teaspoon red pepper flakes
- ½ teaspoon black peppercorns
- ½ teaspoon mustard seeds
A Closer Look at the Key Ingredients
Pickling cucumbers. Look for small, firm cucumbers labeled “pickling” or “Kirby.” They have thinner skin, fewer seeds, and a denser flesh than slicing cucumbers, so they hold their crunch in brine. If you can’t find Kirbys, small Persian cucumbers are a good substitute. Avoid large waxy slicing cucumbers, which turn soft and watery.
Fresh dill. Fresh dill gives these pickles their classic aroma and bright, grassy flavor. Dried dill weed isn’t a good substitute here, since it tastes dull by comparison. Use whole sprigs, fronds and stems included.
Garlic. Thinly sliced garlic releases flavor into the brine while still looking pretty in the jar. Over a few days, it becomes mellow and slightly sweet, and many people love eating the pickled garlic too.
White vinegar. Distilled white vinegar provides clean, sharp acidity and keeps the brine clear. Its 5% acidity is the standard for pickling.
Salt. Use pickling salt or kosher salt if you can. Table salt often contains anti-caking agents or iodine that can cloud the brine. If you only have table salt, it will still taste good, but the liquid may look hazy.
Red pepper flakes, peppercorns, and mustard seeds. This trio brings the heat and the traditional pickle-spice flavor. Mustard seeds add a subtle earthy tang, peppercorns give a gentle warmth, and red pepper flakes deliver the main spice.
Instructions
Wash the cucumbers well under cool running water and scrub off any dirt. Trim a thin slice off the blossom end of each cucumber, since that end contains enzymes that can soften pickles over time. Then cut the cucumbers lengthwise into spears that will fit your jar with a little room at the top.
Use a clean glass jar, about a 1-quart (32 oz) size. Pack the cucumber spears upright into the jar, snug but not crushed. As you pack, tuck in the sliced garlic, fresh dill sprigs, red pepper flakes, black peppercorns, and mustard seeds. Distributing the aromatics throughout the jar, rather than piling them on top, gives more even flavor.
In a small saucepan, combine the vinegar, water, sugar, and salt.
Bring the mixture to a simmer over medium heat, stirring until the sugar and salt dissolve completely. You don’t need a hard boil. Once the liquid turns clear and the crystals disappear, you’re ready to pour.
Carefully pour the warm brine over the cucumbers, making sure they are completely submerged. Cucumbers poking above the liquid can spoil or discolor, so top off with a splash of extra brine (equal parts vinegar and water) if needed. Gently tap the jar on the counter to release trapped air bubbles.
Let the jar cool on the counter until it reaches room temperature. Cooling it first prevents condensation and temperature shock inside the fridge.
Seal the jar tightly and move it to the refrigerator. Chill for at least 24 hours before eating.
You can technically eat the pickles after one day, but patience pays off. For the best flavor and crunch, chill for 2 to 3 days before serving. During that time, the brine fully penetrates the cucumbers and the garlic, dill, and spices meld together.






